
This post may contain affiliate links. If you buy through them, we may earn a small commission at no extra cost to you.
Most people who give up on poles never learned how to use trekking poles properly. They buy a pair, hold them like ski poles, find them awkward on the flat, and end up carrying them strapped to a pack for the rest of the season. The technique is genuinely simple, but almost none of it is obvious, and one detail in particular, the way your hand goes through the strap, does more work than everything else combined.
This guide covers pole length, strap technique, arm timing, and what to change when the trail tilts. It takes about ten minutes to read and one hike to make automatic. If you are still choosing a pair, our round up of the best trekking poles for 2026 compares six that are worth owning.
Table of Contents
Start With the Right Pole Length
Set the length before you worry about anything else, because every other technique depends on it. Stand on flat ground, put a pole tip beside your foot, and hold the grip. Your elbow should sit at roughly ninety degrees, with your forearm parallel to the ground. Most adults land somewhere between 110 and 130 centimetres.
If your poles have marked sections, note the number that gives you that angle and set both poles to it. On a pair with two adjustable sections, split the difference between them rather than extending one fully and leaving the other short, which keeps the stiffest part of the shaft in the middle where the load is. If this is your first season on trail, our complete beginner hiking guide covers the rest of the basics.
- Flat ground. Elbow at ninety degrees, forearm level.
- Sustained climbs. Shorten both poles by five to ten centimetres so you are not reaching up.
- Sustained descents. Lengthen both poles by five to ten centimetres so you are not reaching down.
- Long traverses across a slope. Shorten the uphill pole and lengthen the downhill one.
How to Use Trekking Poles: The 6 Techniques
Work through these in order. The first one is the one nearly everybody gets wrong.
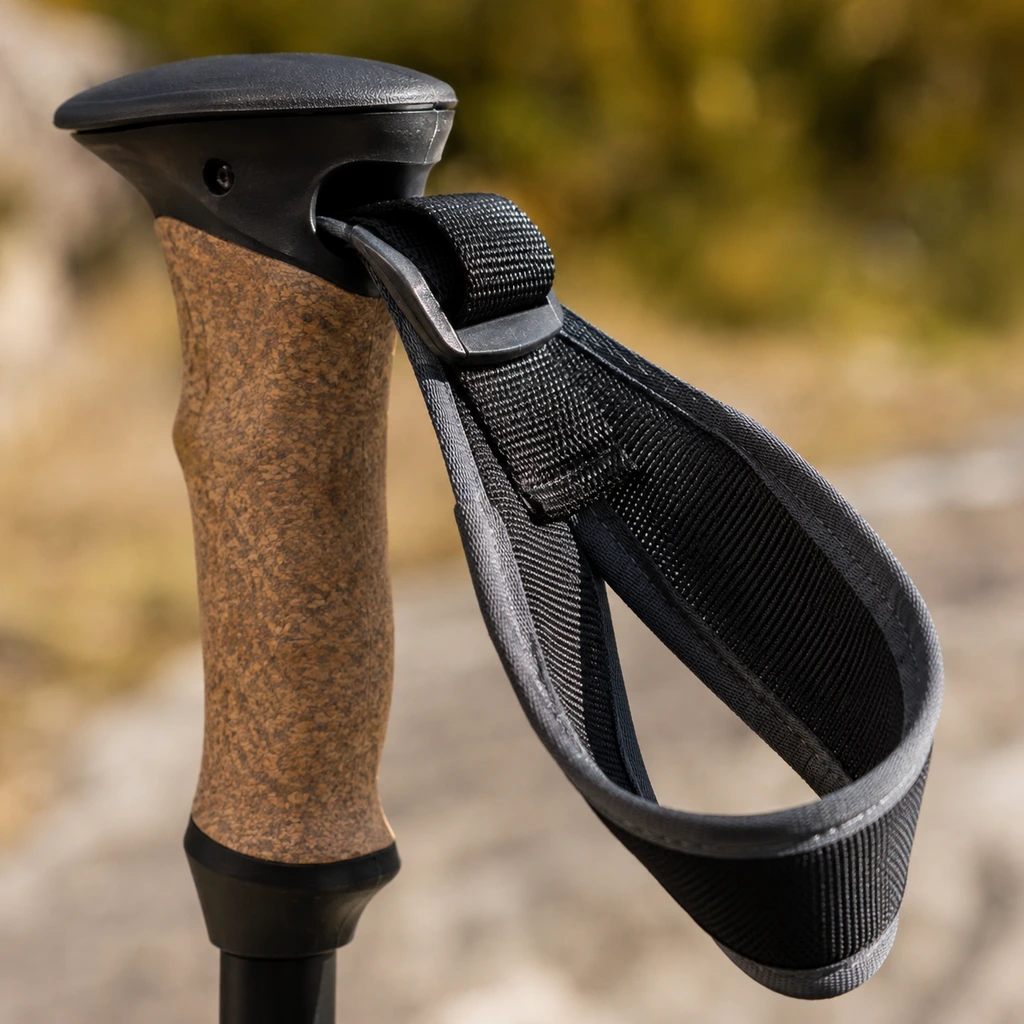
1. Put Your Hand Through the Strap From Below
Come up through the loop from underneath, then bring your hand down over the top of the strap and hold the grip with the strap trapped between your palm and the handle. Done this way, the strap carries the load through the heel of your hand, and you can open your fingers completely without dropping the pole.
The wrong way, dropping your hand into the loop from above, means your fingers do all the gripping. That is what makes people say poles tire their forearms. Ten minutes of walking with the straps loaded correctly and the difference is obvious.
2. Hold the Grip Loosely
Once the strap is loaded, your hand is a guide rather than a clamp. A light hold, closer to holding a bird than a hammer, is enough. A tight grip pumps blood out of your hands, which is the usual reason fingers swell or go numb on a long day.
3. Plant Opposite Arm to Opposite Leg
Left pole goes down as the right foot lands, exactly like the arm swing you already have when walking. You do not need to think about it on flat ground, because your body does it naturally the moment you stop concentrating. If the rhythm feels wrong, look at the horizon and walk for thirty seconds without watching your hands.
4. Push Back, Not Down
Plant the tip slightly behind where your foot is going and push backwards along the direction of travel. Poles are for propulsion and braking, not for propping yourself up. Planting them out in front and pressing down is what makes poles feel like extra work, and it puts the load through your shoulders instead of your triceps.
5. Double Plant on Steep Descents
On a steep drop or a big step down, plant both poles ahead of you together, then lower yourself between them. This is where poles pay for themselves. A study on downhill hiking with poles under load found measurably lower forces at the knee when poles were used on descents, and the effect adds up across thousands of steps.
6. Stow Them When You Need Your Hands
Poles are a liability on scrambles, ladders and anything you climb. Collapse them and stow them before you get there, not halfway up. Folding poles collapse to about fifteen inches and go inside a day pack; telescoping poles usually have to be strapped to the outside, so plan for that when you pack.
Common Trekking Pole Mistakes
Almost every complaint about poles traces back to one of these. Most are small habits rather than equipment problems, in the same way that most pack weight problems are, as our ultralight packing hacks set out.
- Skipping the straps entirely. Without the strap taking the load, your hands do all the work and the poles feel like dead weight.
- Leaving the rubber tips on. Rubber tips are for pavement and slick rock. On dirt and gravel, take them off and use the carbide tips, which is where the grip comes from.
- Never changing the length. Poles set for the flat are wrong on any sustained climb or descent, which is most of the interesting terrain.
- Overtightening the locks. A lever lock should close firmly by hand. Cranking it does not help and can crack a carbon shaft.
- Using them on flat, smooth trail. There is very little benefit on easy ground. Collapse them and enjoy having your hands free.
- Wearing summer baskets in snow. Small baskets sink. Swap to snow baskets before the season, not during it.
Where Poles Earn Their Keep
Poles are not equally useful everywhere, and knowing when to deploy them is half of using them well. They do the most good on sustained descents, on loose or rocky ground, on stream crossings where a third and fourth point of contact is worth a great deal, and any time you are carrying real weight. They do the least good on smooth, flat, dry trail, which is worth remembering when you are picking a route from our snow free trail guide.
They also change how you tread. Keeping to the centre of a trail rather than stepping wide for balance is one of the quieter ways poles help, and it lines up with the Leave No Trace principles. On soft ground, use the baskets and keep the tips out of vegetation at the trail edge. The American Hiking Society guidance on poles is a good second read on the etiquette side.
Seasonally, autumn is when most hikers notice the difference. Wet leaves hide roots and rock, and the descents come at the end of shorter days when your legs are already tired. Our guide to planning autumn day hikes covers the rest of that picture, and the right hiking boots matter just as much underfoot.
Frequently Asked Questions
Should I use one trekking pole or two?
Two. One pole helps with balance but leaves you working asymmetrically, which is uncomfortable over a full day and does far less for your knees. Poles are sold in pairs for a reason.
Do trekking poles actually reduce knee pain?
On descents, yes, provided you use the double plant and lengthen the poles. They shift part of the braking effort into your arms and shoulders. On the flat the effect is small, and anti shock models help most if your elbows or wrists are the sensitive part. The wider picture on how the body adapts to long days is in our piece on the science of thru hiking.
How tight should the wrist straps be?
Snug enough that the strap takes your weight when you open your fingers, loose enough that you can slide your hand out without unbuckling. If the strap is cutting in, it is too tight; if your fingers are doing the gripping, it is too loose.
When should I take the rubber tips off?
As soon as you leave pavement or smooth rock. Carbide tips bite into dirt, gravel and ice, which is the whole point. Keep the rubber tips in a pocket for road sections and for storing the poles.
Are cheap trekking poles good enough to learn on?
Yes, as long as they have cork or foam grips and metal locks. Learning how to use trekking poles well matters more than what you learn on. A solid budget aluminium pair such as the KINGGEAR 7075 aluminium poles does the job, and a mid range pair such as the Cascade Mountain Tech aluminium poles adds an extended down grip. Carbon options like the Foxelli carbon fibre poles are the upgrade once technique is automatic.
Set the length, thread the straps from below, plant opposite arm to opposite leg, and change the length when the trail tilts. That is genuinely all there is to how to use trekking poles. Give it one full hike before you decide whether they suit you. Poles work with what is on your feet rather than instead of it, so it is worth reading how to go about choosing hiking boots as well. If you are still shopping, start with our six best trekking poles for 2026.
Discover more from Maive Verse
Subscribe to get the latest posts sent to your email.