Master solo bikepacking safety tips with our technical guide. Learn to handle wilderness repairs, medical emergencies, and redundant communication.
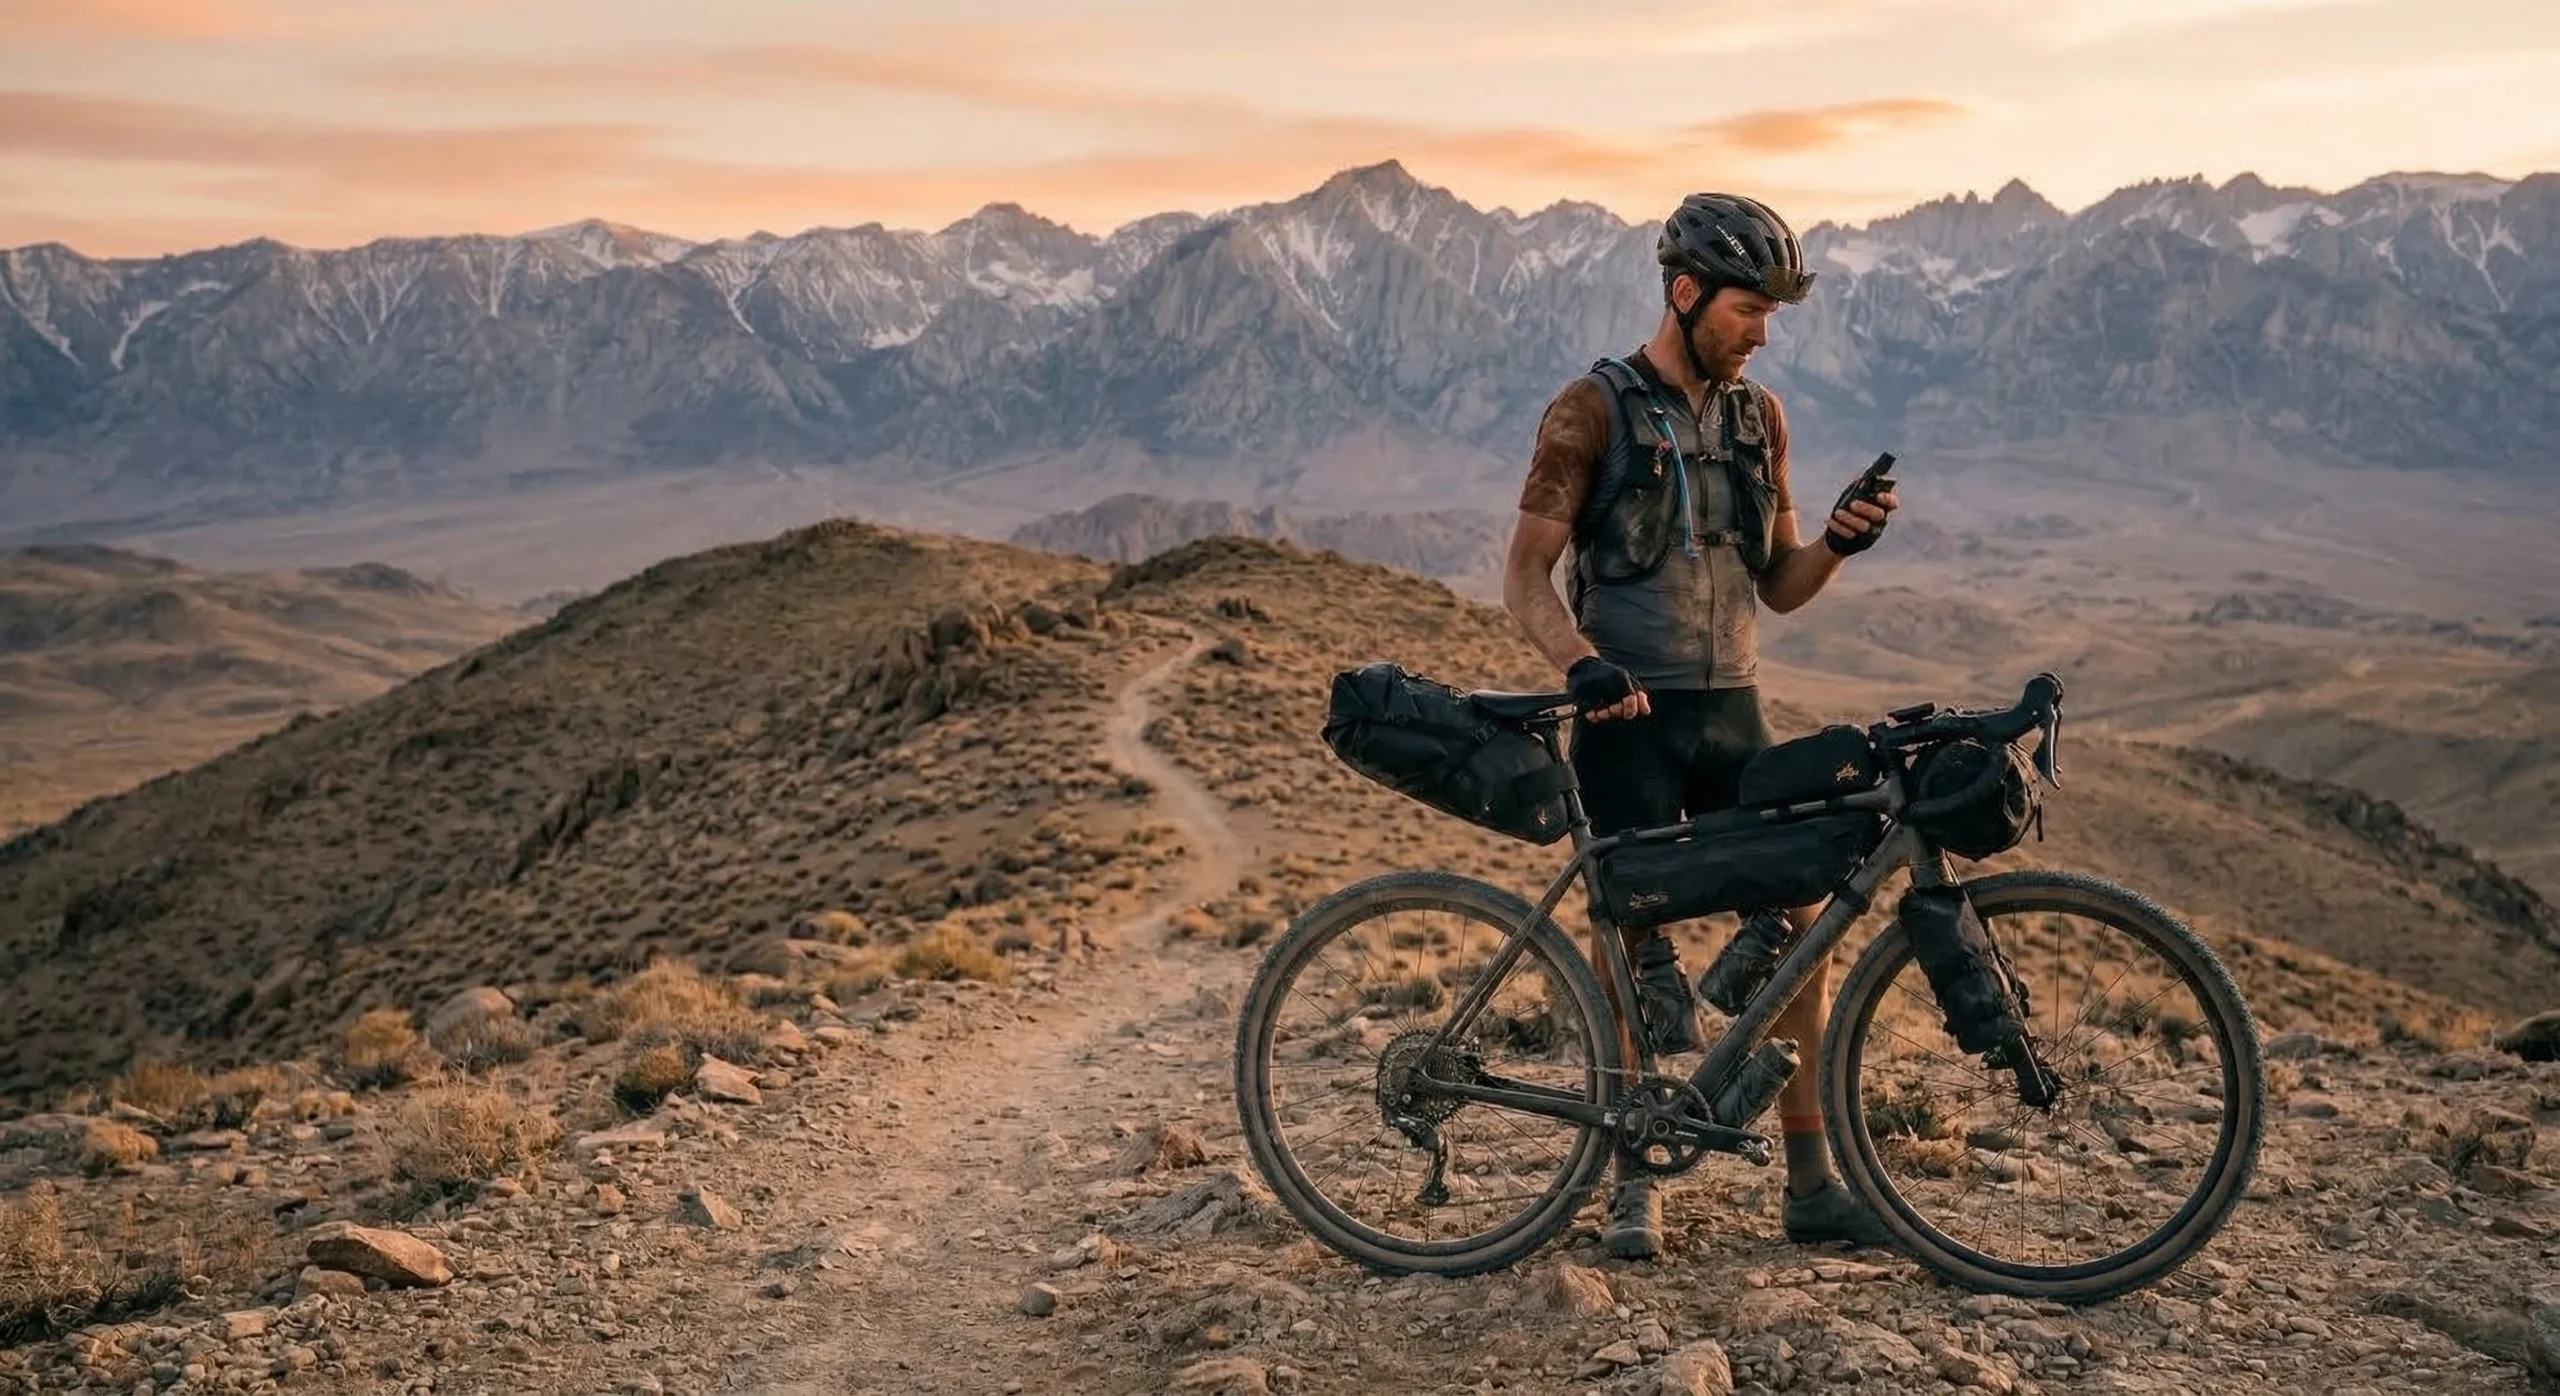
Table of Contents
Introduction: The Technical Mandate for Solo Self-Sufficiency
Implementing rigorous solo bikepacking safety tips is a non-negotiable requirement for any cyclist venturing into the backcountry without a partner. In a group setting, mechanical and medical risks are distributed; however, the solo rider must possess the total sum of knowledge required for survival. This independence offers unparalleled freedom but demands a disciplined approach to risk assessment and logistical redundancy. Success in remote environments depends on the rider’s ability to remain calm and execute technical protocols when systems fail.
The primary objective of solo safety is the prevention of “cascading failures,” where a minor mechanical issue leads to physical exhaustion or environmental exposure. Proactive preparation ensures that every potential crisis has a pre-planned solution. This guide focuses on the mechanical, medical, and navigational frameworks required for a safe return. For those who have already established their Ultimate Gear List, these safety protocols represent the operational layer of technical wilderness travel.
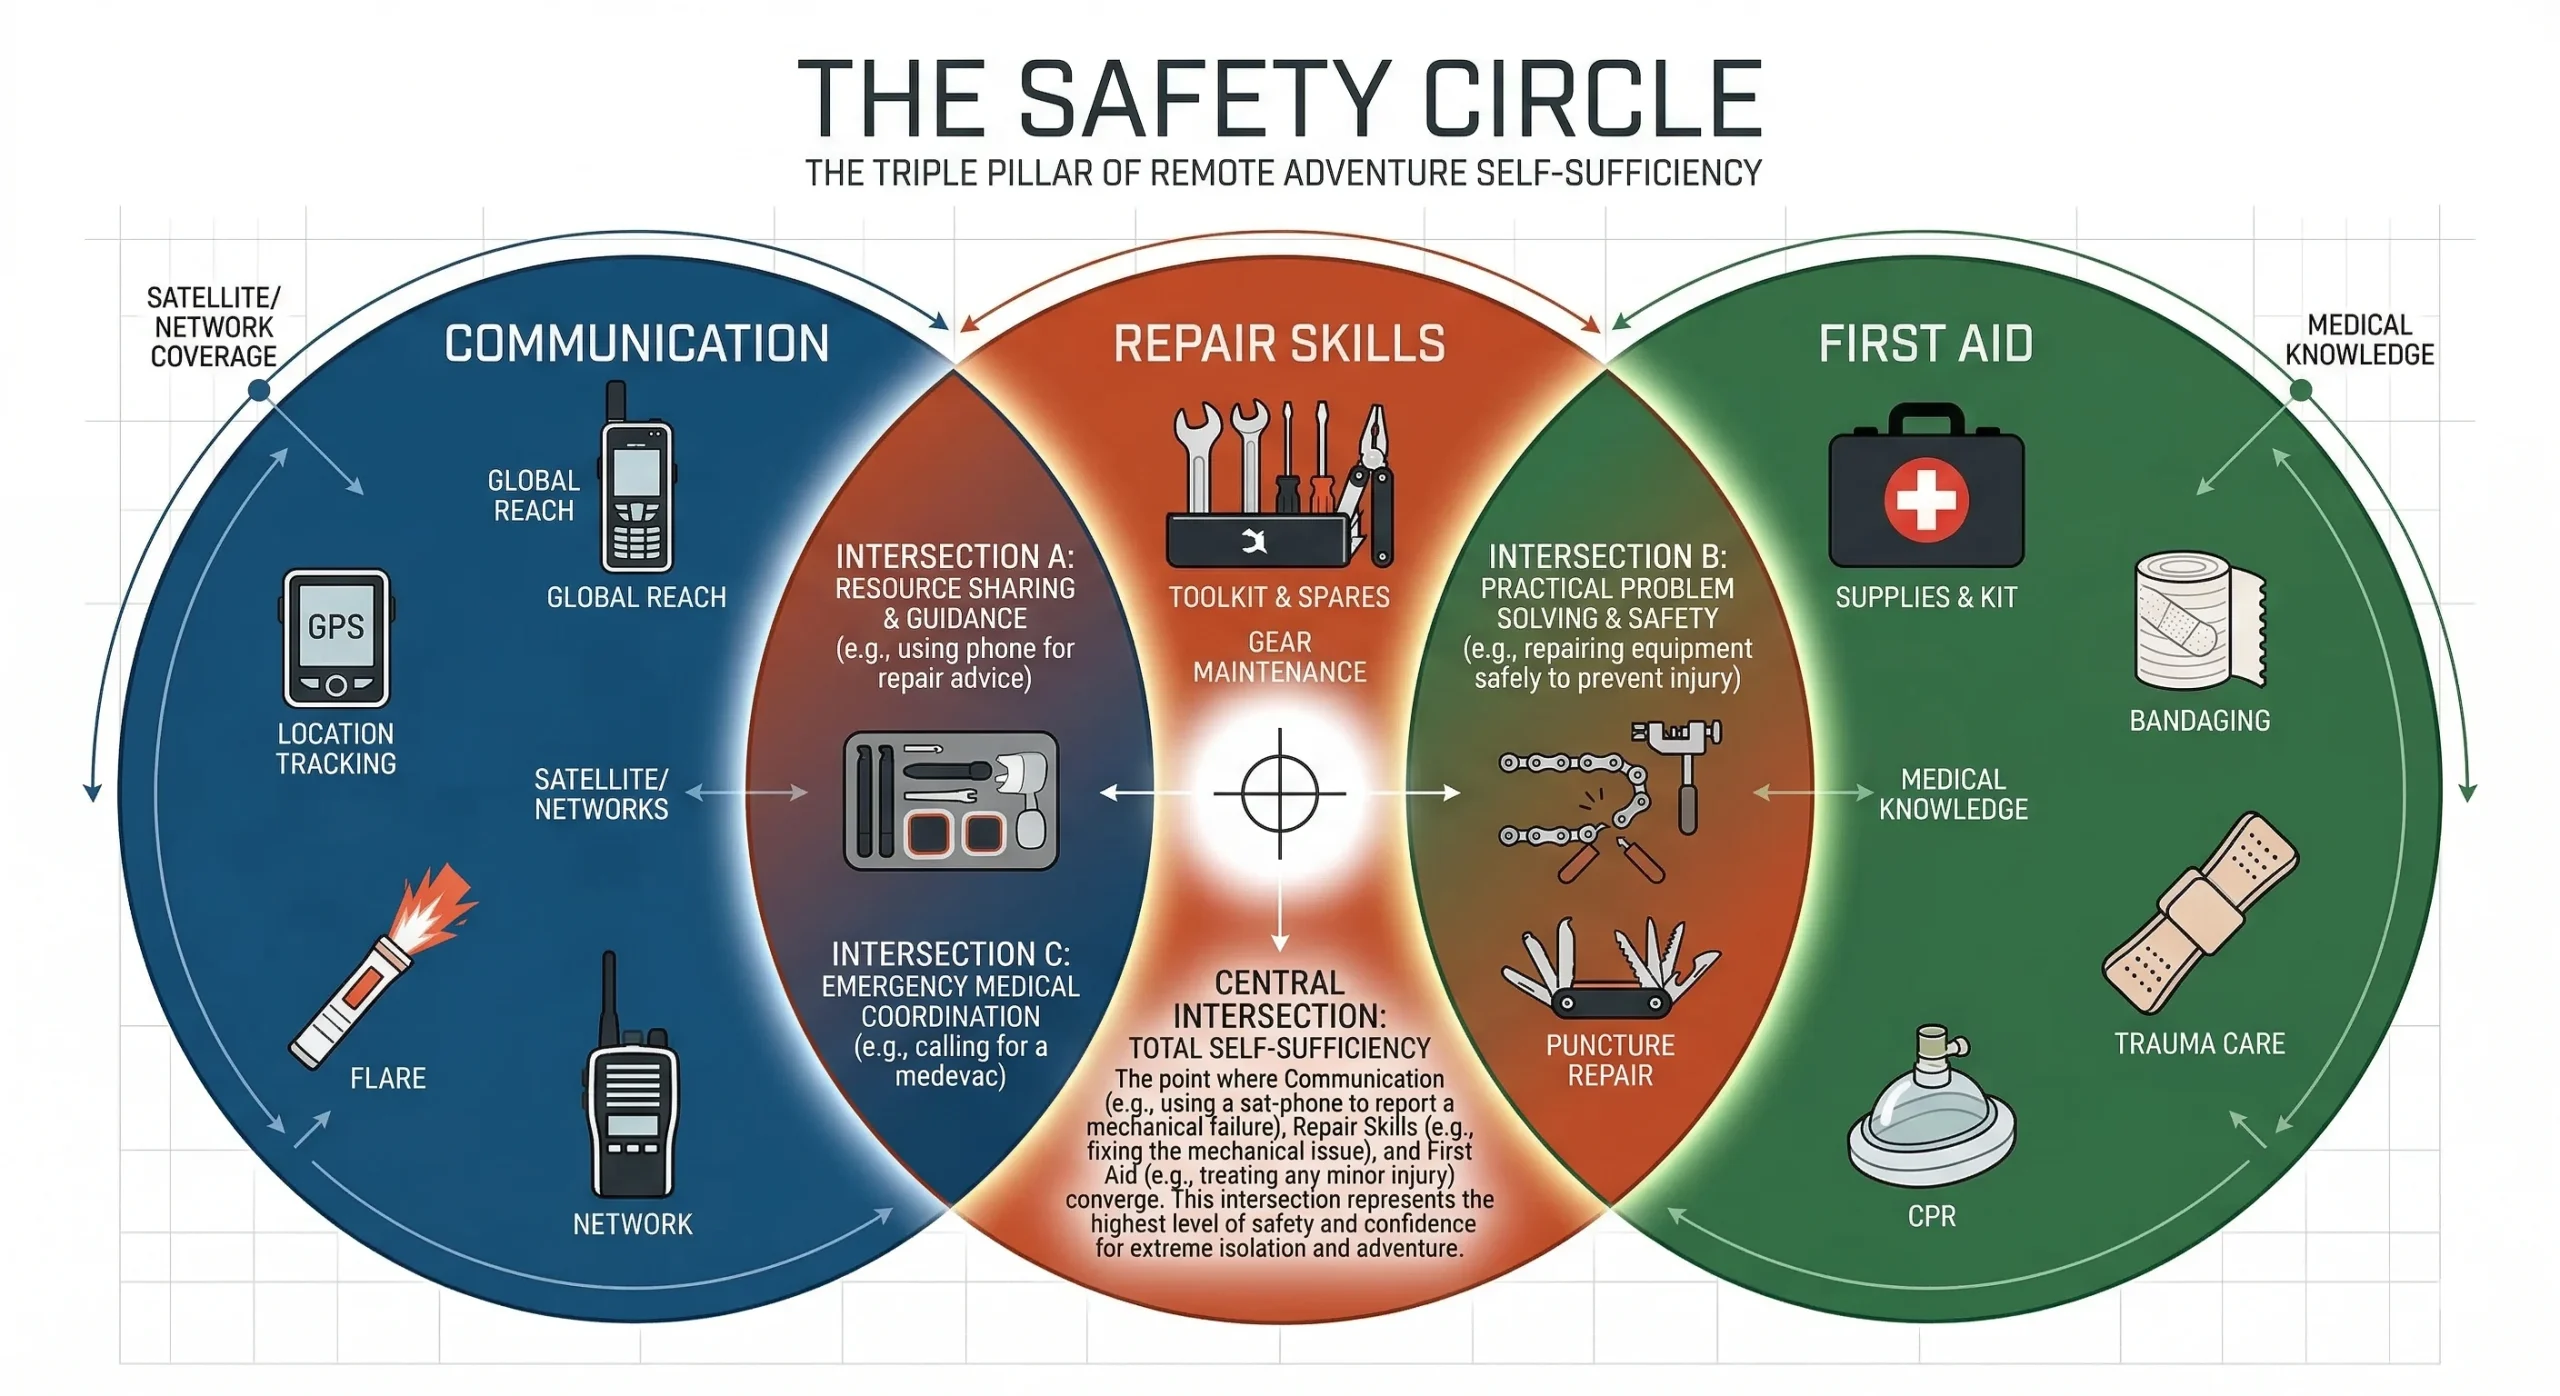
1. Establishing Redundant Communication Protocols
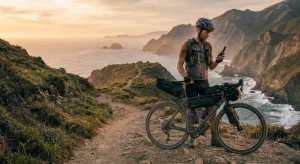
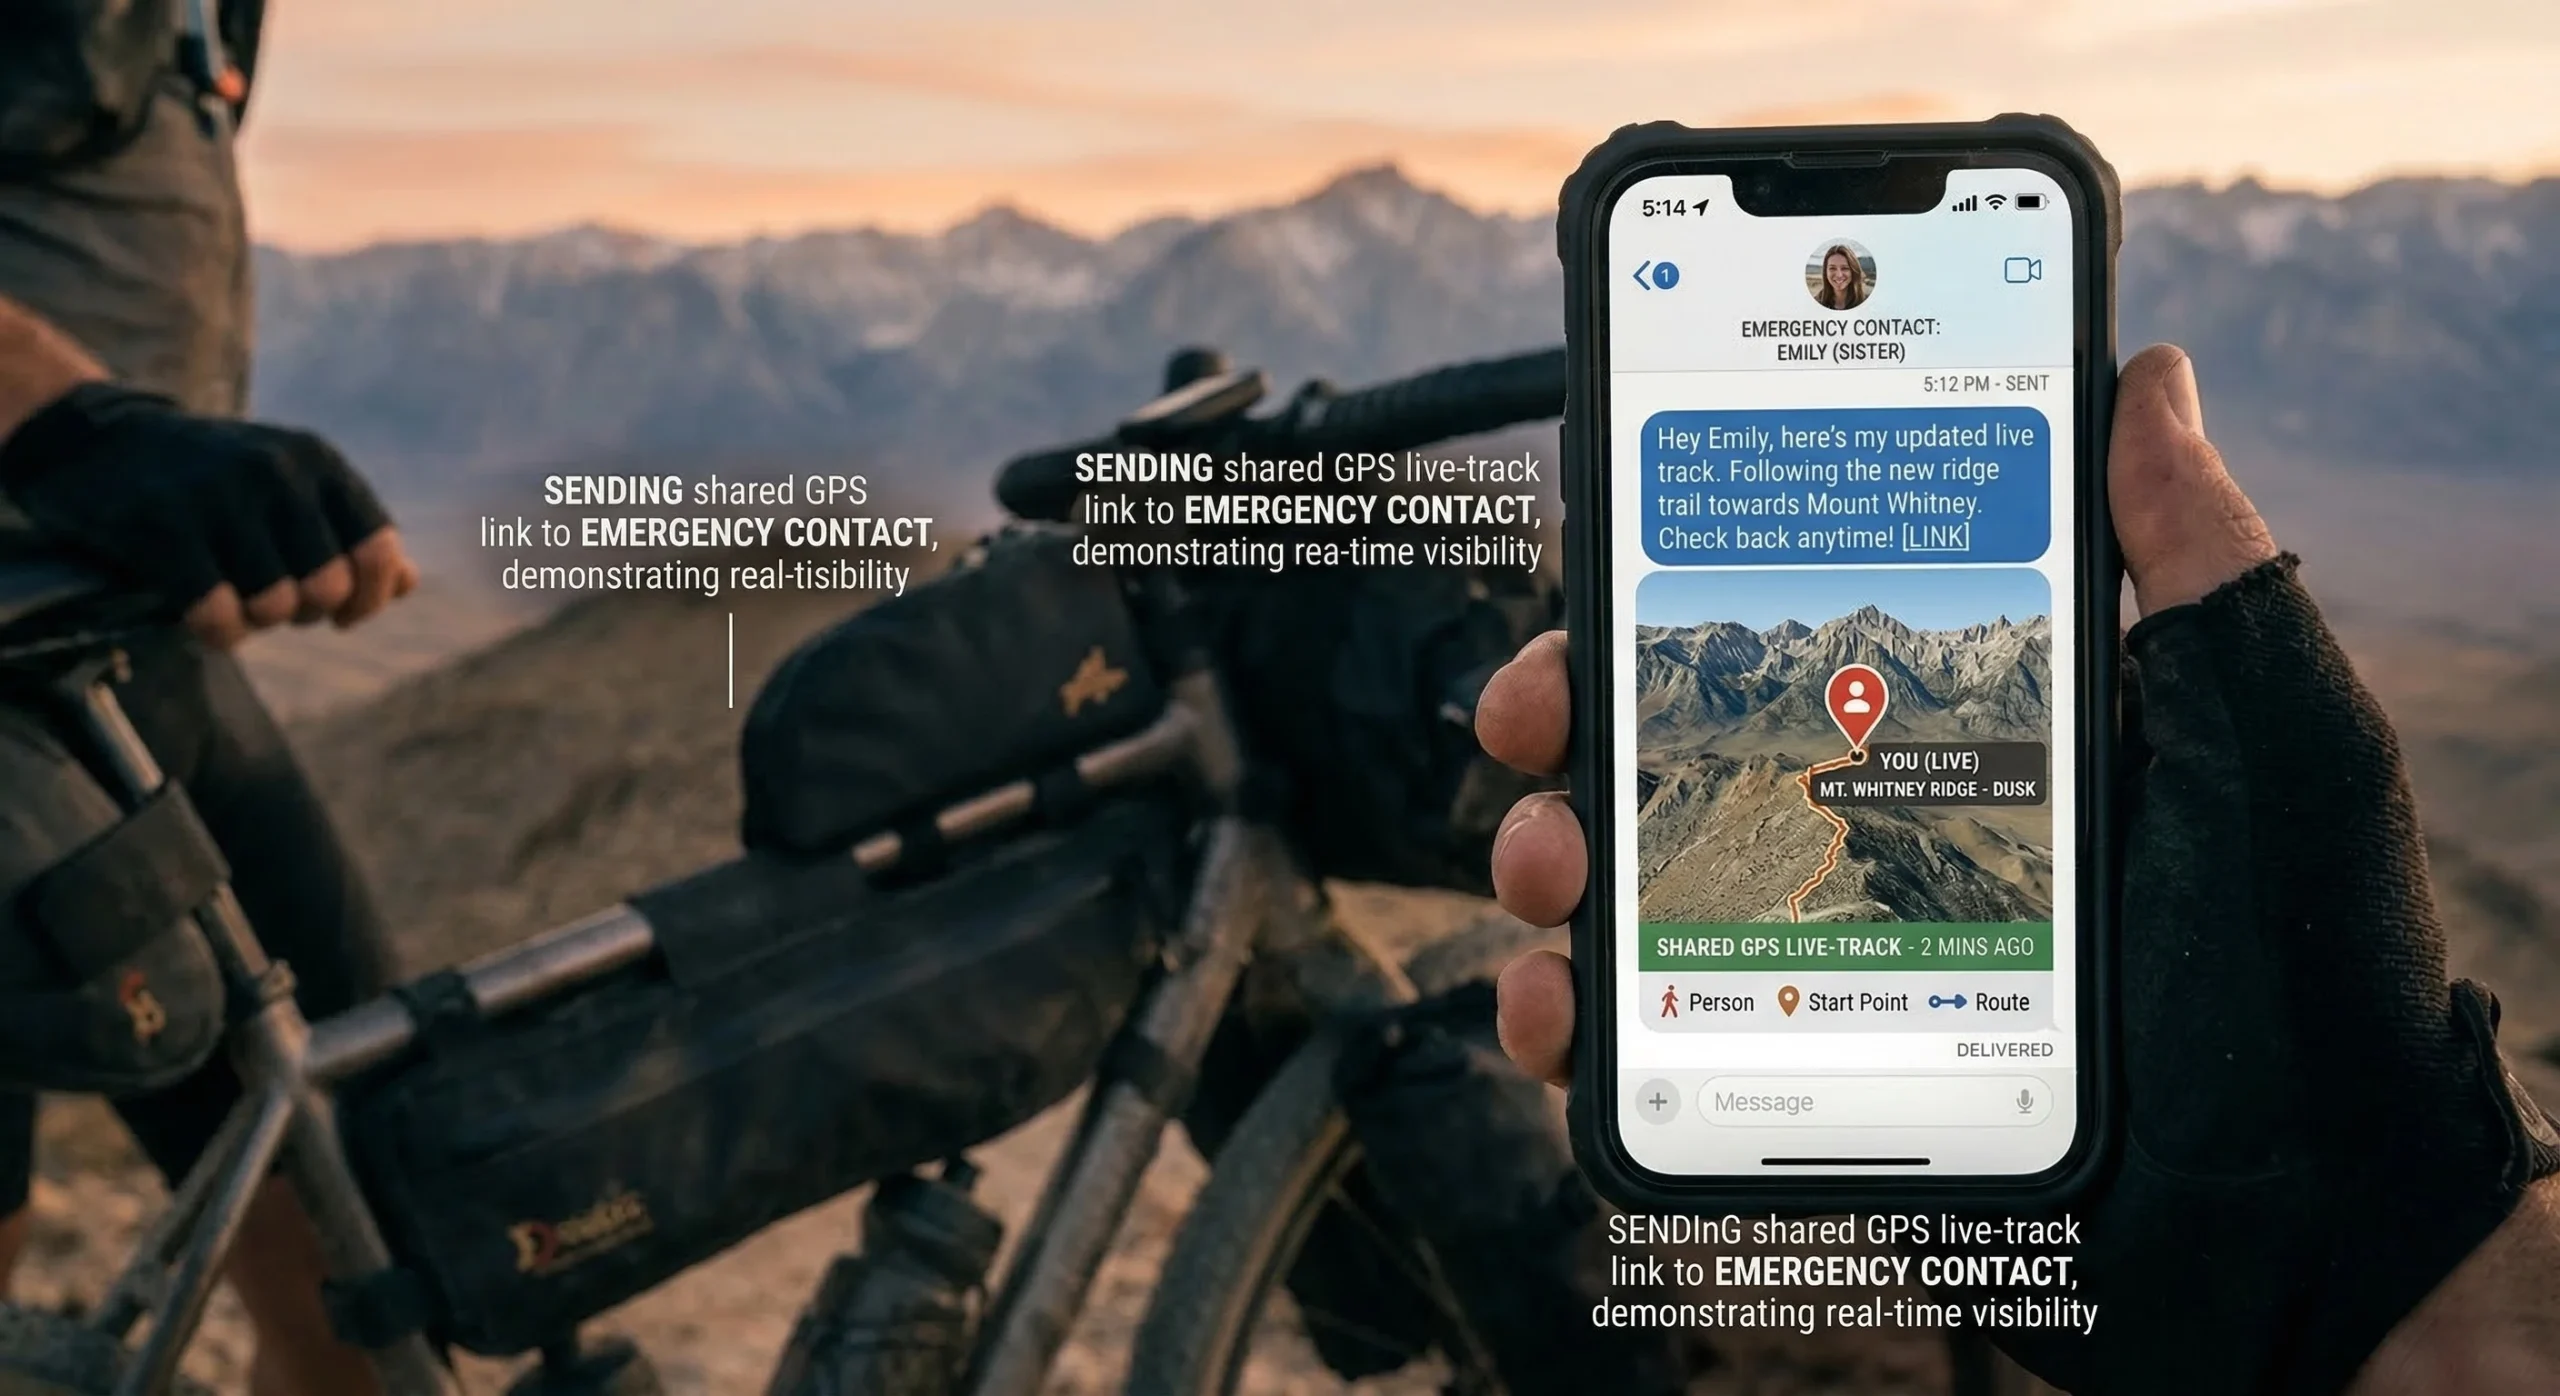
The most critical of all solo bikepacking safety tips is the establishment of a “fail-safe” communication system. In deep wilderness canyons or high-alpine plateaus, cellular service is frequently nonexistent. Relying solely on a smartphone is a high-risk strategy that can lead to isolation during a crisis. A two-way satellite communication device is the primary tool for solo safety, allowing for emergency SOS signals and text-based updates to a “home base” contact.
Recommendation: Garmin inReach Mini 2
- Key Features: Global Iridium satellite network, TracBack routing, 14-day battery life, IPX7 waterproof.
- Pros: Compact and lightweight; provides a definitive lifeline; allows for “check-in” messages to reduce family anxiety.
- Cons: Requires a monthly subscription; messaging can be slow in dense tree cover or narrow slot canyons.
- Check Price on Amazon: Garmin inReach Mini 2.
Effective communication also involves a “Flight Plan” protocol. Before departure, the rider must share a high-resolution map of their Bikepacking Routes with a reliable person. This plan should include a “dead drop” time—a specific hour by which search and rescue should be notified if no check-in is received. This logistical redundancy is a cornerstone of professional Bikepacking for Beginners safety training.
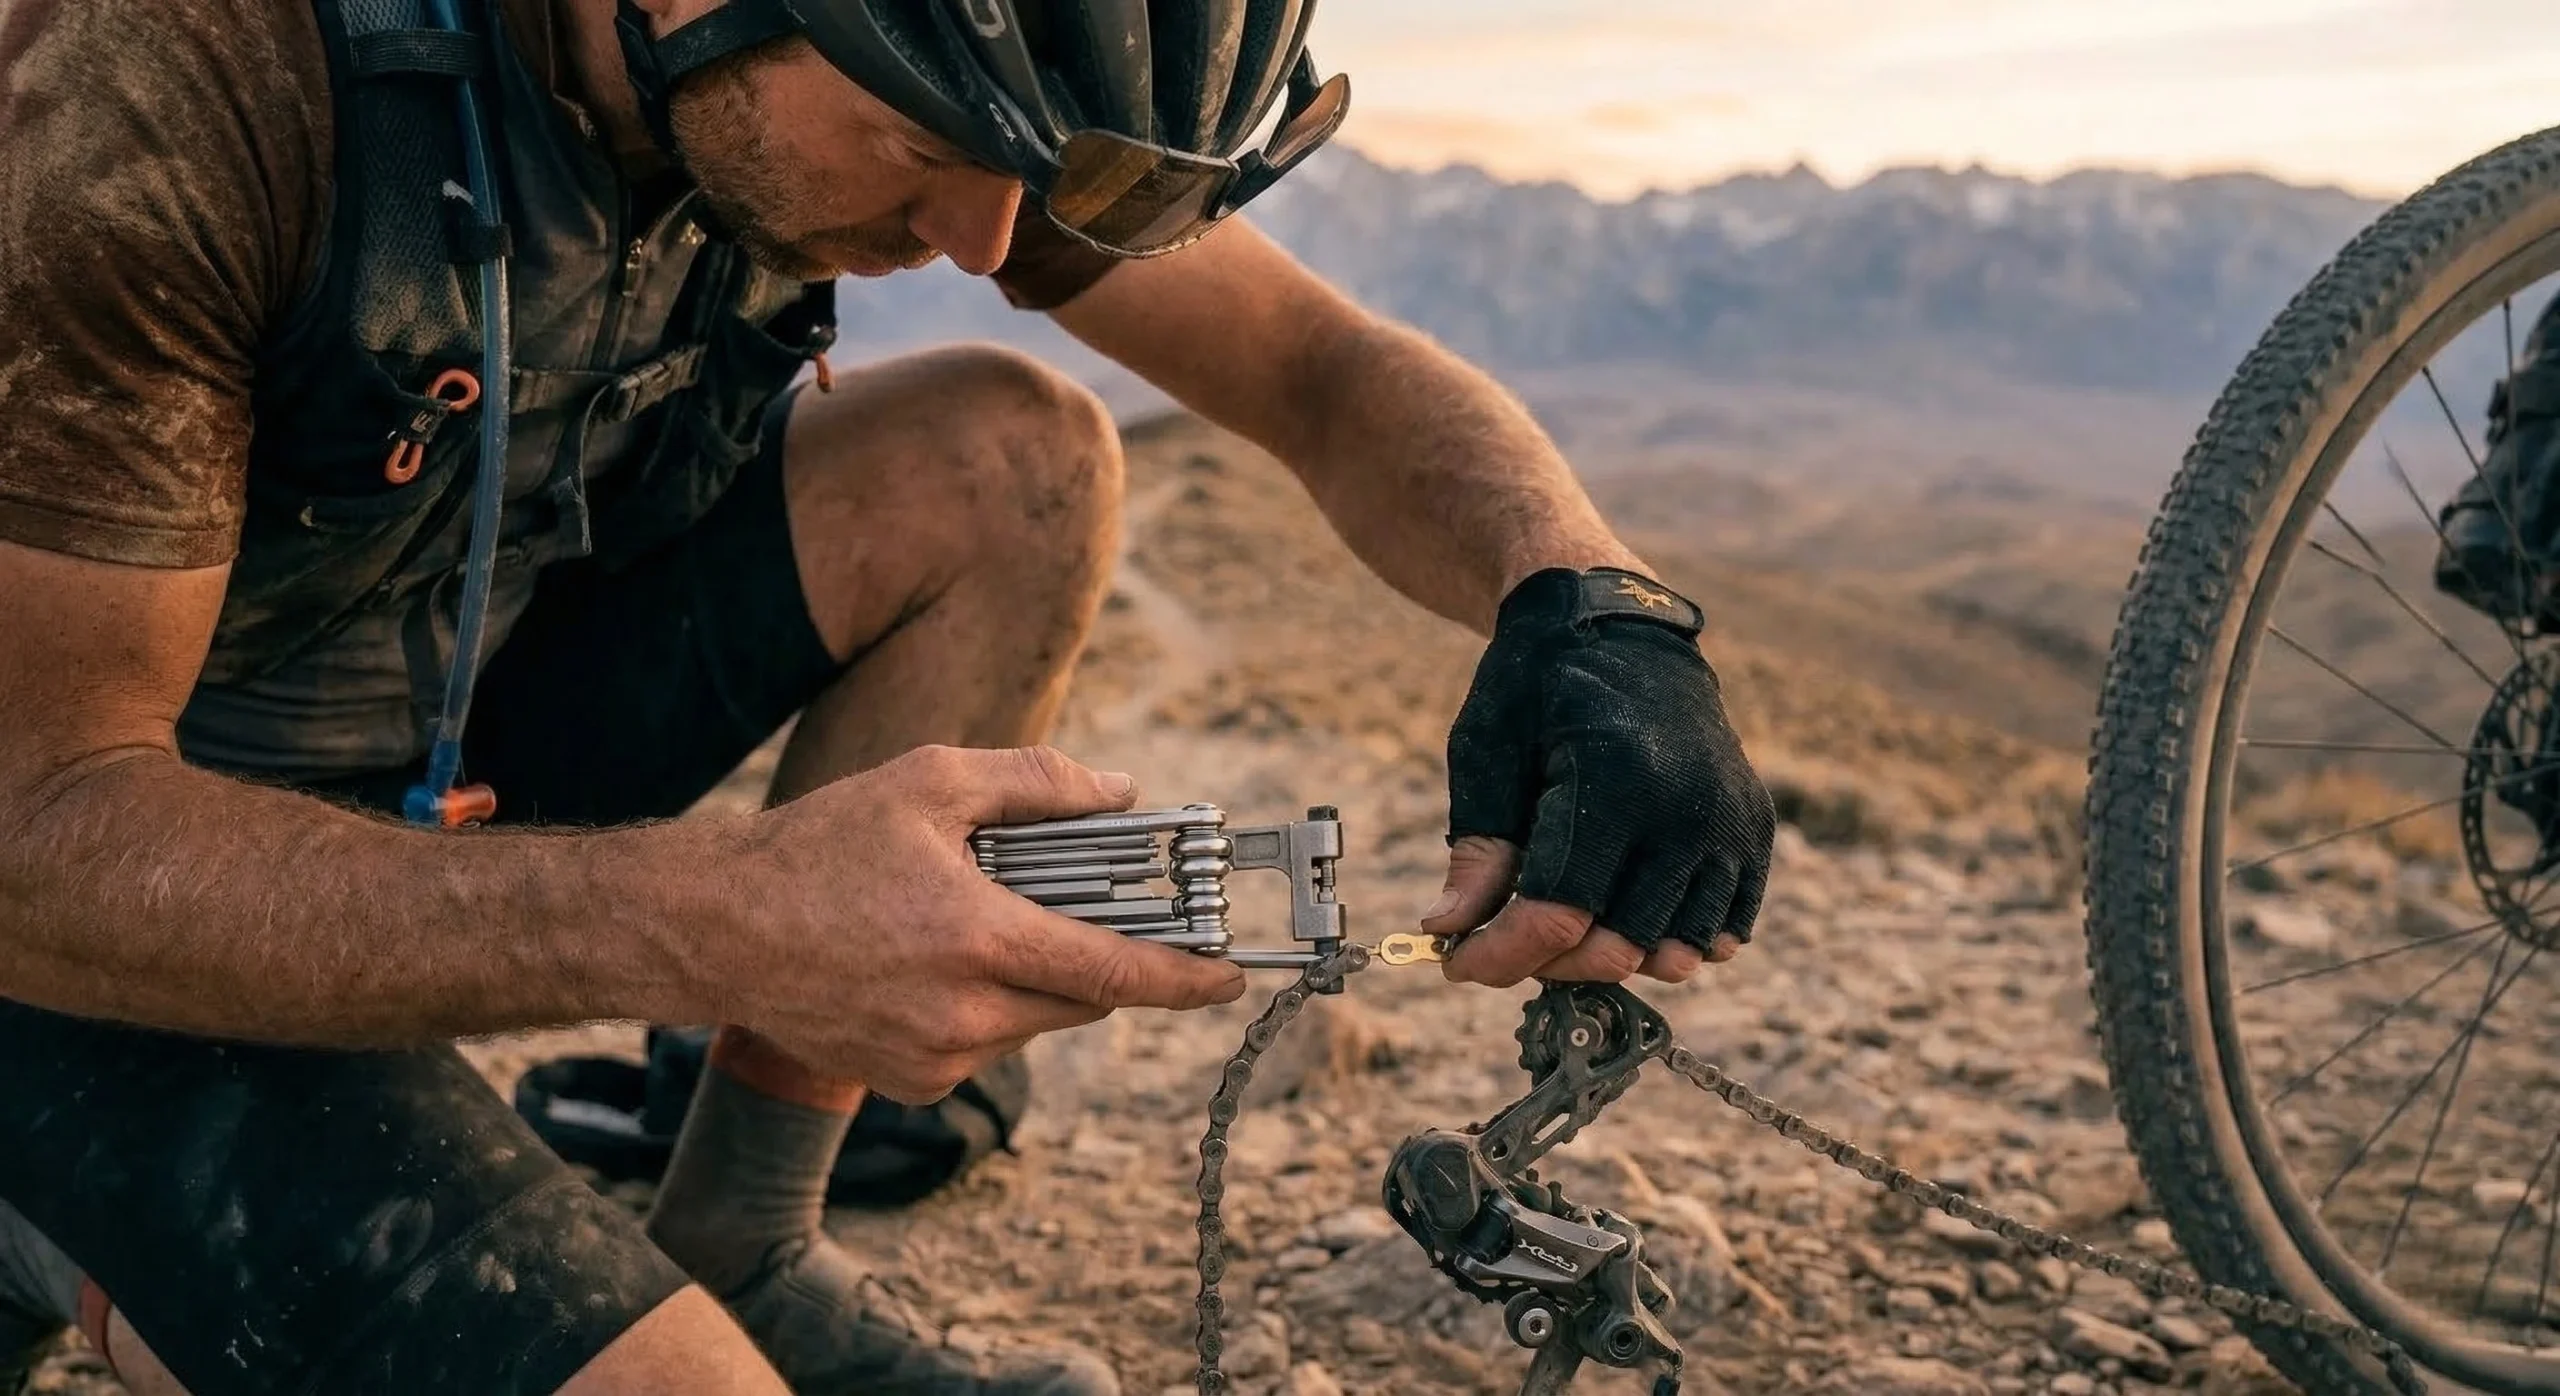
2. Mastery of Trailside Mechanical Self-Sufficiency
Mechanical failure is the most common cause of solo emergencies. A broken chain or a catastrophic puncture can transform a ride into a dangerous “hike-a-bike” situation miles from assistance. The solo rider must possess the tools and the specific knowledge to perform drivetrain repairs and tubeless tire maintenance in sub-optimal conditions. This technical readiness is the primary defense against being stranded by equipment failure.
Recommendation: Crankbrothers M19 Multi-Tool
- Key Features: 19 precision tools, integrated chain breaker, spoke wrenches, hard-shell carry case.
- Pros: Highly durable steel construction; includes every hex key needed for a modern adventure bike; provides excellent leverage.
- Cons: Slightly heavier than minimalist tools; the chain breaker requires manual dexterity to operate correctly.
- Check Price on Amazon: Crankbrothers M19
Mastery includes performing a daily “Bolt Check” to ensure that the high-frequency vibrations of off-road travel have not loosened critical components. Particular attention should be paid to rack mounts and brake calipers, as discussed in our Gravel Bike Maintenance protocols. Riders should also carry a spare derailleur hanger—a small, inexpensive part that is specific to each frame and impossible to source in the wilderness. According to the Park Tool Repair Resource, being able to bypass a broken derailleur by shortening the chain into a “single-speed” is an essential survival skill.
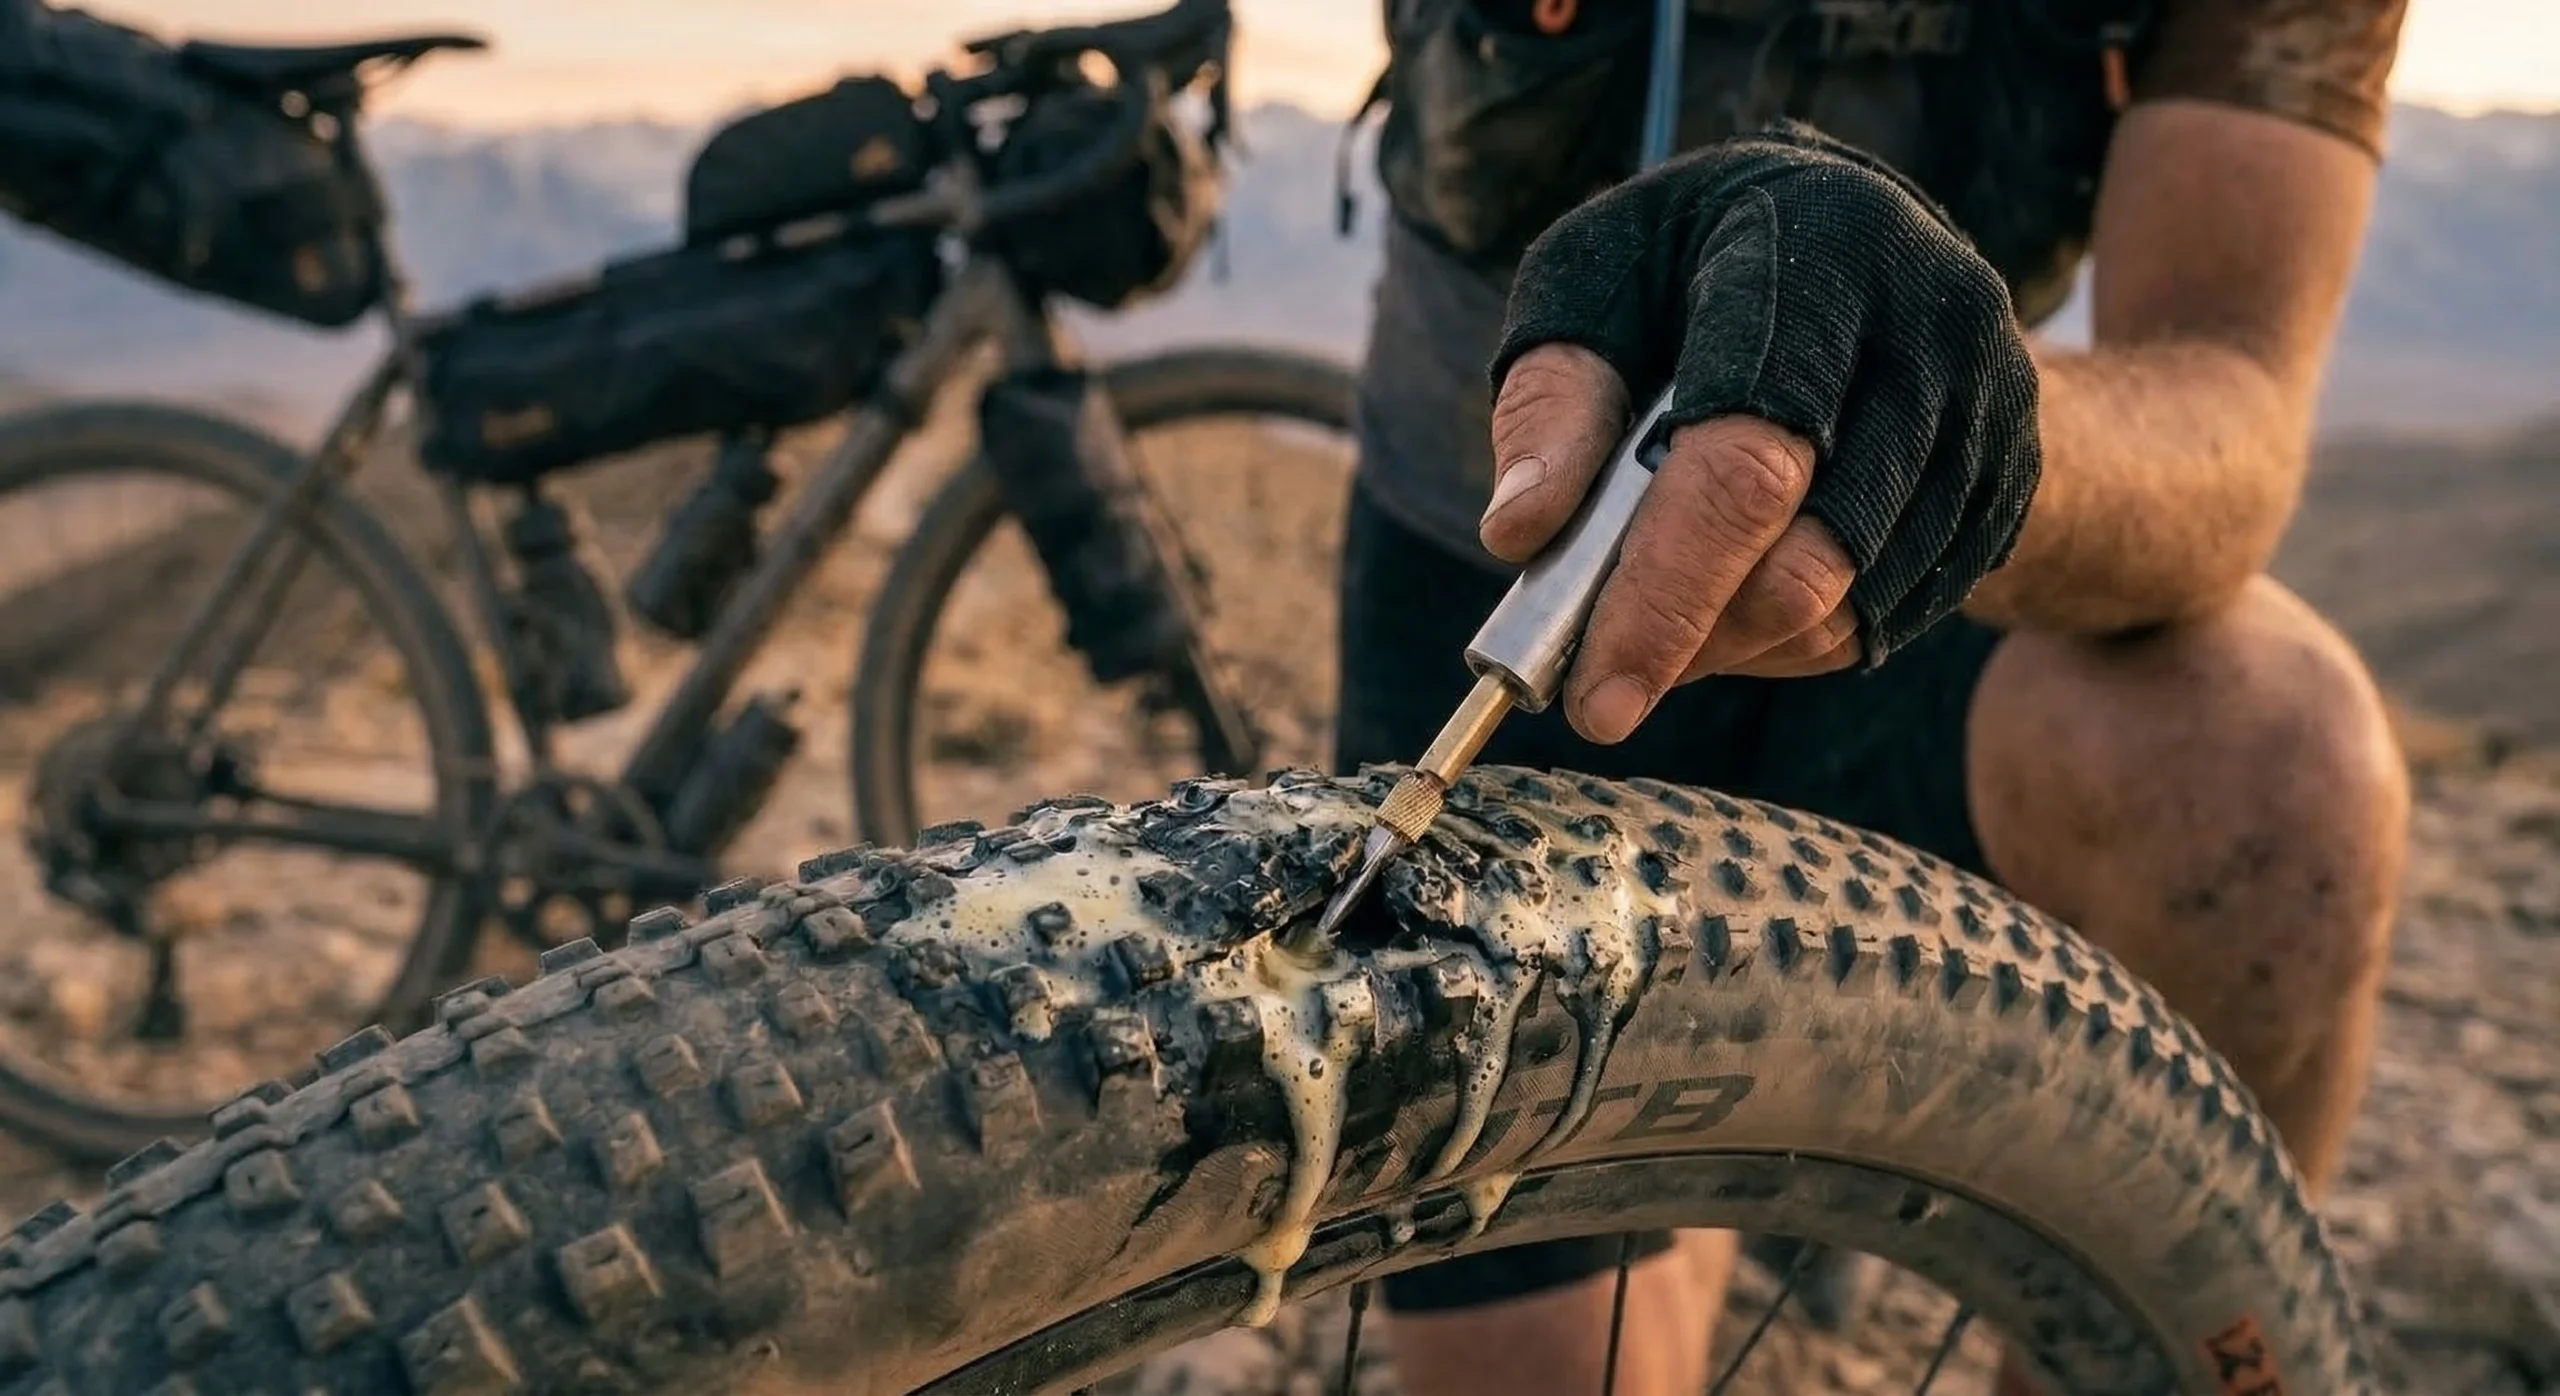
3. Advanced Puncture Management and Redundancy
Tires are the most vulnerable system on a loaded bicycle. While how to pack a bikepacking bag focuses on weight, solo safety focuses on tire integrity. A tubeless system is the standard for 2026, but a solo rider must have a three-tiered backup plan for tire failure: tire plugs for small gashes, a “boot” for sidewall tears, and a spare tube as a final resort.
Recommendation: Dynaplug Racer Pro Tool
- Key Features: Dual-end design, pre-loaded plugs, machined aluminum body, no-mess application.
- Pros: The fastest repair method available; does not require removing the wheel; seals gashes that liquid sealant cannot.
- Cons: Refill plugs are expensive; requires a significant amount of force to insert into high-pressure tires.
- Check Price on Amazon: Dynaplug Racer Pro
When a tire failure occurs, the solo rider must find a safe location away from the trail edge to perform the repair. Maintaining a clean workspace prevents the loss of small parts in the dirt. If the tubeless system fails completely, installing an inner tube requires the removal of the tubeless valve stem, which can be difficult without pliers. This technical detail is a frequent point of failure for beginners. For guidance on selecting durable tires, refer to our Gravel Bike Benefits analysis.
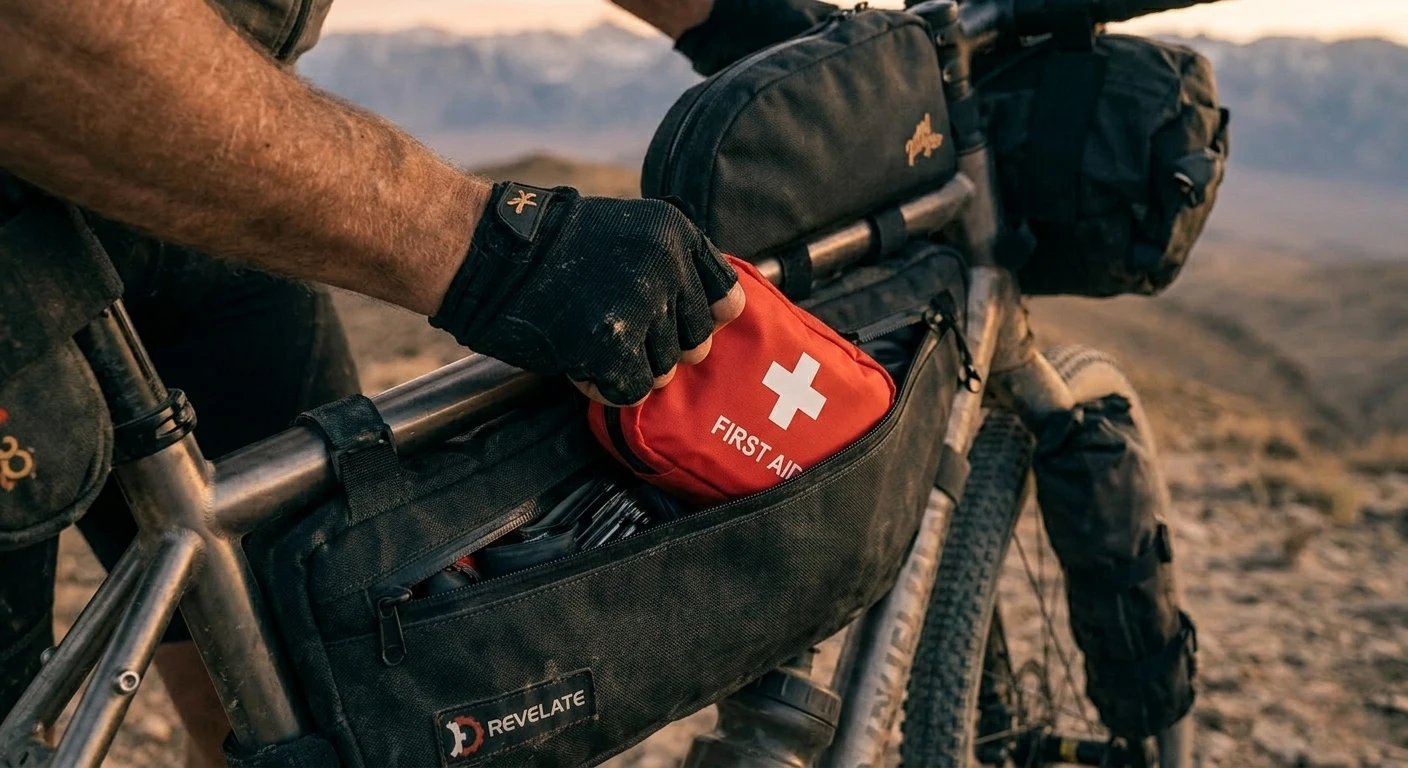
4. Medical Emergency Readiness and Trauma Protocols
A solo medical event requires immediate, decisive action. Without a partner to apply pressure or call for help, the rider must be capable of self-administering first aid. The solo bikepacking safety tips in this category prioritize trauma management and environmental illness (heatstroke/hypothermia). A basic first aid kit is insufficient; the kit must be tailored for high-impact cycling injuries and wilderness infection control.
Recommendation: Adventure Medical Kits Ultralight .7
- Key Features: 100% waterproof bag, wound care supplies, medications for inflammation and stings, moleskin for blisters.
- Pros: Specifically designed for solo adventurers; weight is negligible; the “DryFlex” bag ensures contents stay sterile.
- Cons: Does not include a tourniquet for major arterial bleeding; limited quantities of bandages for multi-day needs.
- Check Price on Amazon: AMK Ultralight .7 Kit.
A solo rider should also carry an “ICE” (In Case of Emergency) card visible on their person or displayed on their smartphone’s lock screen. This card should list blood type, allergies, and contact information. In the event of a crash resulting in a concussion, the rider may become disoriented; a pre-written emergency protocol helps maintain focus. Technical training from the NOLS Wilderness First Aid course is highly recommended for anyone planning a solo 3-Day Wilderness Adventure.
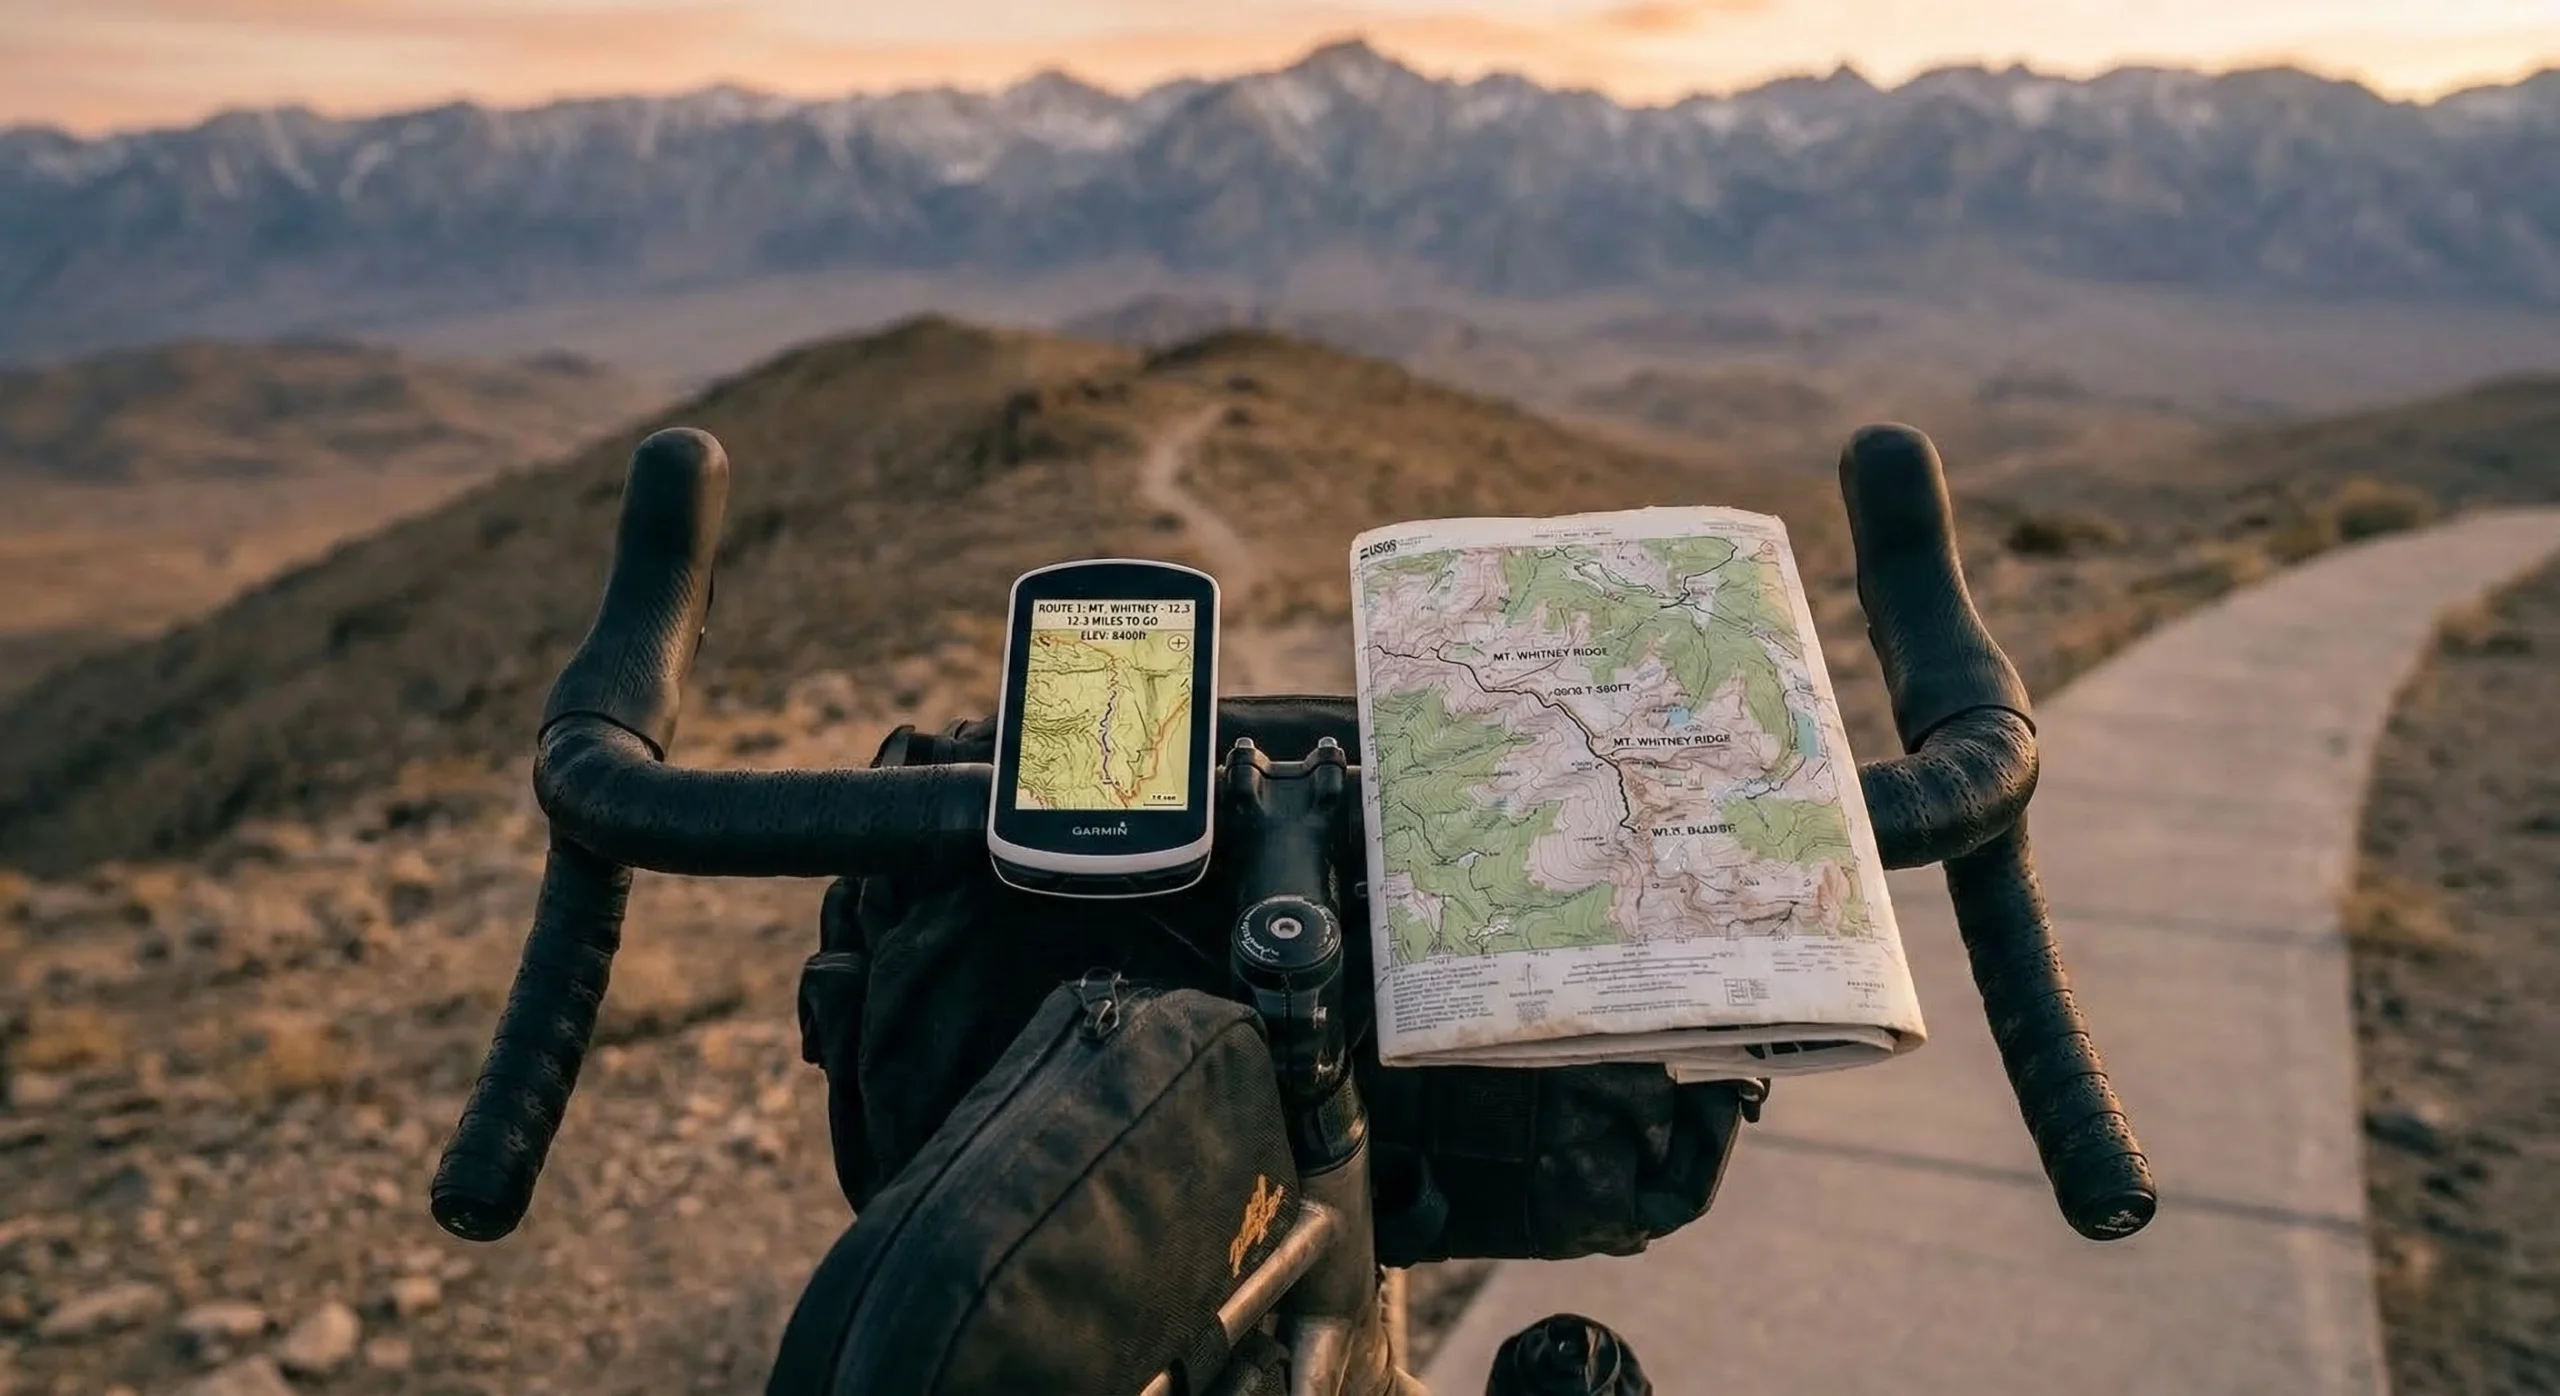
5. Navigational Redundancy and Disorientation Prevention
Getting lost is a primary source of solo anxiety and danger. Solo bikepacking safety tips dictate that a rider should never rely on a single device for navigation. A combination of a dedicated GPS head unit, a smartphone with offline maps, and a physical paper map provides the necessary redundancy for remote travel. Digital systems can fail due to battery drain, software glitches, or high-impact crashes.
- Primary Device: Dedicated GPS (e.g., Garmin Edge) with high-contrast topographic maps.
- Secondary Device: Smartphone with Komoot or Gaia GPS offline maps downloaded.
- Analog Backup: Paper USGS Topographic Map of the route corridor.
- Orientation Tool: A small magnetic compass to verify direction if the digital compass becomes decalibrated.
Maintaining a low center of gravity through proper Weight Distribution reduces the risk of crashes that damage electronics. Solo riders should practice “Orientation Checks” every hour, matching physical landmarks (peaks, river bends) to the map. This proactive awareness prevents the rider from wandering into dangerous Off-Road Terrain that exceeds their technical ability. Disorientation in the desert or high mountains can lead to rapid dehydration and exhaustion.
6. Environmental Awareness and Wildlife Safety
Solo riders are more likely to surprise wildlife because they are generally quieter than groups. In bear or mountain lion country, solo bikepacking safety tips include making regular noise when approaching blind corners or thick brush. Understanding the local ecosystem and the behavior of predatory animals is a fundamental survival skill. Proper food storage is equally vital to prevent attracting wildlife to the Bikepacking Sleeping System area.
- Bear Spray: Should be carried in a holster on the handlebars or a waist belt for immediate access—not buried in a bag.
- Food Management: Use odor-proof bags and store food at least 100 feet from your tent in a bear-resistant container or hang.
- Weather Awareness: Monitor barometric pressure changes on your GPS. A sudden drop often precedes a mountain storm.
- Leave No Trace: Follow LNT Principles to avoid leaving scents or waste that disrupts the habitat.
Environmental safety also includes managing water sources. Carrying a high-capacity Water Filtration System ensures that the rider can stay hydrated if the route takes longer than expected. According to the National Park Service, dehydration is a major contributor to poor decision-making and accidents. A solo rider must prioritize hydration as a cognitive safety tool.
7. The Psychology of Solo Safety: Managing Fear and Fatigue
The most overlooked aspect of solo bikepacking safety tips is the psychological state of the rider. Fear can lead to “tunnel vision,” where the rider focuses on a single obstacle and misses a larger hazard. Fatigue degrades technical skill, making a simple descent on Gravel Roads dangerous. A solo rider must have the discipline to stop and rest before they become “exhaustion-blind.”
Managing the internal dialogue is a core skill for long-distance solo travel. When a mechanical or navigational error occurs, the first step is the “S.T.O.P.” protocol: Sit, Think, Observe, and Plan. This prevented reactive, panic-based decisions that often worsen a situation. Maintaining a high-calorie Bikepacking Food Plan keeps the brain fueled for this critical thinking. The transition to expert solo travel is as much a mental journey as a physical one.
Conclusion: The Reward of Self-Reliant Adventure
Mastering solo bikepacking safety tips transforms a risky endeavor into a calculated adventure of self-discovery. By prioritizing redundant communication (Section 1), mechanical mastery (Section 2), and medical readiness (Section 4), any rider can confidently explore the most remote corners of the map. The success of a solo mission is not defined by the speed of the ride, but by the level of technical competence and safety maintained throughout the journey.
Remember that self-reliance is a skill developed through consistent practice and incremental challenges. Start with shorter overnight trips near your home base before attempting a 3-Day Wilderness Adventure. Keep your Bikepacking Gear maintained and your Navigation Apps updated to the 2026 standards. As you progress, your ability to handle emergencies will become a source of profound confidence.
The wilderness is waiting, and with the right safety foundation, you are ready to conquer it alone. Treat the environment with respect, follow the Responsible Outdoor Code, and enjoy the unique liberation of solo travel. The transition from a local cyclist to a backcountry expert is a path paved with preparation and a passion for the trail. Step out with a plan, respect your limits, and embrace the unparalleled freedom of the bicycle.
Discover more from Maive Verse
Subscribe to get the latest posts sent to your email.