Master how to pack a bikepacking bag for optimal stability. Discover technical strategies for weight distribution, gear access, and better trail handling.
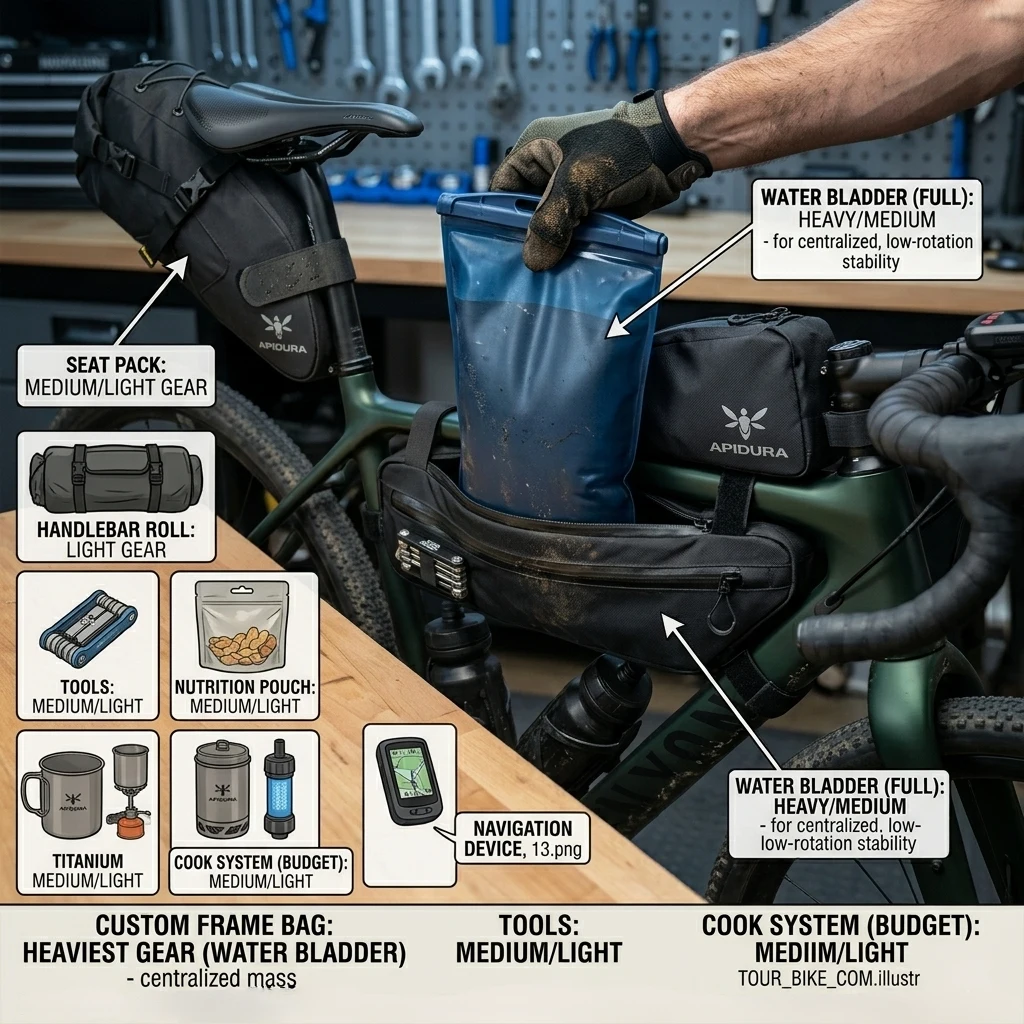
Table of Contents
Introduction: The Physics of the Loaded Bicyc
Understanding how to pack a bikepacking bag is a technical requirement for maintaining safety on variable off-road terrain. A bicycle’s handling characteristics are fundamentally altered by the addition of 15 to 30 pounds of wilderness gear. If the weight is poorly distributed, the bike becomes difficult to steer, prone to lateral swaying, and unstable during steep descents. This guide focuses on the mechanical principles of weight distribution to ensure your bike remains nimble and predictable. Mastering this skill is as essential as building your Ultimate Bikepacking Gear List.
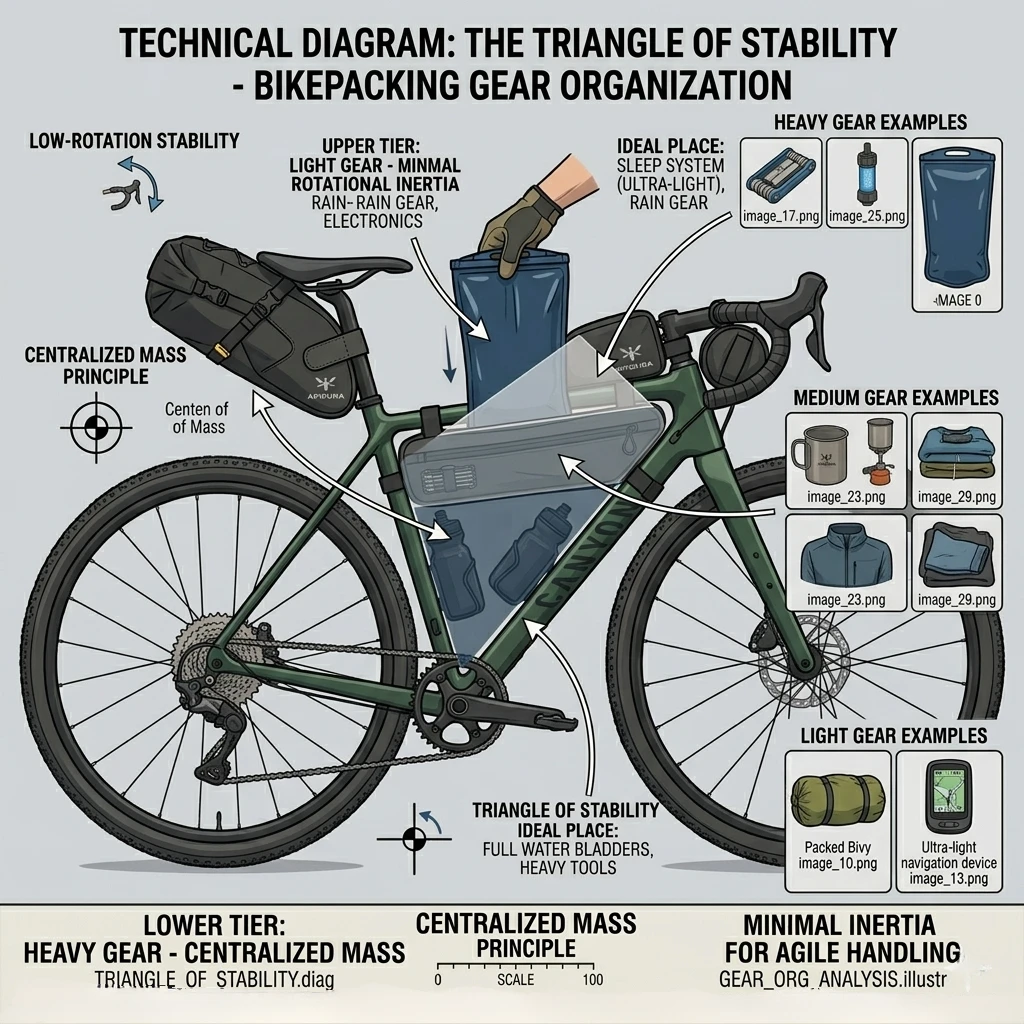
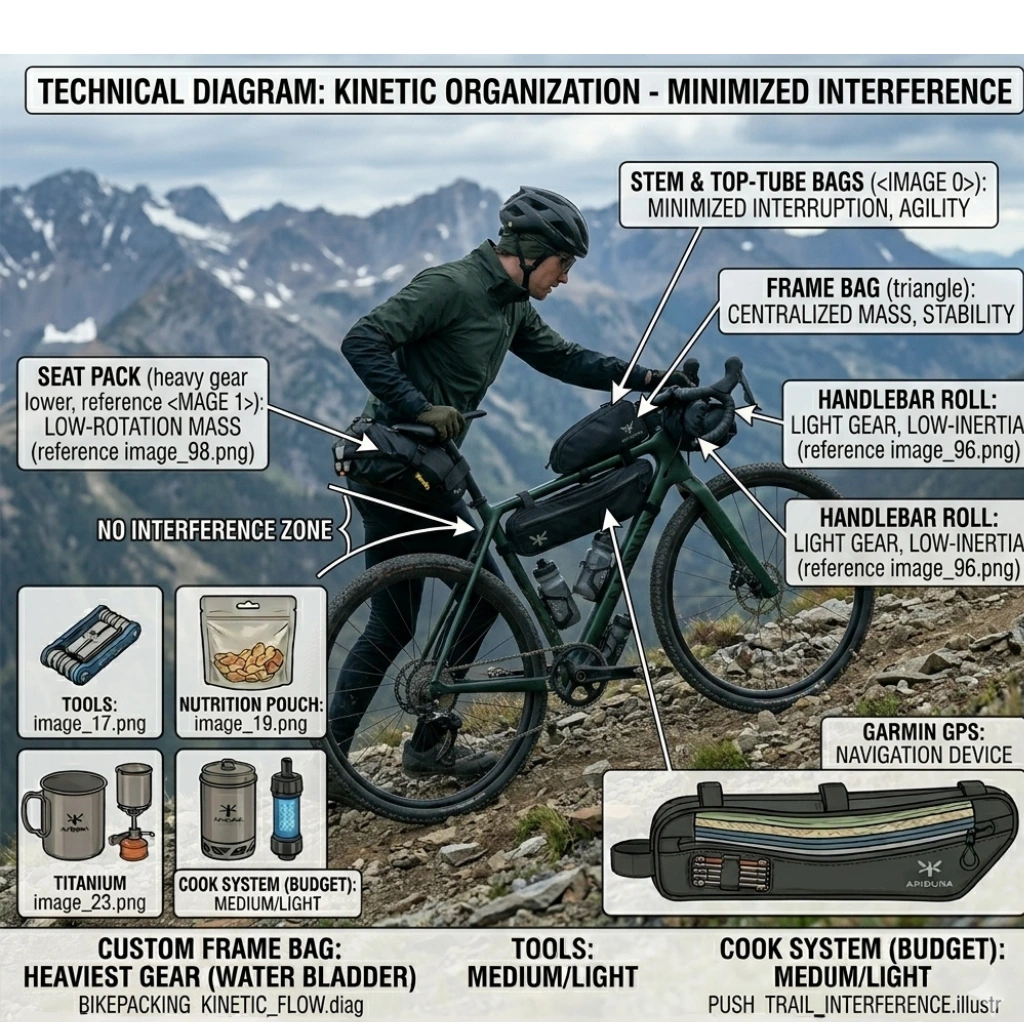
The primary goal of efficient packing is to keep the center of gravity as low and centralized as possible. This minimizes the “pendulum effect” caused by heavy items swaying at the extreme ends of the frame. High-quality bikepacking systems rely on soft bags that integrate with the bike’s geometry. Beginners often make the mistake of overpacking the seat pack, which leads to significant “tail wag” on technical climbs. Learning the correct sequence of loading transforms the bike from a heavy burden into a capable exploration tool.
Self-sufficiency in the backcountry requires rapid access to specific tools without fully unpacking. Proactive organization separates gear into “active use” and “static camp” categories. This division of equipment ensures that a mechanical failure or sudden weather shift can be managed in seconds. This methodology follows the same logic found in our Bikepacking for Beginners Guide. A well-packed bike is a silent bike, reducing the mechanical stress on bag straps and frame mounting points.
1. The Heavy-Low-Center Rule of Weight Distribution
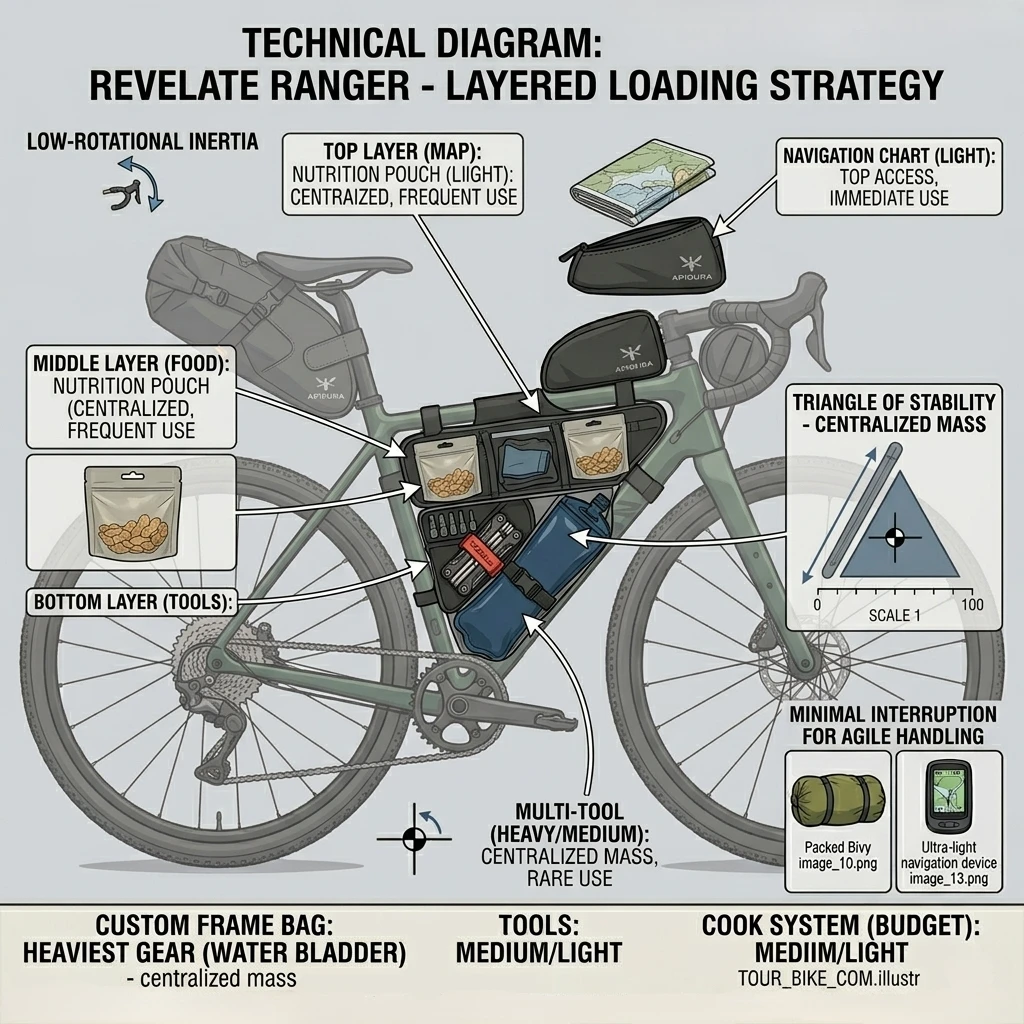
The most important concept in learning how to pack a bikepacking bag is the “Heavy-Low-Center” rule. This principle dictates that the densest items must be placed in the lowest possible position within the center of the frame. This placement preserves the bike’s natural tip-in behavior during cornering. Placing heavy items in a handlebar bag or a seat pack creates leverage that resists the rider’s steering inputs. Stability is the foundation of off-road safety, especially on Difficult Trails.
Identifying High-Density Gear
High-density items include water, tools, stove fuel, and calorie-dense food like canned goods or dense bars. These items have the highest mass-to-volume ratio and exert the greatest influence on handling. For a technical breakdown of these essentials, refer to our 3-Day Adventure Gear List. Proper identification allows the rider to prioritize the frame bag for these specific components.
Managing the Center of Gravity
By centering the mass, the rider ensures that the weight is shared equally between the front and rear tires. This maximizes traction and prevents the front wheel from washing out in loose gravel. A centralized load also reduces the stress on the headset and seat post. This mechanical conservation is a core tenet of the Leave No Trace packing ethos . Maintaining a balanced machine is a proactive safety measure for long-distance travel.

2. The Frame Bag: The Core of the Packing System
The frame bag is the most valuable real estate for anyone learning how to pack a bikepacking bag. Because it sits within the main triangle, it is the only location that does not significantly compromise steering or balance. Most modern frame bags are available in “full-frame” or “half-frame” versions to accommodate water bottle cages. Choosing a model with a tapered design prevents the bag from interfering with the rider’s knees during intense pedaling.
Recommendation: Revelate Designs Ranger Frame Bag
- Key Features: Tapered shape to prevent knee rub, heavy-duty #10 YKK zippers, internal hydration port.
- Pros: Incredibly durable; fits a wide variety of frame geometries; dual compartments for organization.
- Cons: Not 100% waterproof (requires a liner); zipper maintenance is required in muddy conditions.
- Check Price on Amazon: Revelate Designs Ranger.
Strategic Internal Loading
Load the heaviest items at the very bottom of the frame bag, closest to the bottom bracket. This typically includes a hydration bladder or a large tool roll. Use the upper compartment for mid-weight items like electronics or a day’s worth of food. This organization ensures the bike remains stable when navigating technical singletrack. For more on frame clearance, Rockgeist Technical Resources provide excellent frame-mapping tools.
3. The Handlebar Roll: Managing Steering Sensitivity
The handlebar bag is reserved for light, bulky items that require protection from the elements. Knowing how to pack a bikepacking bag on the front end is vital because excess weight here slows down the bike’s steering response. This can be dangerous on steep, rocky descents where quick corrections are mandatory. The roll-top design of these bags provides an airtight seal, making them ideal for down-filled sleeping gear.
Recommendation: Ortlieb Handlebar-Pack (15L)
- Key Features: IP64 waterproof rating, twin-sided roll-top closures, internal compression straps.
- Pros: Truly waterproof; incredibly stable mounting system; includes spacers for brake lever clearance.
- Cons: Wide profile can interfere with narrow drop bars; difficult to access while riding.
- Check Price on Amazon: Ortlieb Handlebar-Pack.
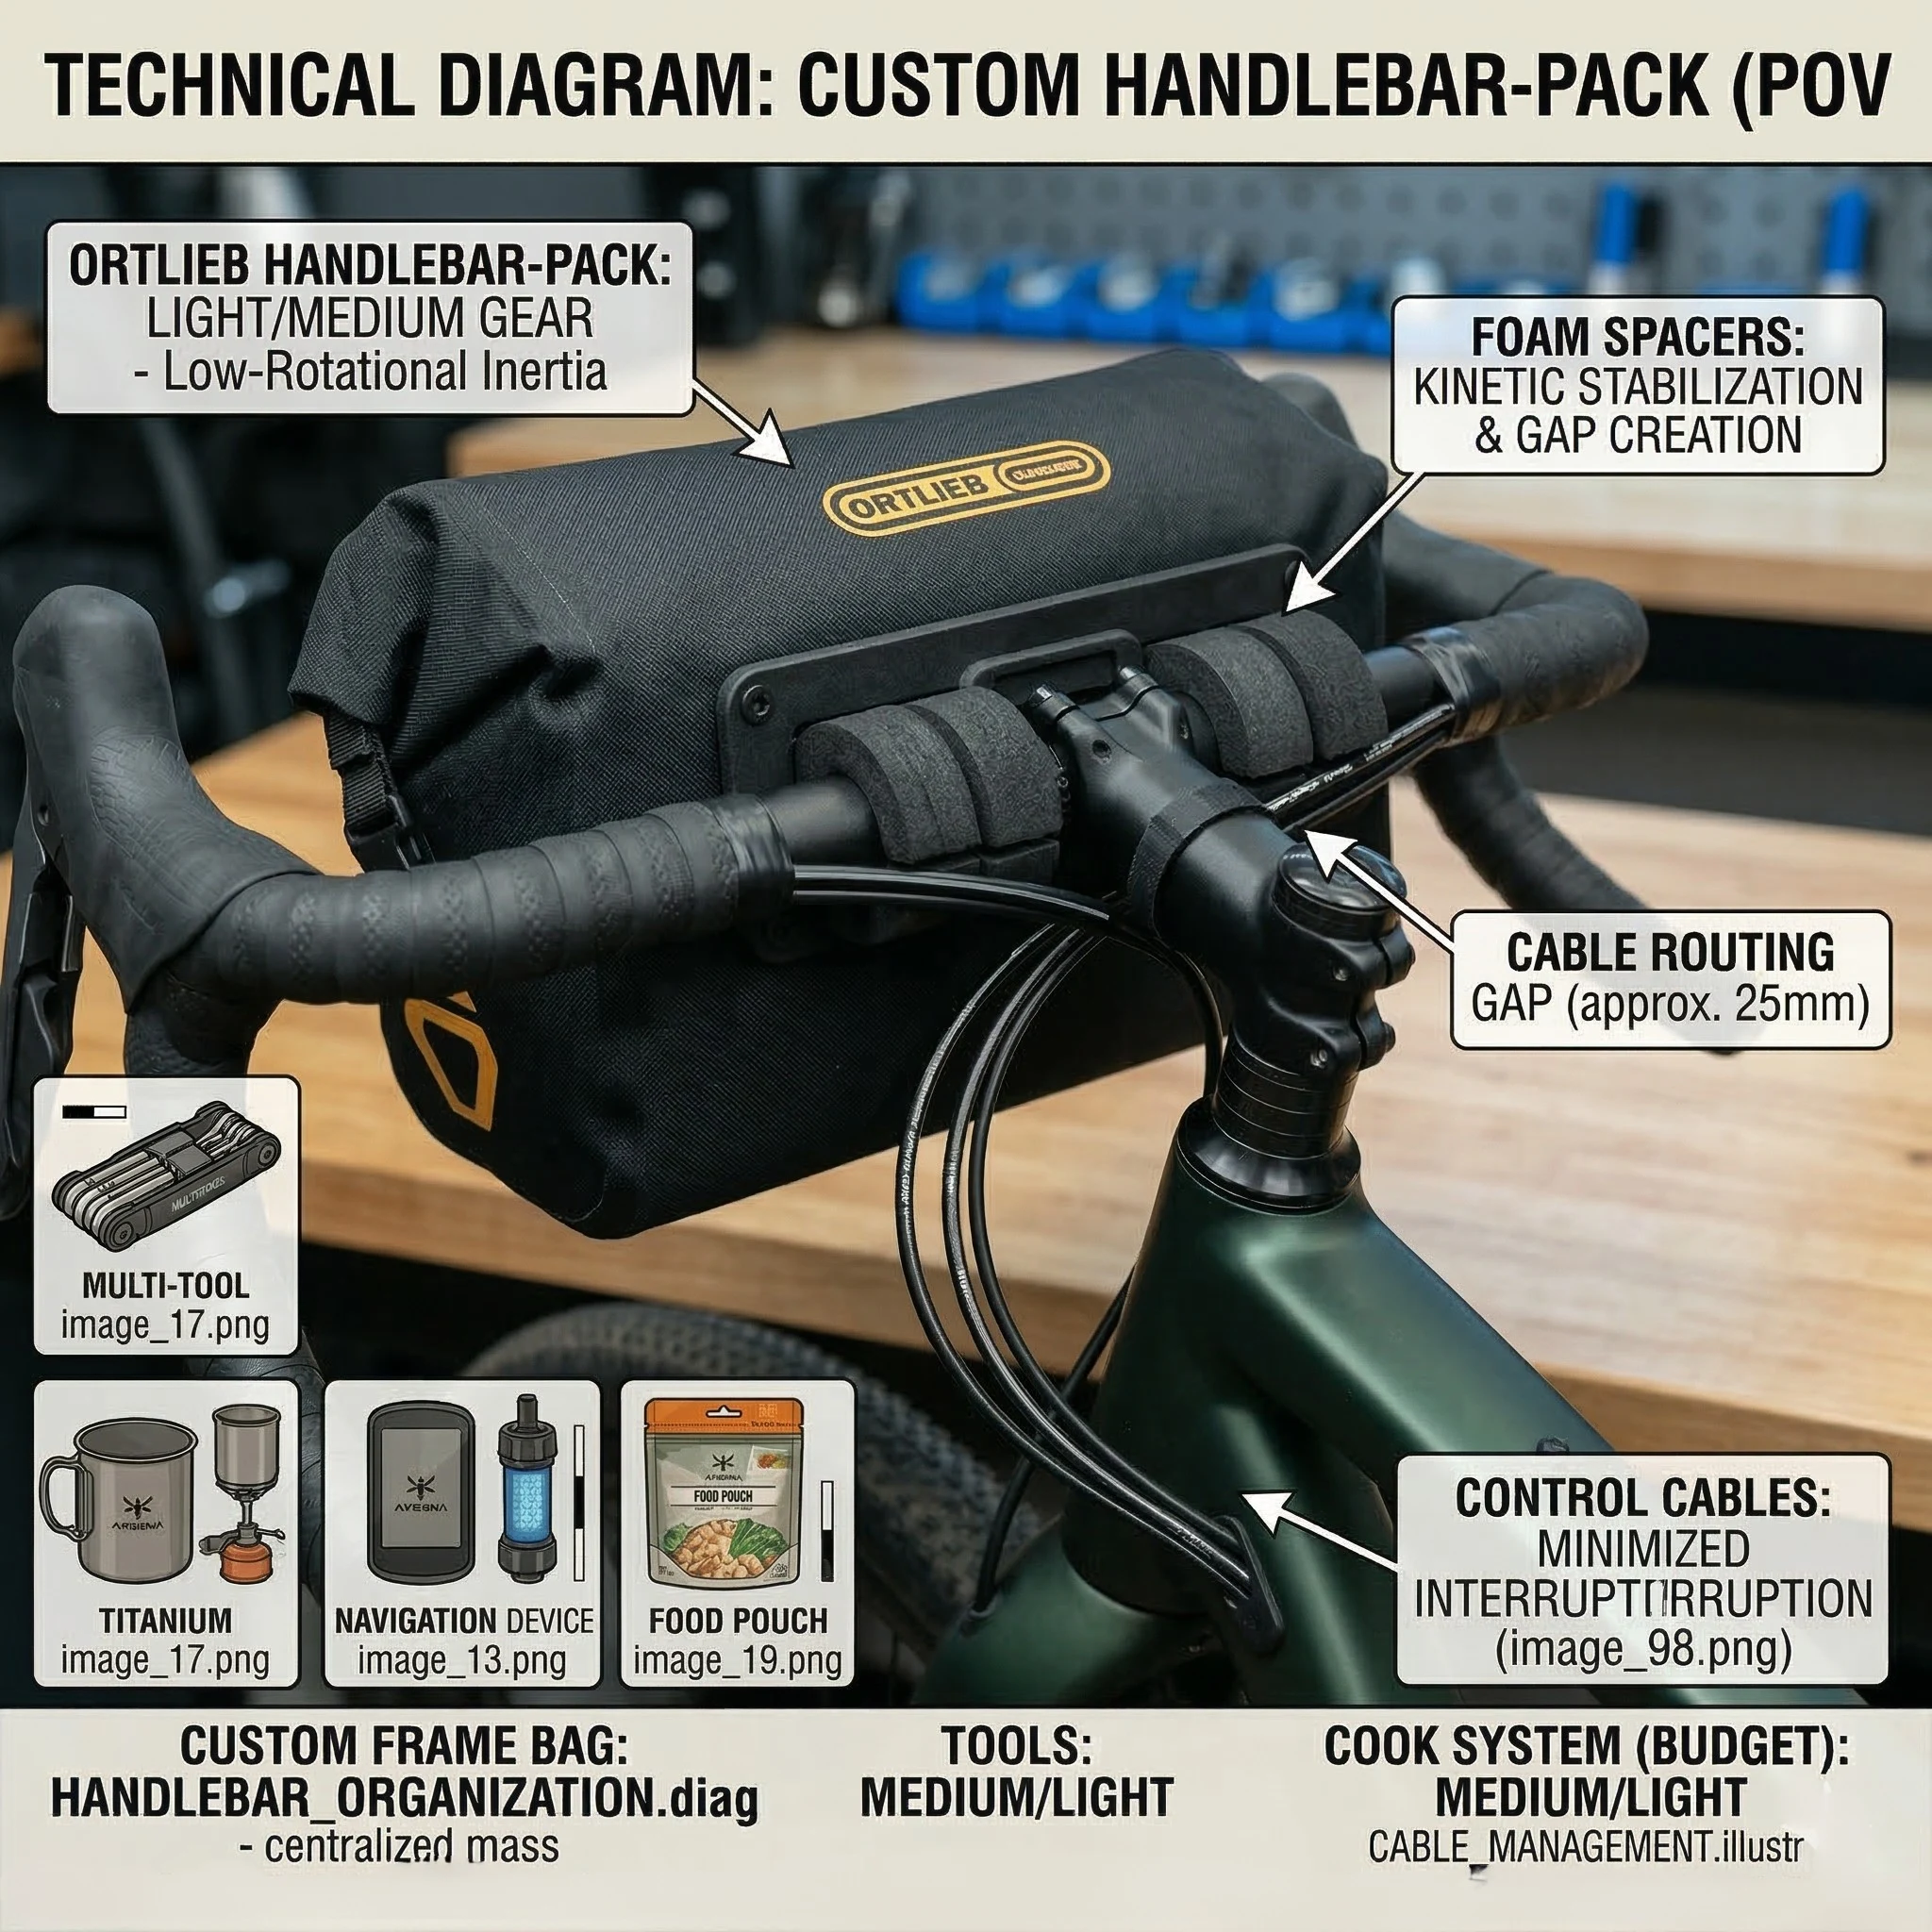
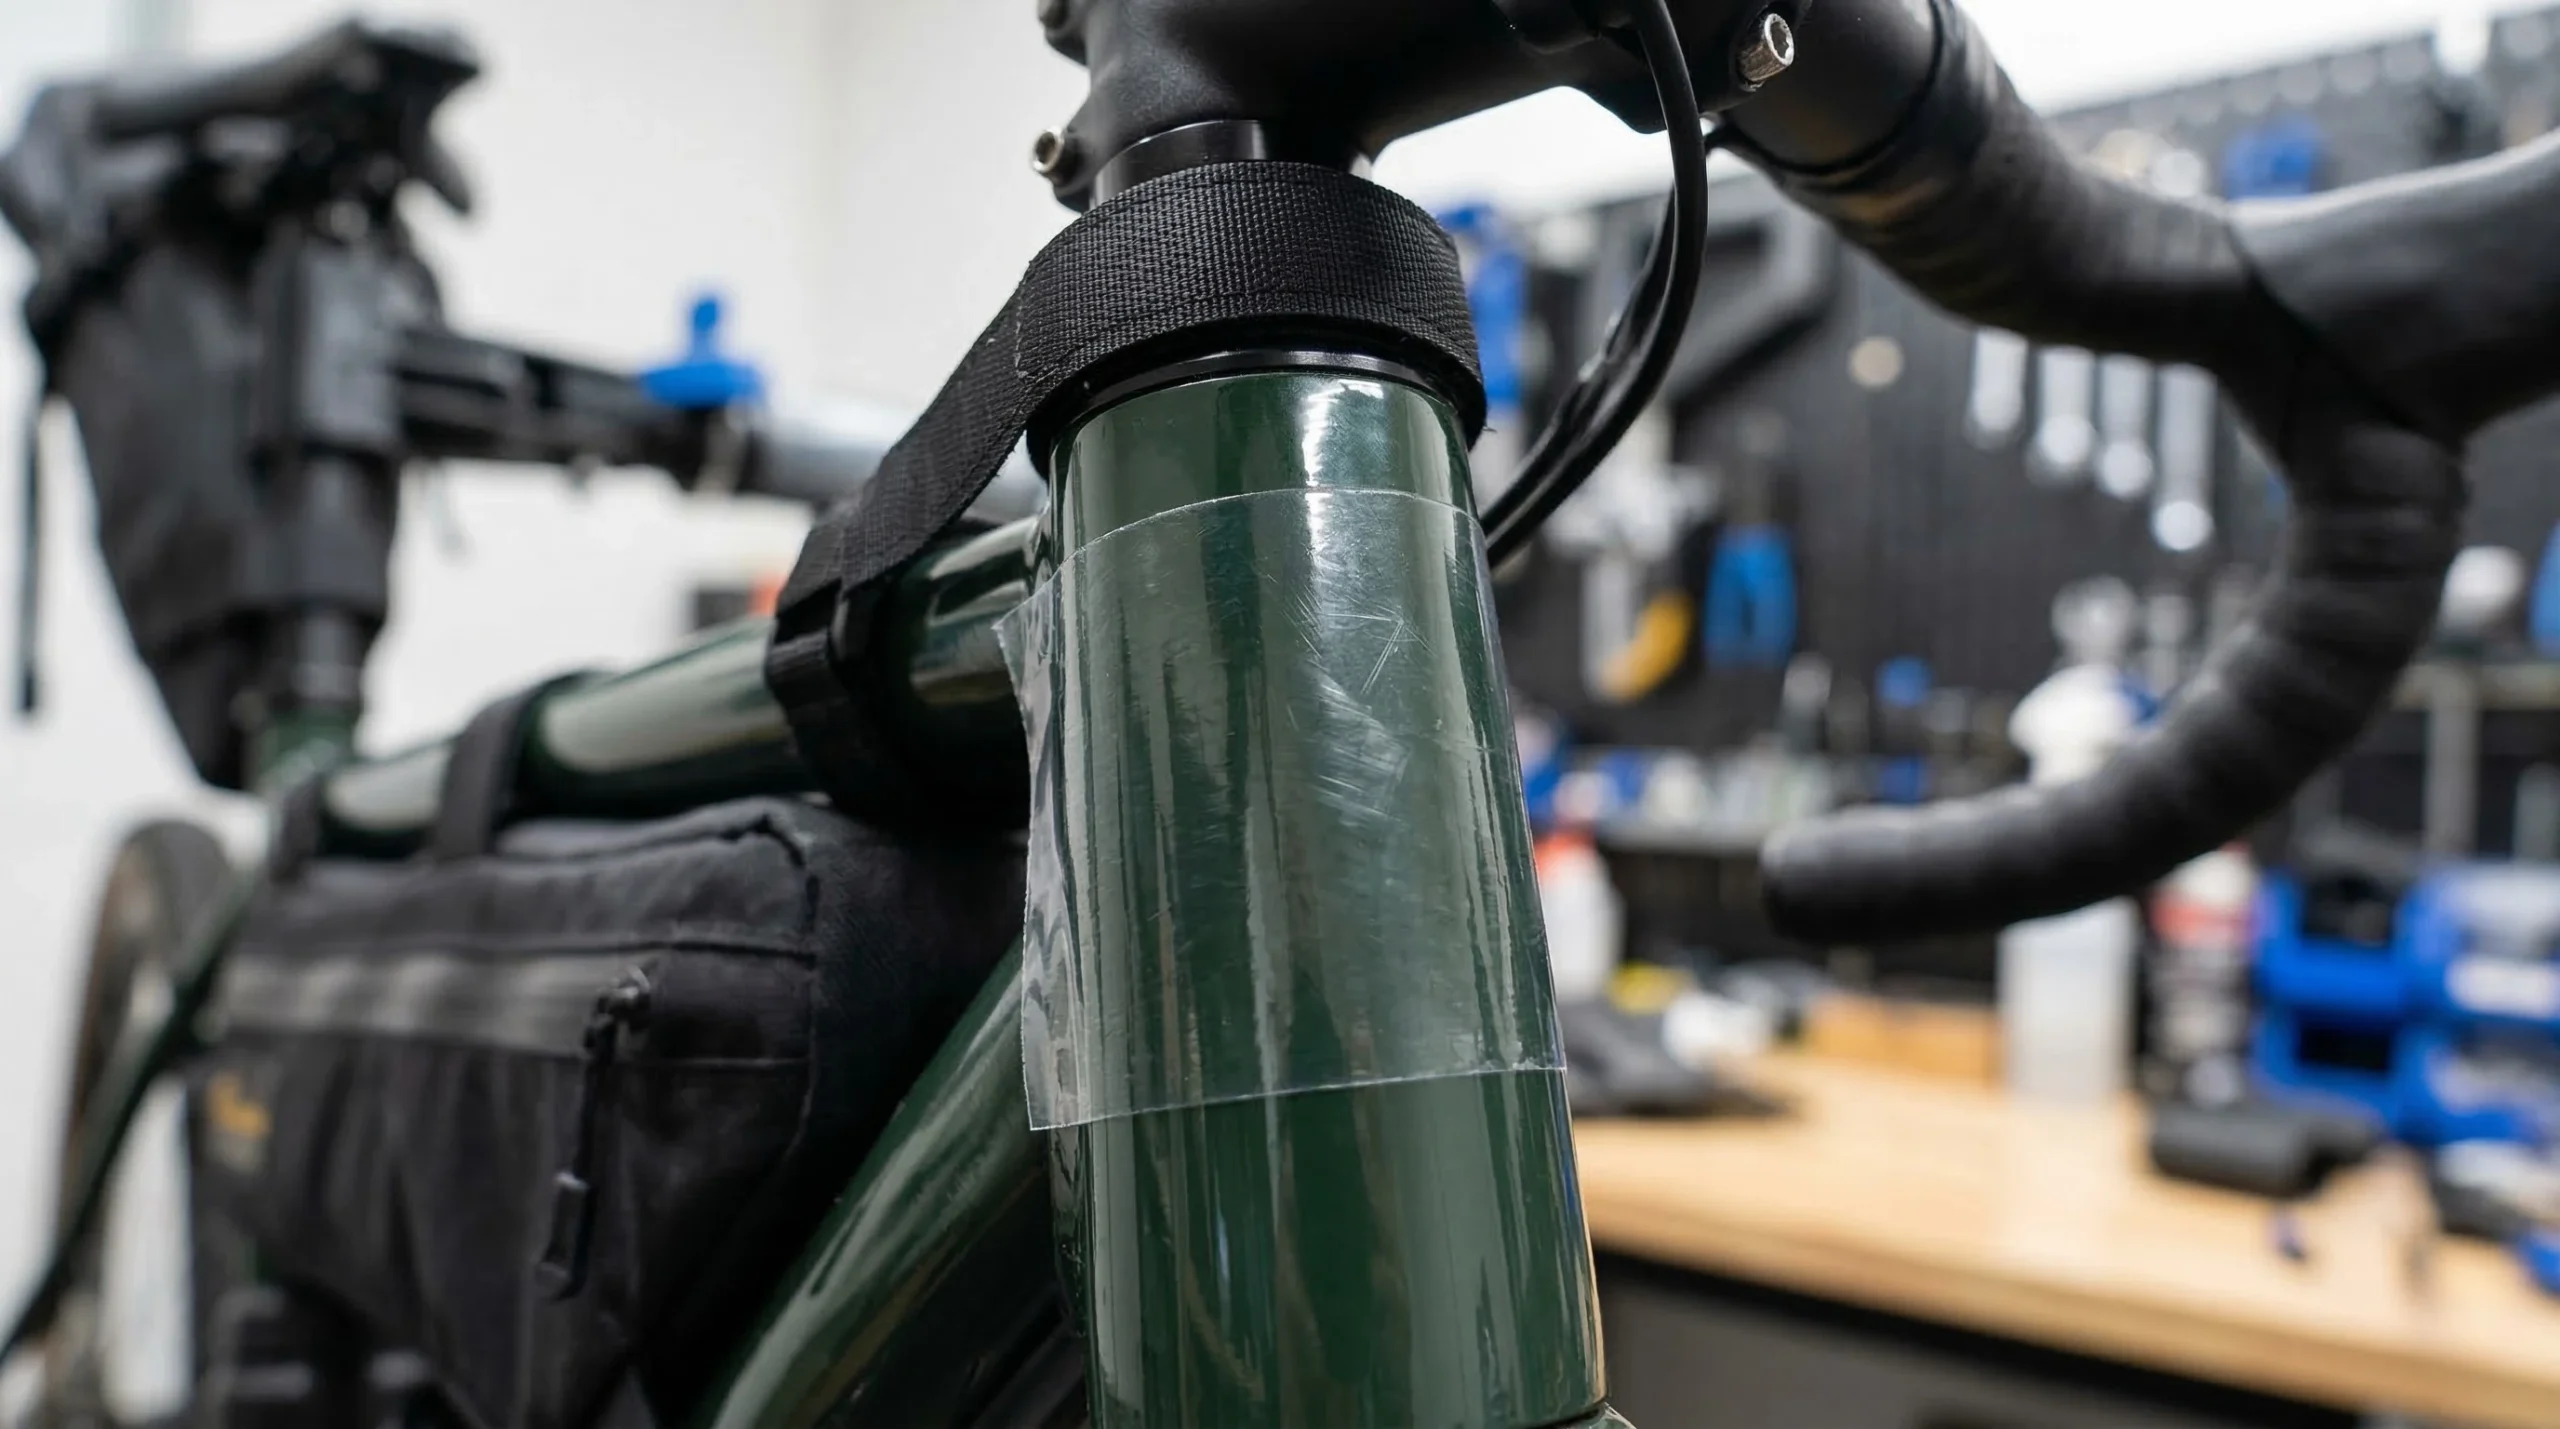
Protecting Cables and Hoses
Before mounting a handlebar roll, the rider must ensure that brake hoses and shifting cables are not pinched or kinked. Constant friction from a heavy bag can wear through hydraulic lines over 72 hours of riding. Using protective frame tape at all contact points prevents aesthetic and structural damage. This attention to mechanical detail is discussed in our 7 Proven Steps. A well-mounted bag allows for full range of motion in the steering.
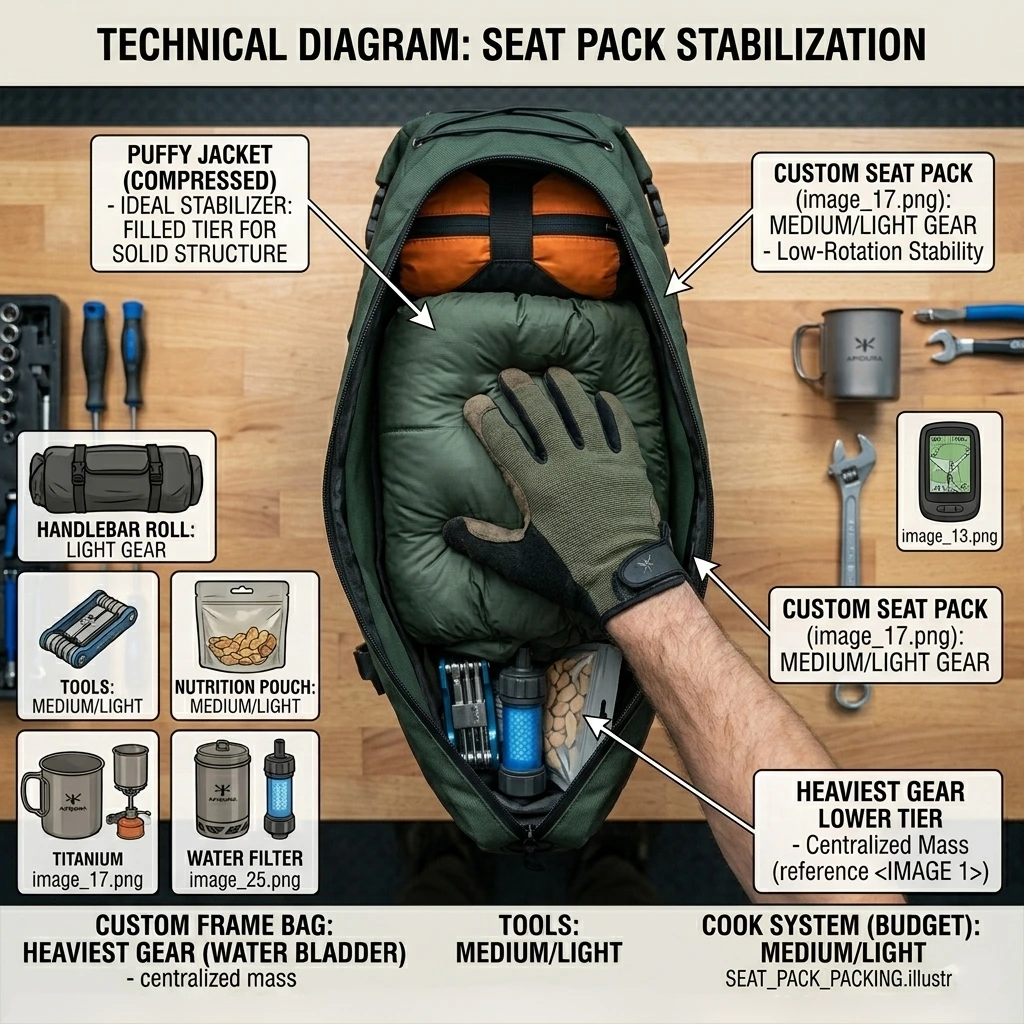
4. The Seat Pack: Managing Bulk and Sway
The seat pack is often the largest bag in the system, typically holding 10 to 17 liters of gear. Because it is cantilevered behind the saddle, it is highly susceptible to lateral swaying, or “tail wag.” Learning how to pack a bikepacking bag in this position involves technical compression to create a rigid, stable load. Only the lightest items should be placed at the very rear of the bag.
Recommendation: Topeak BackLoader (10L/15L)
- Key Features: Built-in air release button for maximum compression, waterproof inner bag, rugged strap system.
- Pros: Affordable price point; the separate inner bag makes campsite transitions fast; very effective compression.
- Cons: Can sway on technical trails if not cinched tight; the outer shell can sag toward the tire.
- Check Price on Amazon: Topeak BackLoader.
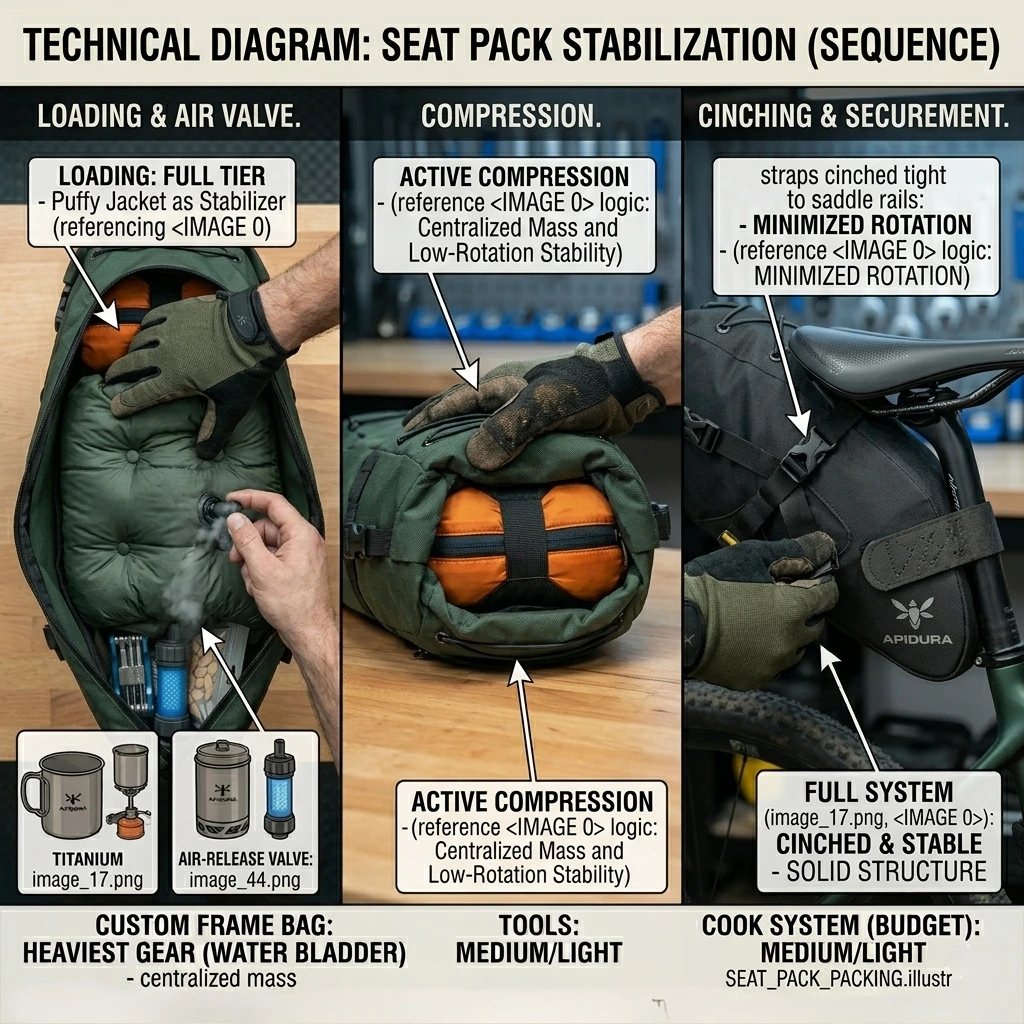
Technical Packing Sequence
Start by stuffing your bulkiest, lightest item (usually the tent body or a spare jacket) into the very end of the bag. Place heavier, mid-weight items like a camp stove or extra food closer to the seat post. This concentrates the weight near the bike’s centerline. Use the external compression straps to eliminate all dead air space. For advice on selecting these bulky items, see our Ultimate Gear List.
5. Accessory Bags: On-the-Fly Access Strategies
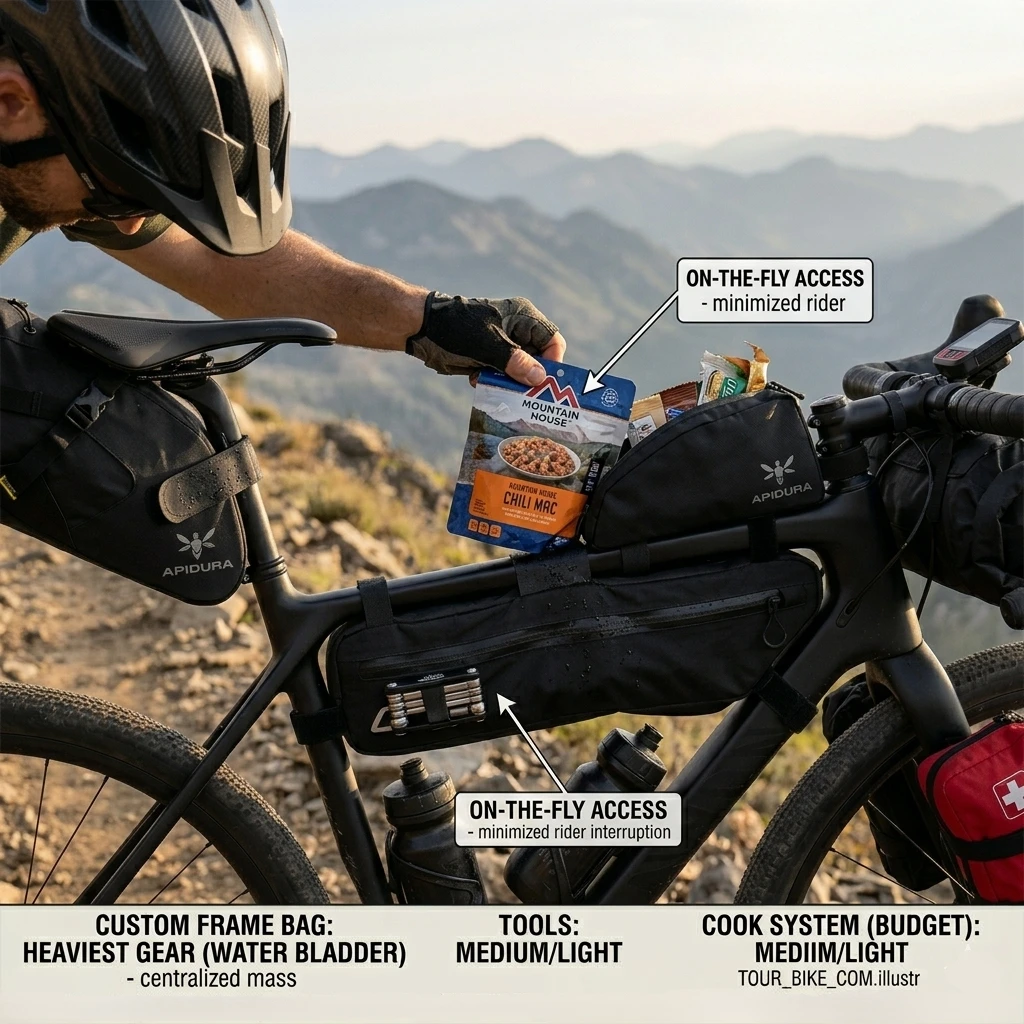
Top-tube bags and stem-mounted “feed bags” are the most convenient components of any packing system. They provide immediate access to items used while the bike is in motion. Understanding how to pack a bikepacking bag for accessibility ensures that the rider maintains a consistent pace without frequent stops. This is essential for managing energy levels on Multi-Day Expeditions.
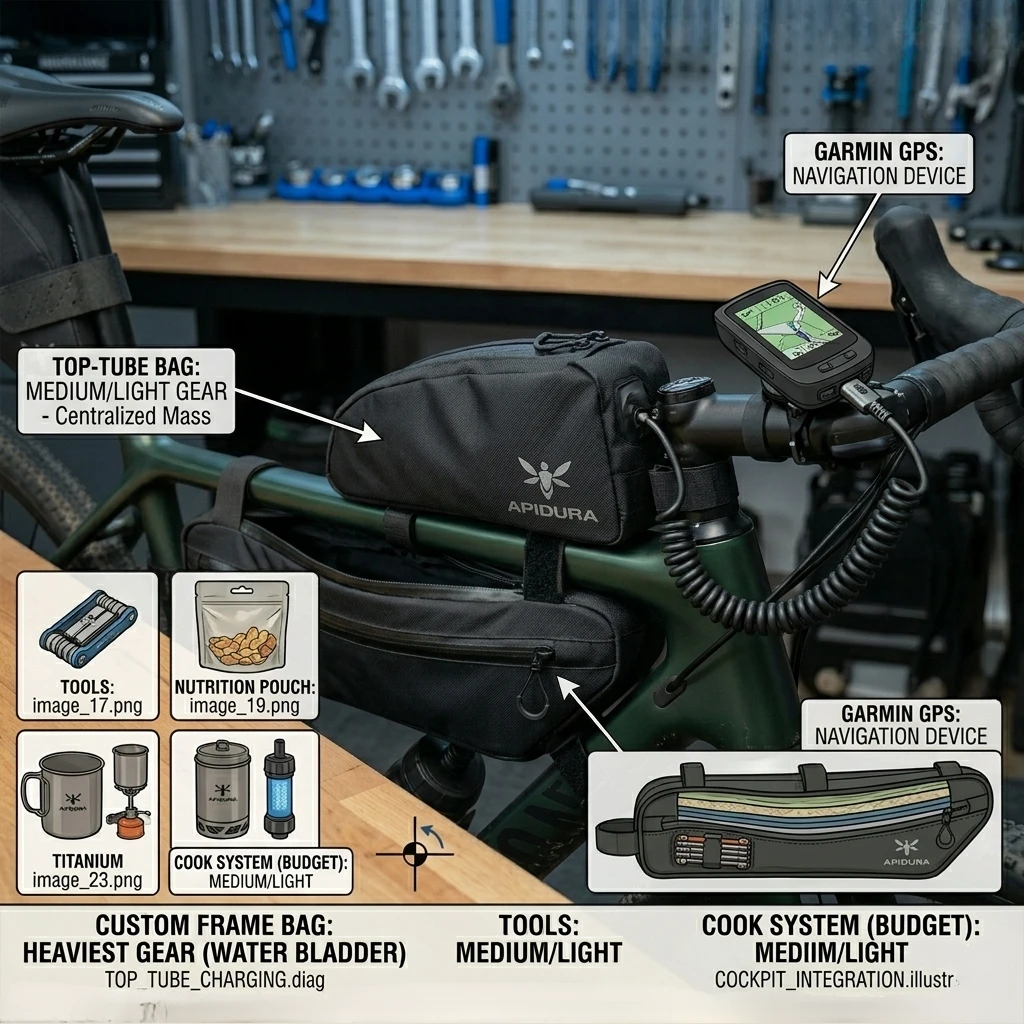
Top-Tube Bags for Electronics
The top-tube bag should be reserved for high-value, sensitive items like a smartphone, external power bank, or a compact camera. These bags sit directly in front of the rider for constant visibility. High-quality models feature cable ports for charging a GPS unit while riding. For power bank recommendations, Nitecore Battery Technology offers the lightest solutions for cyclists. Keeping electronics centralized and protected is a primary logistical goal.
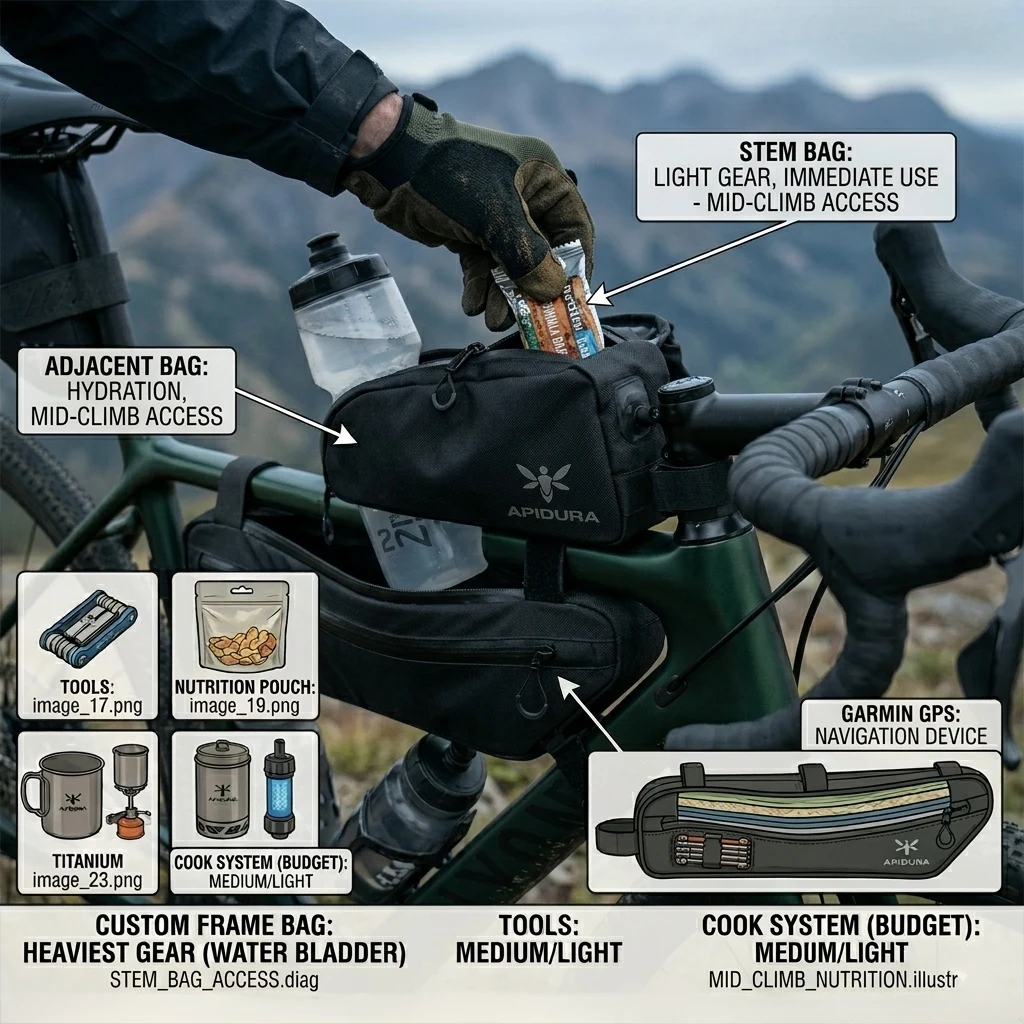
Stem Bags for Hydration and Nutrition
Stem bags, often called “feed bags,” attach to the handlebar and stem. They are ideal for holding a standard 26oz water bottle or a handful of loose snacks. The drawstring closure allows for one-handed operation. This accessibility prevents dehydration, a common risk identified in our Beginner Route Planning guides. Strategic placement of nutrition ensures the rider can “graze” throughout the day to avoid a caloric deficit.
6. Hydration Management: Bladders vs. Bottles
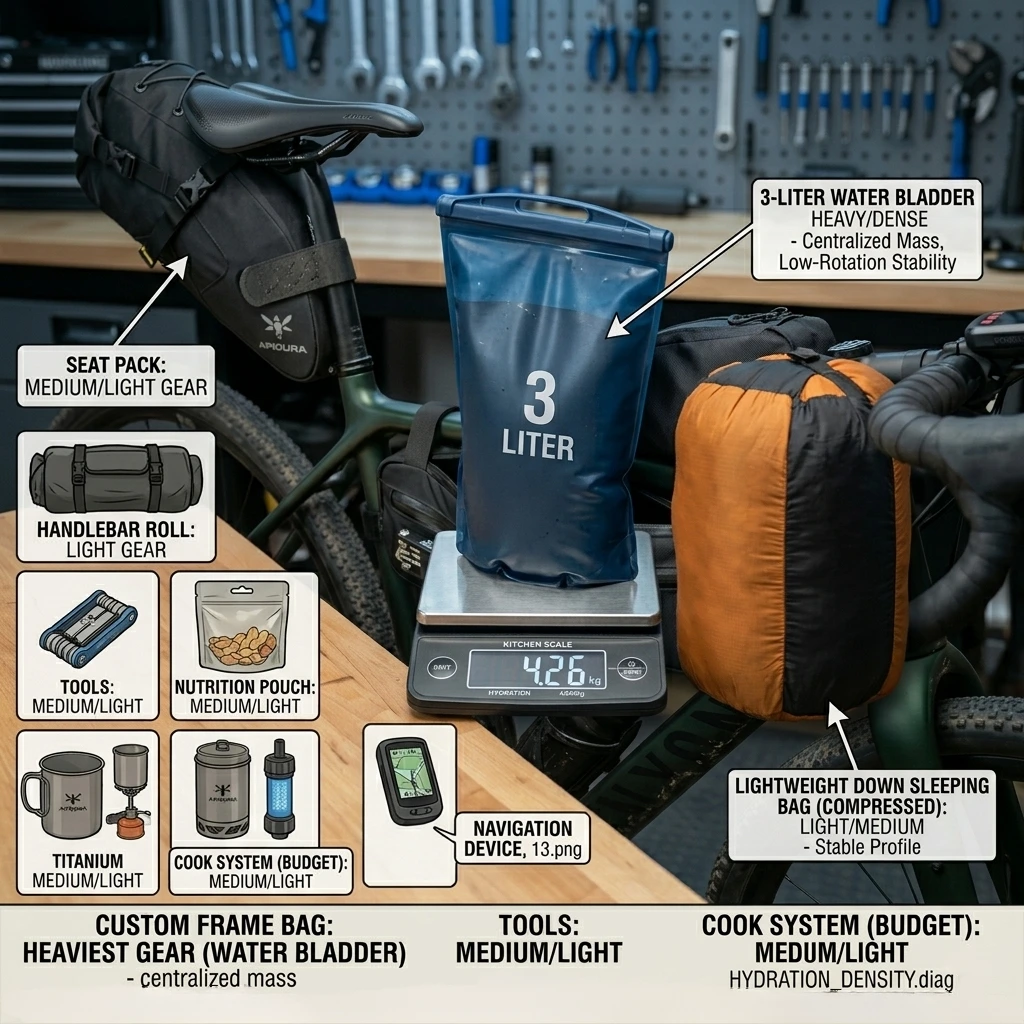
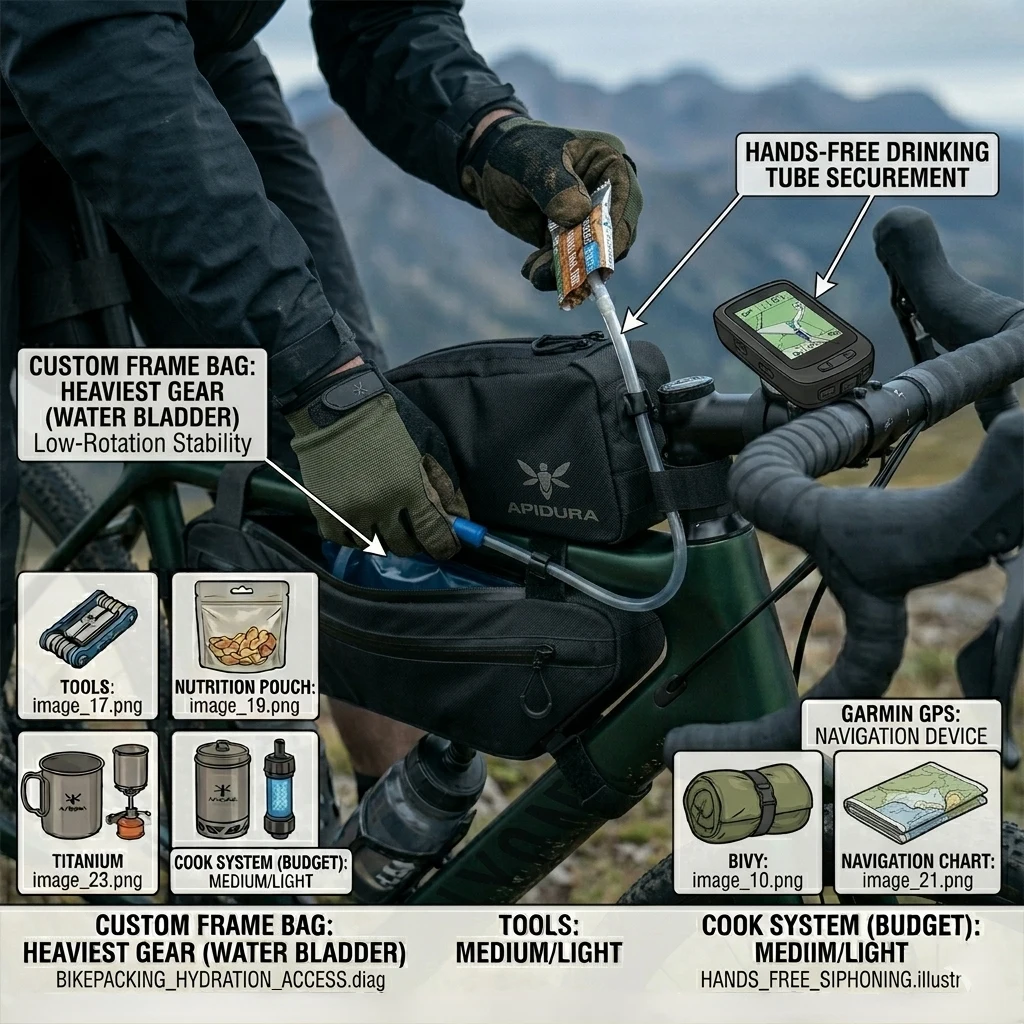
Water is the densest and heaviest item in any packing setup, weighing approximately 2.2 pounds per liter. Decisions on how to pack a bikepacking bag for hydration are dictated by frame space and route distance. Utilizing natural water sources requires a high-quality filtration system . The goal is to carry the minimum amount of water necessary while maintaining a low center of gravity.
The Frame Bladder Strategy
A hydration bladder placed inside the frame bag is the most efficient method for carrying 2 to 4 liters of water. This keeps the heaviest mass centered between the wheels and low on the frame. It also allows the rider to drink through a tube without stopping, improving average speed. Bladders like the Hydrapak Velocity are reinforced to survive the pressure of being packed into tight spaces.
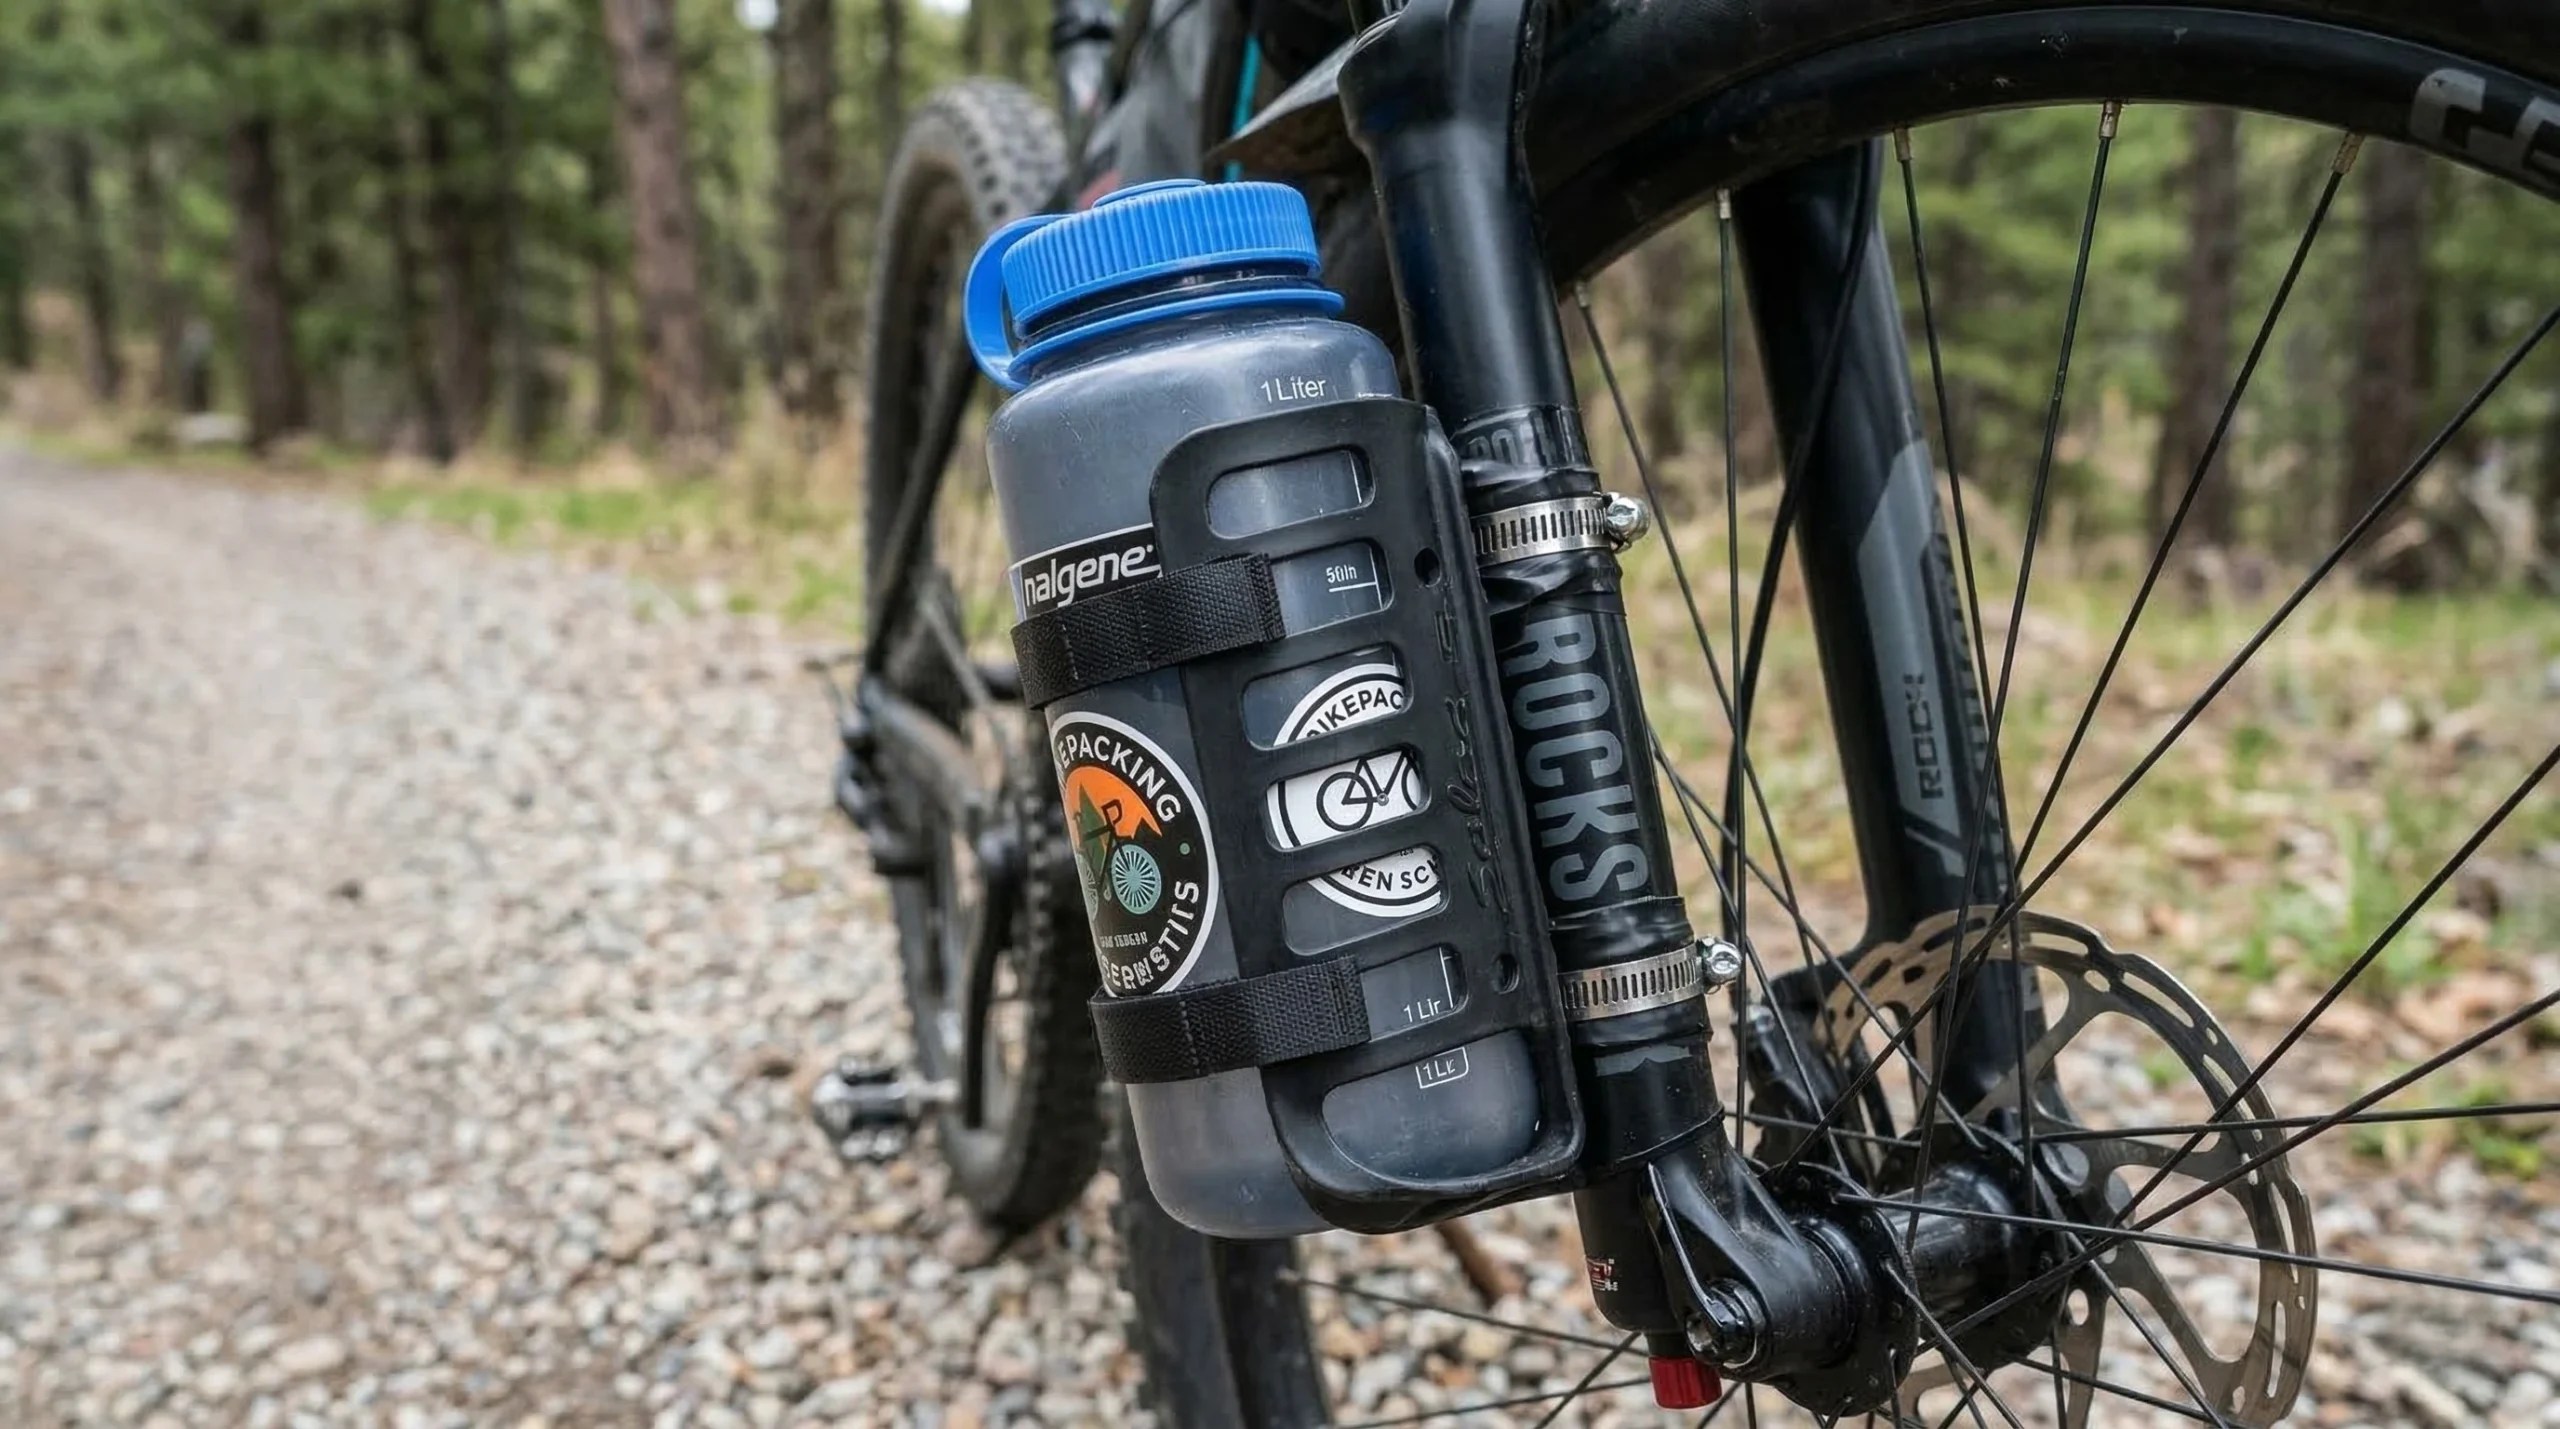
Fork Cages and Auxiliary Storage
If the frame triangle is occupied by gear, “Three-Pack” fork bosses allow for the mounting of specialized cages. These can hold 1-liter bottles or small dry bags. This placement adds weight to the steering axis, so it should be used for mid-weight items only. For technical sizing on these cages, King Cage provides titanium solutions that are virtually indestructible. Proper hydration management is a cornerstone of Backcountry Safety.
7. Organizing the Mechanical Repair Toolkit
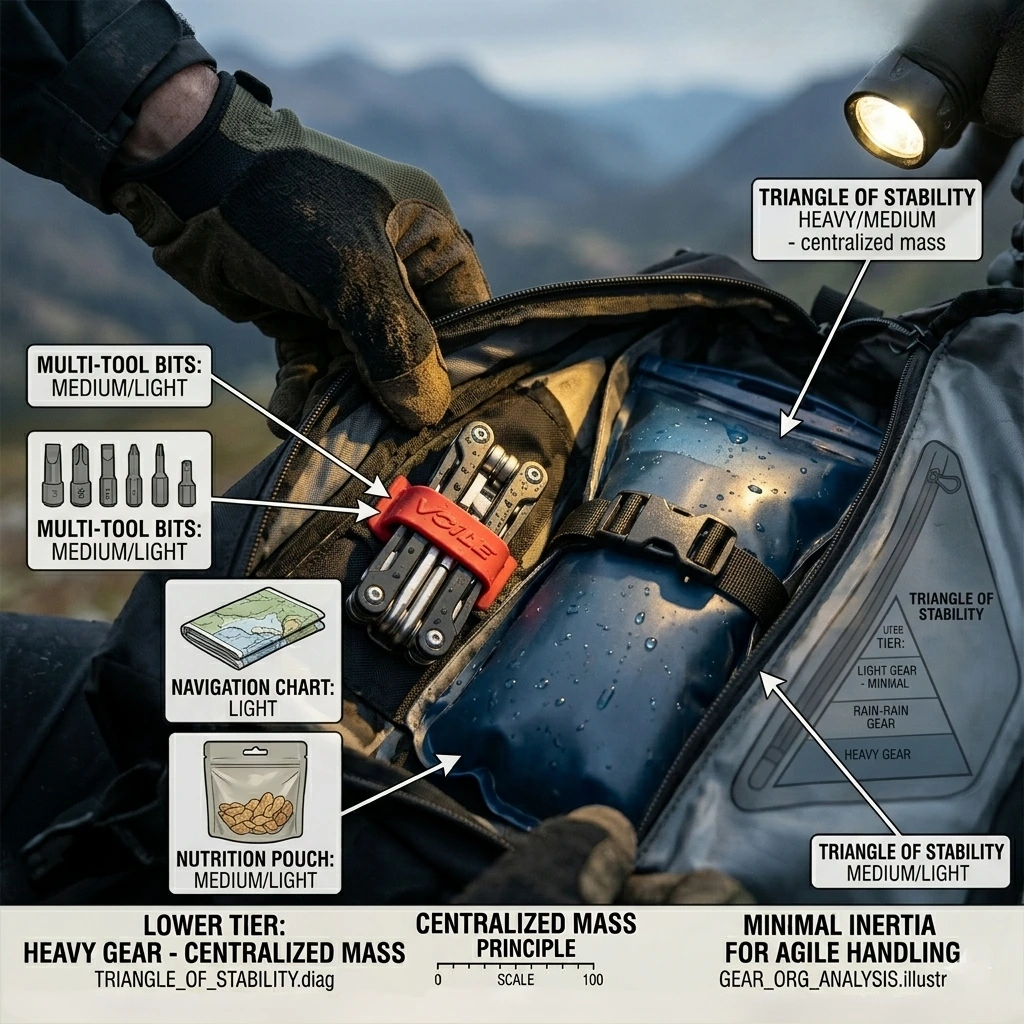
A mechanical failure in a remote wilderness area is a significant safety hazard. The toolkit must be packed for immediate access, usually in the most accessible part of the frame bag or a dedicated tool keg. Knowing how to pack a bikepacking bag for repairs ensures that a 5-minute fix doesn’t turn into a 2-hour delay. For a list of required tools, refer to our Mechanical Readiness documentation.
Separation of Dirty and Clean Tools
Store greasy items like chain lubricant, a spare chain link, and a multi-tool in a separate small pouch. This prevents grease from contaminating your sleeping bag or food supply. High-vibration trails can cause tools to rattle against the frame; wrap the toolkit in a small rag to eliminate noise. This rag also serves as a cleaning tool during a Chain Repair. Self-sufficiency is the ultimate goal of the technical bikepacker.
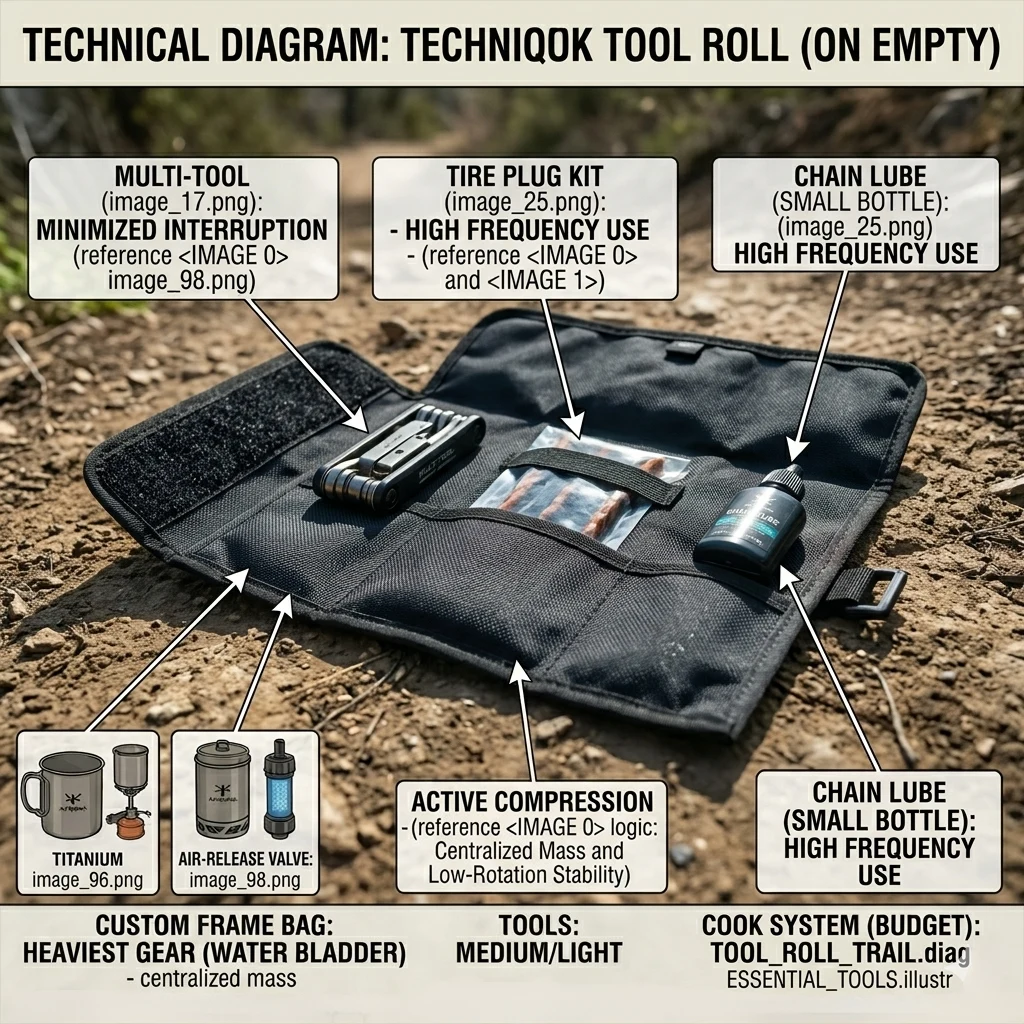
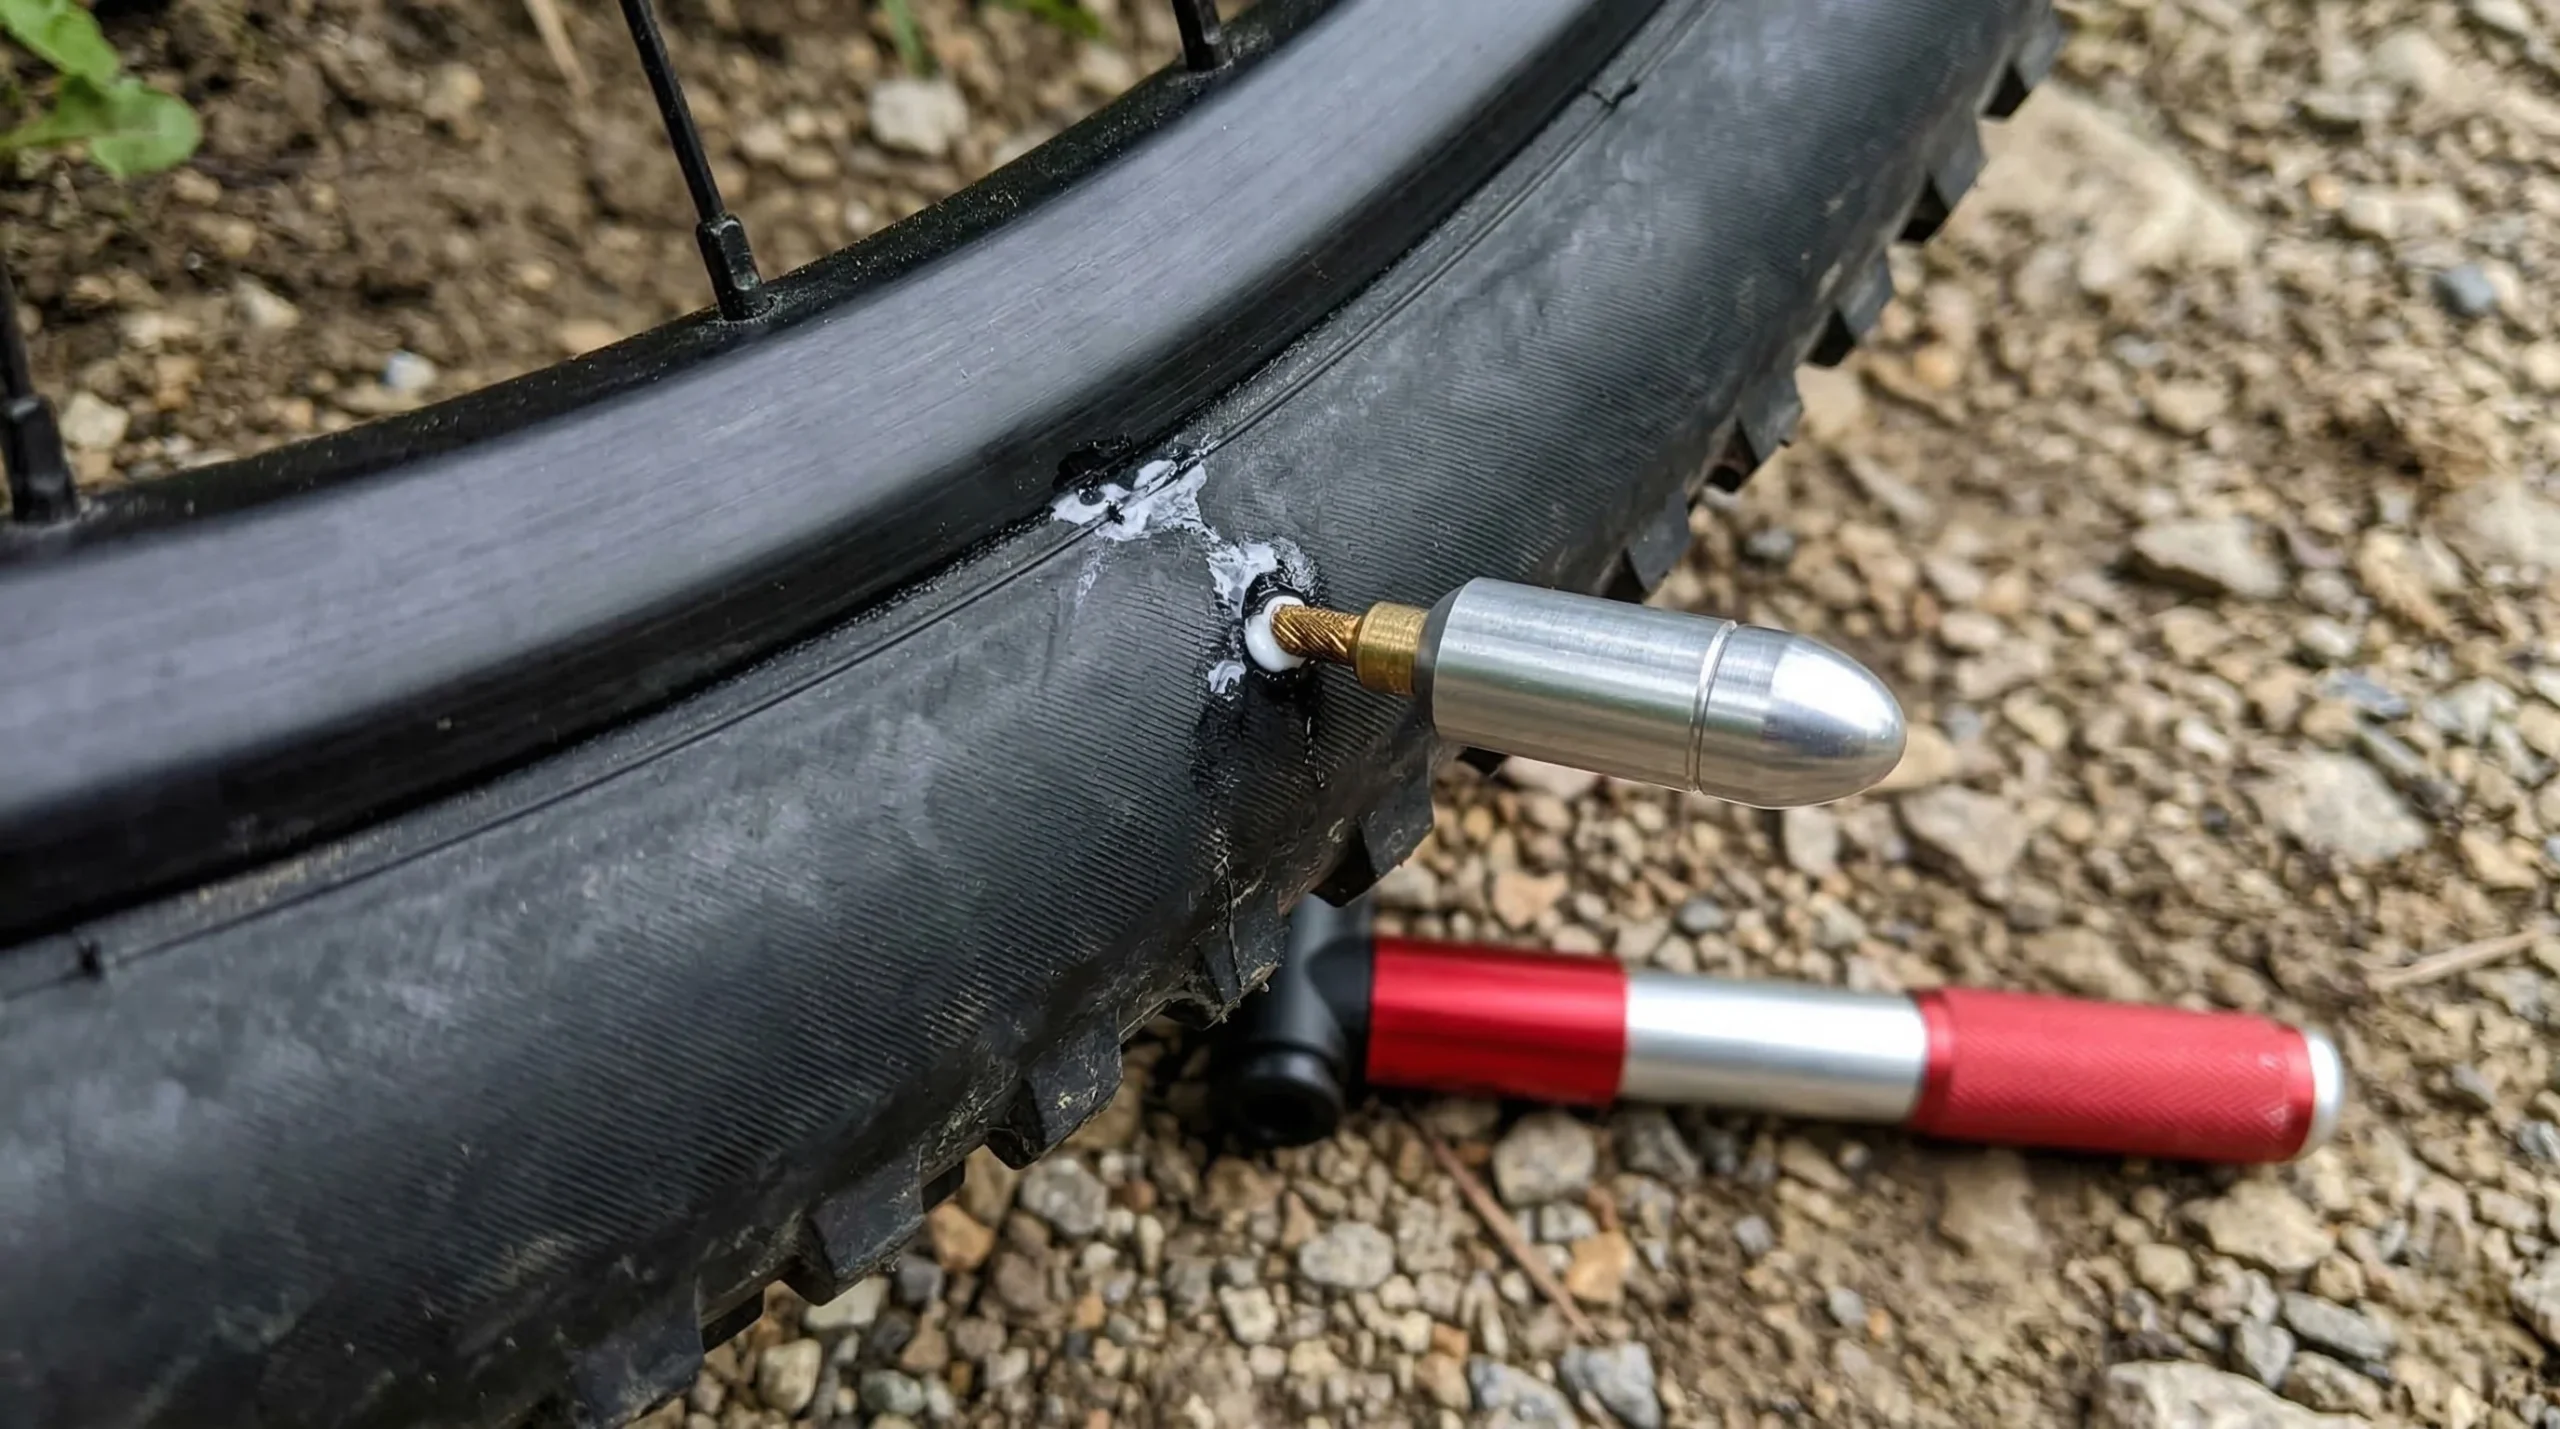
Tire Repair Accessibility
Tubeless tire plugs and a compact pump must be the easiest items to reach. A slashed tire can lose all air pressure in seconds; a fast repair prevents the tire bead from unseating. Carry a spare tube as a secondary backup for catastrophic failures. Mastery of these trailside repairs is a non-negotiable skill for anyone following our 7 Proven Steps. Maintaining the integrity of the bike ensures a successful return to the trailhead.
8. Organizing the “Static Camp” Gear
“Static camp” gear includes items that are only used once the riding day is finished. This includes the tent, sleeping bag, and camp clothing. Because these items are not needed during the day, they should be packed in the least accessible locations, such as the bottom of the seat pack or the center of the handlebar roll. This strategy is a fundamental part of learning how to pack a bikepacking bag for logistical efficiency.
Sleeping Systems and Volume
Down-filled items are incredibly compressible but lose all thermal properties if they become wet. Always use a secondary waterproof liner inside your bags, even if the bags themselves are rated as waterproof. This redundant protection is a core safety protocol for Backcountry Trave. For specific quilt recommendations, our 3-Day Adventure List provides deep technical data.
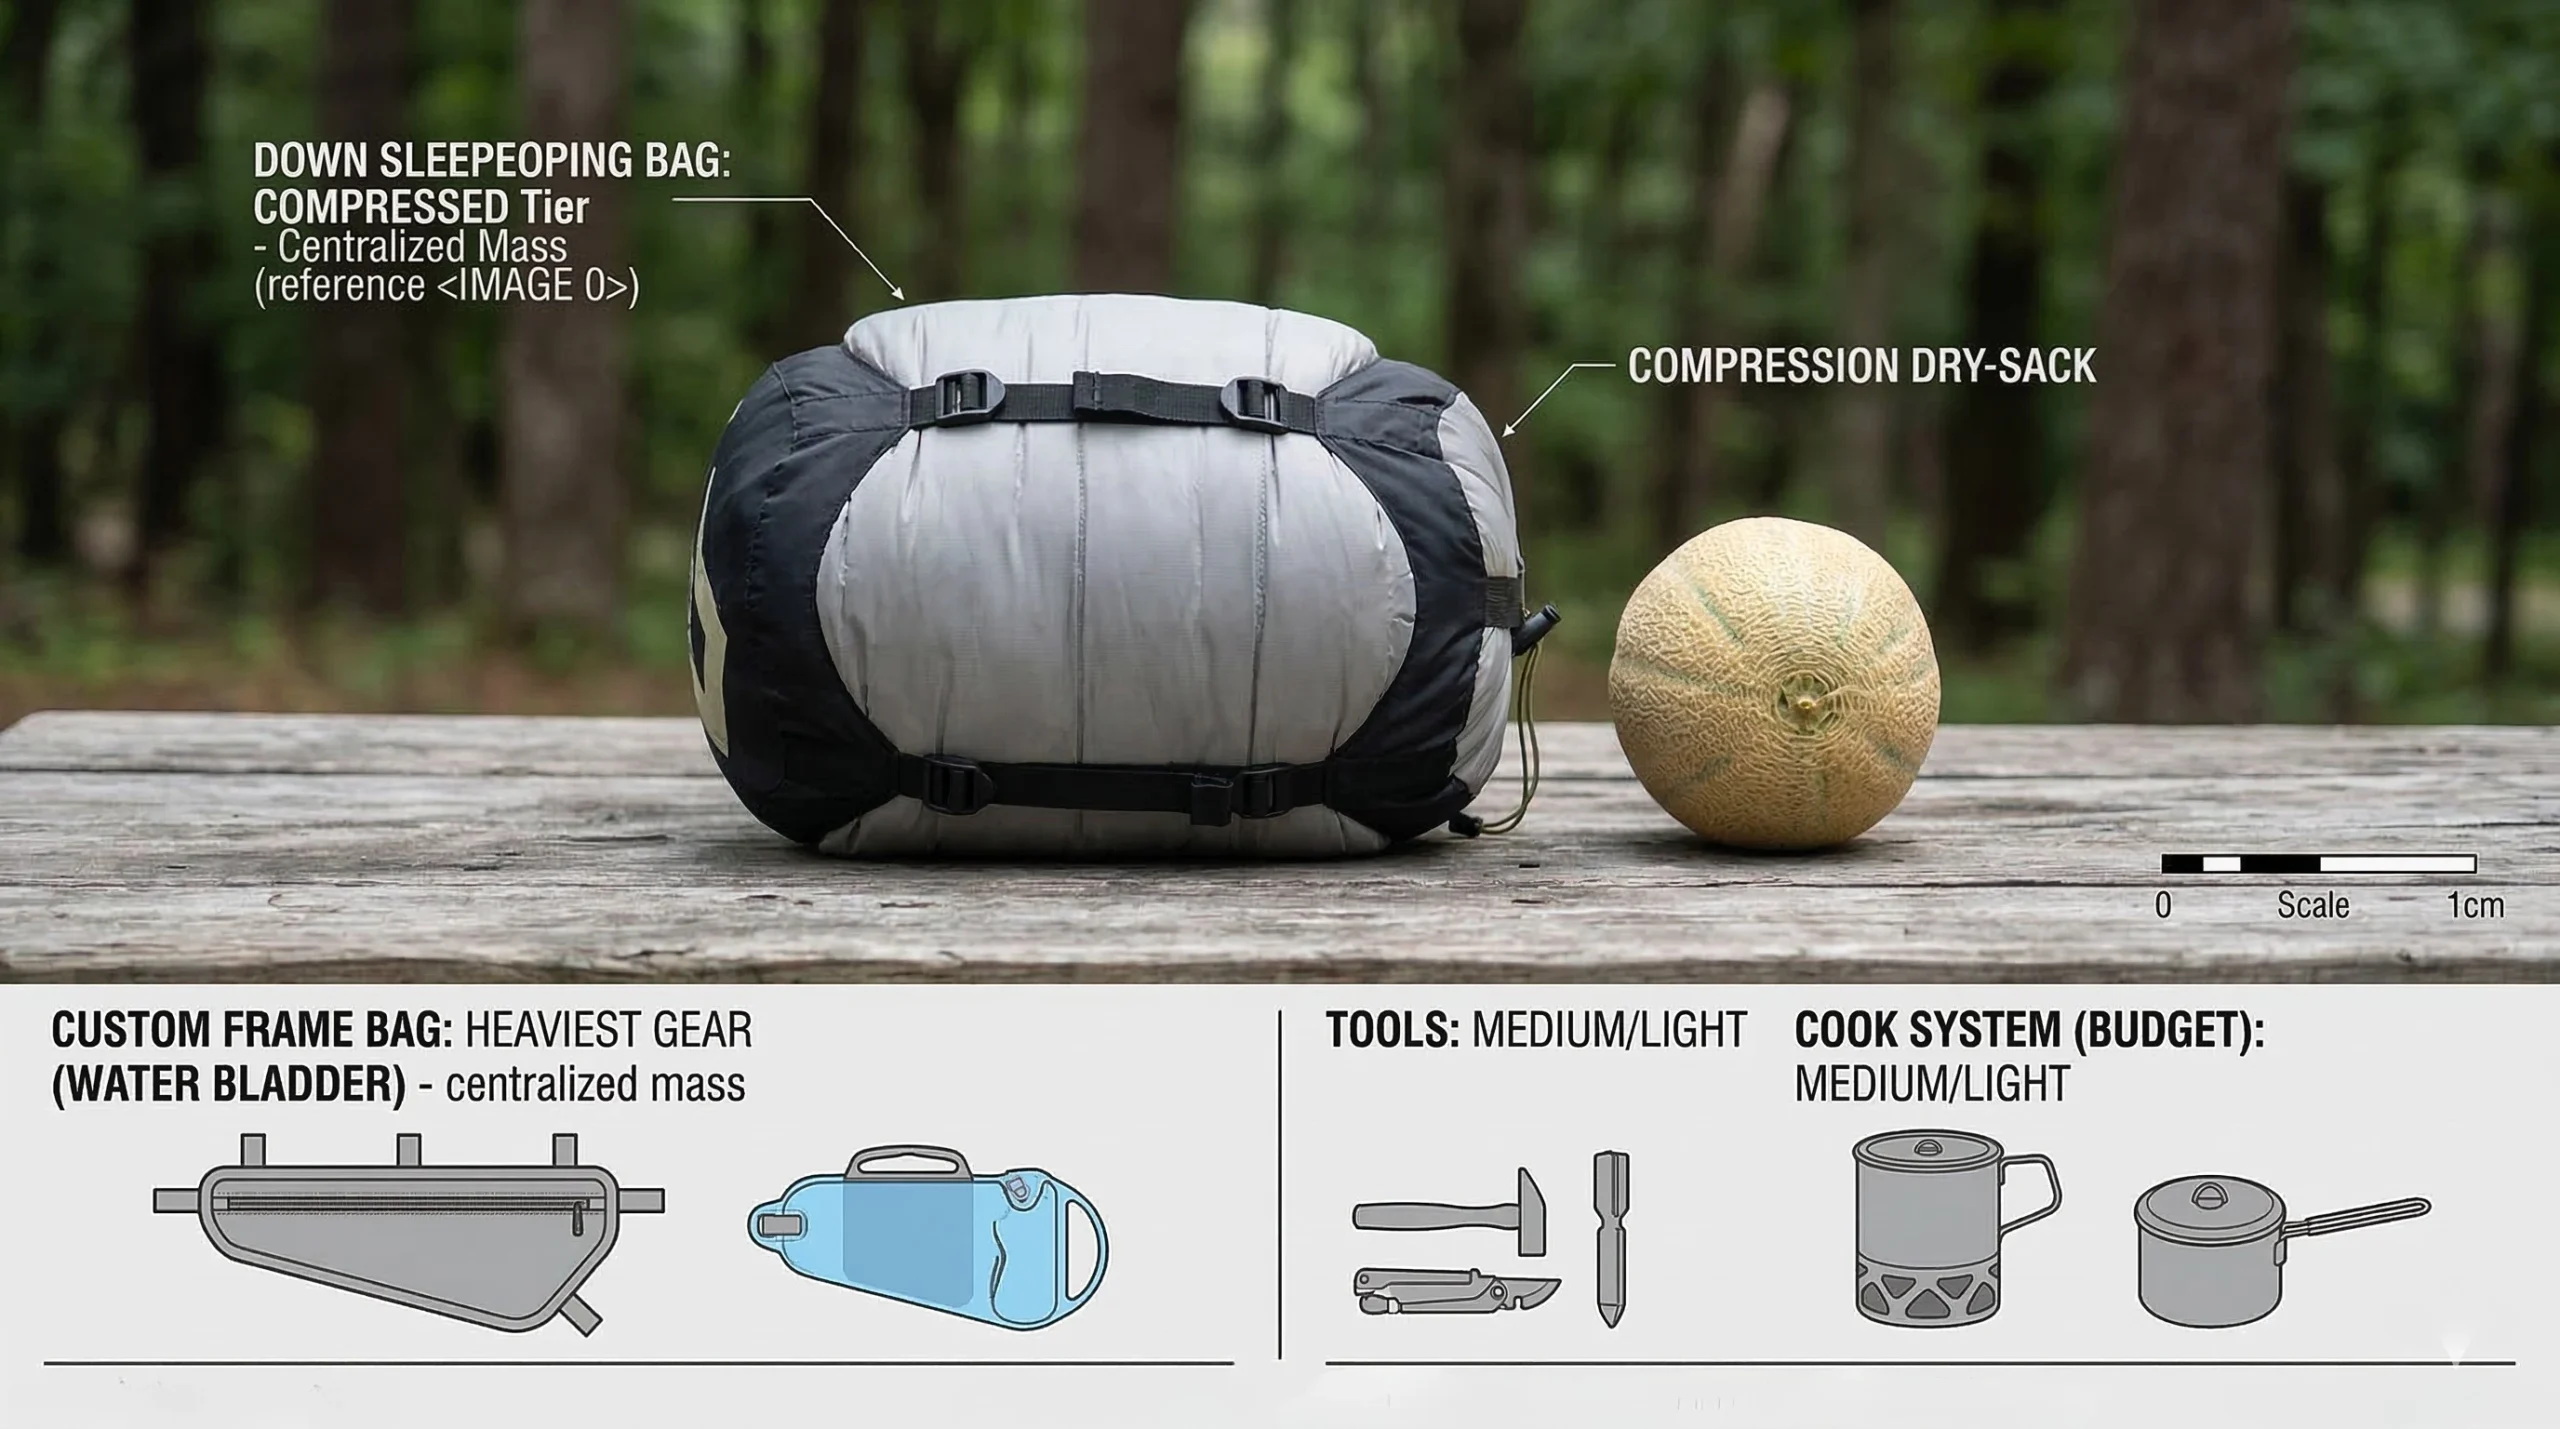
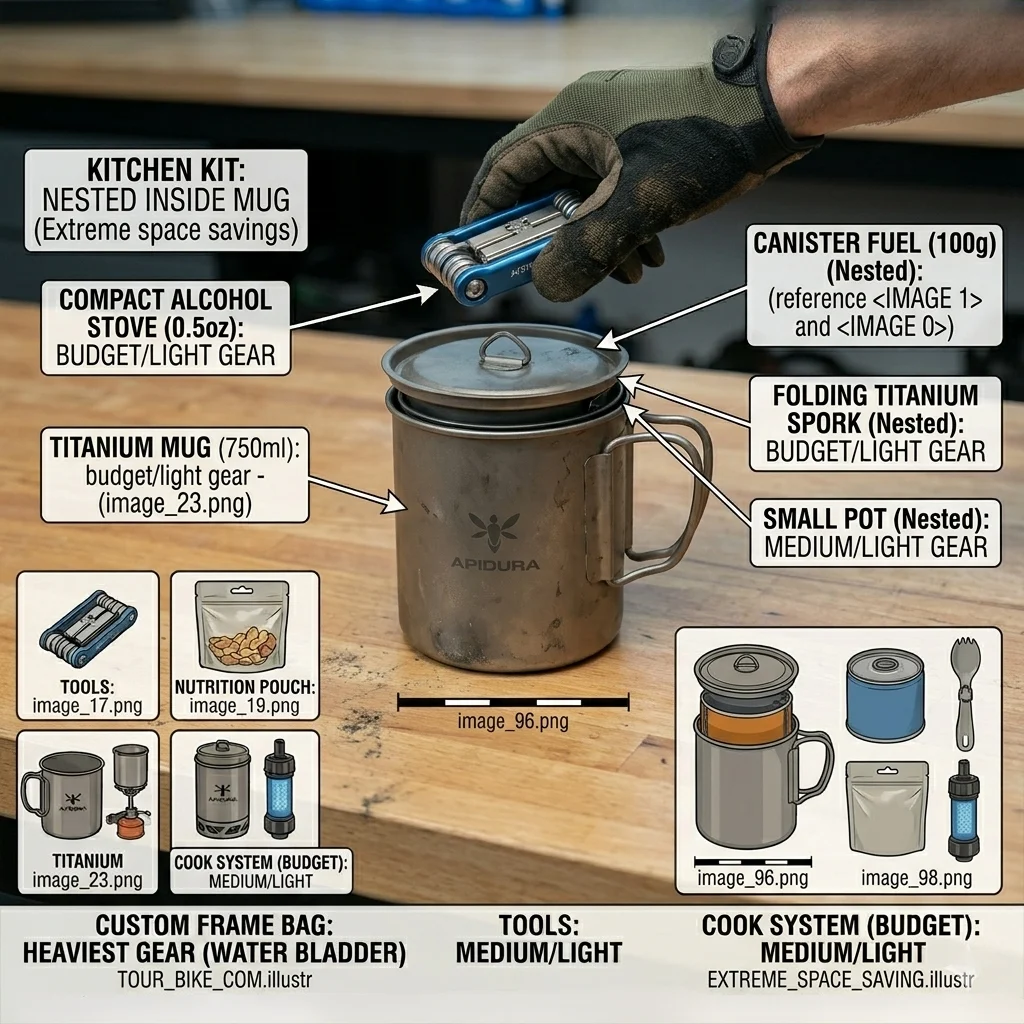
Cooking Gear and Fuel
The camp stove and fuel should be stored together to prevent the fuel canister from leaking onto your clothing. Most bikepackers store their stove inside their titanium mug to save space. Place this kit in the seat pack, close to the seat post for stability. For boiling speed metrics, refer to our review of the MSR PocketRocket 2. Proper fuel management is essential for long-term Wilderness Survival.
9. Handling the “Hike-a-Bike” Challenge
In technical terrain, you will inevitably encounter sections that are too steep or rugged to ride. This is known as “hike-a-bike.” Learning how to pack a bikepacking bag for these scenarios involves ensuring that the bike can be easily lifted and pushed. If the handlebar bag is too wide, it will interfere with your ability to grasp the bars while walking. If the seat pack is too low, it can strike your legs.
Clearance and Mobility
Maintain at least 3 to 4 inches of clearance between the seat pack and the rear tire. This prevents the bag from rubbing when the suspension is compressed during steep descents. Avoid hanging loose items like sandals or mugs from the outside of the bags; these snag on brush and create instability. This “clean profile” is a hallmark of Professional Bikepacking. Mobility is the key to conquering Extreme Gradients.
Lifting Points and Weight Management
Identify the “lifting points” on your frame before you depart. This is usually the underside of the top tube or the junction of the seat tube. A full-frame bag can block these lifting points, requiring you to lift by the handlebars and saddle. This places significant stress on the back and shoulders. For strength conditioning tips to manage these loads, consult our Fitness Conditioning Guide.
10. Environmental Protection: Waterproofing and Dust
Off-road travel exposes your gear to extreme elements, including fine glacial silt, heavy rain, and deep mud. Learning how to pack a bikepacking bag for environmental protection ensures that your sensitive electronics and dry camp gear survive the trip. Redundancy is the only guaranteed method for keeping gear dry in a 3-day storm. Dust is equally destructive, as it can act as sandpaper on your bike’s finish.
Double-Bagging Protocols
Even IP-rated waterproof bags can leak under high pressure or prolonged exposure. Place critical items like your sleeping quilt and electronics into ultralight dry bags before placing them in your main bikepacking bags. This “double-bagging” ensures that even if a main bag fails, your survival gear remains dry. This meticulous approach is mirrored in our Off-Season Maintenance guides.
Managing Mud and Grit
Mud buildup can interfere with bag straps and eventually wear through technical fabrics. After a muddy section, wipe down the contact points of your bags with a damp rag. Check that the tires have enough clearance from the bags to prevent mud from acting as a grinding paste. This mechanical care is vital for anyone following our 7 Proven Steps for Beginners. A clean bike is a reliable bike.
11. Final Shakedown: Testing the System
The final step in mastering how to pack a bikepacking bag is the “shakedown ride.” Never head into the wilderness with a brand-new packing configuration that hasn’t been tested under load. A 10-mile ride on local trails will reveal swaying bags, rubbing tires, or noisy gear. Proactive testing is the difference between a successful adventure and a mechanical nightmare.
The Bounce Test
Lift your fully loaded bike 6 inches off the ground and drop it onto its tires. Listen for rattles, clanks, or shifting weight. A silent bike indicates a secure, stable load. If items move, add Voile Straps to secure the load further. This test is a standard protocol used by Backcountry Guides to ensure student readiness.
Dynamic Handling Check
Take the loaded bike through a series of sharp turns and emergency stops. Observe how the weight influences the braking distance and the steering speed. If the bike feels “heavy” in the front, move dense items from the handlebar roll to the frame bag. This refinement process is how you achieve the Better Bike Handling promised in this guide. Mastering the balance of your machine is a lifelong skill.
Conclusion: Mastery Through Deliberate Packing
Mastering how to pack a bikepacking bag is a technical milestone that transforms the riding experience. By adhering to the Heavy-Low-Center rule (Section 1), utilizing the frame triangle for density (Section 2), and prioritizing accessibility for active gear (Section 5), any rider can achieve superior bike handling. The success of a 3-day adventure is not measured by speed, but by the level of self-sufficiency and stability achieved on the trail.
Remember that packing is an iterative process. Every trip will reveal new ways to optimize your gear for Better Trail Management. Keep your Technical Conditioning high and your gear maintained. As you progress from local gravel roads to remote alpine singletrack, your confidence in your machine’s balance will become your greatest asset.
The trail is waiting, and with a perfectly balanced bike, you are ready to conquer it. Treat the environment with respect, pack with intention, and enjoy the unparalleled freedom of off-road travel. The transition to expert packing is a path paved with preparation and a passion for the outdoors. Step out with a plan, respect the physics of your load, and embrace the unique liberation of the backcountry.
Discover more from Maive Verse
Subscribe to get the latest posts sent to your email.