Master how to read a ski resort trail map with our guide. Understand 7 essential symbols to navigate safely and find the best terrain for you.

Table of Contents
Introduction: The Map as Your Primary Survival Tool
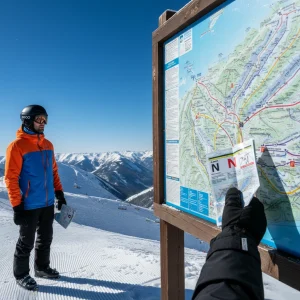
Learning how to read a ski resort trail map is the most important non-technical skill a skier can acquire. A trail map is a two-dimensional representation of a massive, three-dimensional environment that can change instantly due to weather. For those on their First Ski Day, a map provides the necessary context to stay within safe boundaries. Without the ability to interpret these symbols, a skier risks wandering onto terrain that far exceeds their physical capabilities.
- Spatial Awareness: Maps allow you to visualize the relationship between different peaks and base areas.
- Safety Protocol: Understanding boundaries prevents accidental entry into unpatrolled or dangerous zones.
- Efficiency: A well-read map helps you plan a route that maximizes your time on the snow and minimizes time in lift lines.
- Terrain Matching: Maps are the key to finding runs that align with your current Ski Slope Difficulty level.
- Emergency Readiness: Knowing where the nearest aid station is located can be life-saving in the event of an injury.
- Equipment Context: Maps often indicate where specialized gear is needed, such as in high-alpine bowls or glades.
Navigating a mountain requires more than just following the person in front of you. It requires a proactive understanding of where you are and where you are going. This guide identifies seven critical keys to read a ski resort trail map with total confidence. Mastering these features is as vital as following a Complete Winter Skiing Equipment Guide 2026.
1. Decoding Difficulty Symbols and Color Codes
The most recognizable feature when you read a ski resort trail map is the color-coded system of circles, squares, and diamonds. These symbols provide an immediate visual cue regarding the average steepness and grooming status of a trail.
- The Green Circle (Beginner):
- Profile: These are the flattest trails on the mountain, designed for learning foundational movements.
- Adjustment: Practice Parallel Turn Progression without excessive speed.
- Consistency: These runs are almost always groomed to provide a smooth, predictable surface.
- The Blue Square (Intermediate):
- Profile: Slightly steeper gradients that require confident speed control.
- Versatility: These runs often include small rolling terrain or the occasional un-groomed section.
- Equipment: Ensure your Ski Edge Control is sharp before attempting these.
- The Black Diamond (Expert):
- Profile: Steep pitches, often exceeding 40% grade, frequently left in their natural state.
- Hazards: Expect moguls, icy patches, and narrow “chutes” that require advanced technique.
- Conditioning: These runs demand the stamina found in a Ski Fitness 8-Week Plan.
- Double Black Diamond (Extreme):
- Profile: The highest level of difficulty, often involving mandatory air, cliffs, or extremely tight trees.
- Commitment: Only for those who have mastered Every Snow Condition from ice to crud.
It is important to remember that these ratings are relative to each specific resort. A blue square at a large Rocky Mountain resort might be as difficult as a black diamond at a smaller coastal hill. For a history of this standardization, consult the National Ski Areas Association (NSAA). Always check the “local” difficulty scale by skiing a known trail first.
2. Understanding Lift Types and Map Designations
Lifts are the “highways” of the mountain, and knowing which one to take is essential to read a ski resort trail map effectively. Different line styles on the map represent different mechanical lift systems.
- Gondolas and Trams:
- Map Symbol: Often depicted as a double line with cabin icons.
- Benefit: Enclosed cabins provide protection from the wind, allowing you to stay warm in your Best Ski Jackets 2026.
- Usage: Usually the primary transport from the base to the summit.
- Chairlifts (High-Speed vs. Fixed Grip):
- Map Symbol: Solid lines with small chair icons.
- High-Speed: Often marked with a lightning bolt or “Express” label; these move quickly and slow down for loading.
- Fixed Grip: These move at a constant, slower speed; knowing the difference is key to managing slope difficulty and time.
- Surface Lifts (T-Bars, Pomas, Carpets):
- Map Symbol: Often a dotted or dashed line.
- Function: These keep the skier on the snow during the ascent; common in beginner areas or high-alpine ridges.
- Difficulty: T-bars require significant balance; refer to our Ski Fitness Guide for core stability tips.
Lifts are also named, which helps with communication if you become separated from your group. When you read a ski resort trail map, look for the lift’s base and summit elevation. This information helps you understand how much vertical descent you will face. Authority resources like Ski Magazine’s Lift Guide explain how lift capacity affects trail congestion.
3. Identifying Boundaries, Ropes, and Out-of-Bounds Markers
Safety is the primary reason to learn how to read a ski resort trail map. Mountains have defined limits, and crossing them can lead to dangerous situations or the loss of skiing privileges.
- Ski Area Boundary:
- Symbol: Typically a bold, dashed, or serrated red/orange line.
- Meaning: Once you cross this line, you are no longer in a patrolled area.
- Danger: Hidden rocks, avalanches, and no rescue services are the primary risks.
- Closed Trails:
- Symbol: Often marked with a “Closed” sign icon or a red “X” across the run.
- Reasoning: Thin cover, dangerous wind, or ongoing avalanche mitigation.
- Gates and Access Points:
- Symbol: A small circle or gap in the boundary line.
- Usage: These are the only legal places to exit the resort into the Backcountry.
- Equipment: These areas often require beacons, shovels, and probes, which should be kept in a high-quality Ski Bag during travel.
Understanding boundaries is especially critical when skiing in powder. Untracked snow often exists just outside the ropes, but the risks are significantly higher. If you see a trail marked with a “Skull and Crossbones,” it indicates extreme terrain that should only be tackled by experts. Organizations like teton gravity research emphasize that respect for boundaries is the mark of a pro.
4. Reading Terrain Features: Glades, Bowls, and Parks
Modern maps use specific textures and icons to indicate the type of terrain you will encounter, which is a vital part of learning to read a ski resort trail map.
- Glades (Tree Skiing):
- Icon: Groups of small evergreen tree symbols.
- Experience: These runs involve navigating between trees; they require the quick reflexes taught in Beginner Mogul Guide.
- Open Bowls:
- Icon: Large, white, featureless areas, often at the top of the map.
- Condition: Highly susceptible to Flat Light; ensure your goggles are correct for these zones.
- Terrain Parks:
- Icon: Often a stylized “P” or an orange oval.
- Features: Contains jumps, rails, and boxes; always read the “Park Rules” signs before entering.
- Mogul Fields:
- Icon: Stylized bumps or wavy patterns.
- Technique: These require the specific absorption and extension movements covered in mogul skiing guide.
Terrain icons help you avoid surprises. If you are an intermediate skier who dislikes bumps, avoiding trails with “wavy” icons is a smart strategy. When you read a ski resort trail map, these textures provide a sensory preview of your run. Specialized terrain often demands specialized Ski Poles with powder baskets.
5. Locating Lodges, Aid Stations, and Safety Zones
A trail map is also a map of the resort’s infrastructure. Knowing where these “safety zones” are located is a mandatory part of learning to read a ski resort trail map.
- Ski Patrol/First Aid:
- Icon: A red cross or a red building.
- Importance: This is where you go for medical assistance or to report an injury on the hill.
- Lodges and Warming Huts:
- Icon: A small house or fork/knife symbol.
- Function: Essential for refueling and preventing cold-related fatigue. Ensure your ski jackets are hung properly to dry in these areas.
- Meeting Points:
- Icon: Usually a large star or a numbered circle.
- Usage: Designated areas to regroup with your party if you get separated.
- Restrooms:
- Icon: Standard male/female silhouettes; these are often spaced out along the mountain, not just at the base.
Being able to find the nearest lodge is critical if conditions suddenly turn toward flat light and fog. Many beginners underestimate how quickly energy is depleted by the cold. When you read a ski resort trail map, take note of mid-mountain lodges, which save you from having to ski all the way to the base for a break. High-altitude safety protocols are further detailed by the National Ski Patrol.
6. Practical Navigation Tips for On-Mountain Success
Once you can read a ski resort trail map, you must apply that knowledge to real-world navigation. Digital and physical maps both have their advantages in the alpine environment.
- Paper vs. Digital:
- Paper: Reliable and doesn’t require battery power; however, it can be difficult to read in the wind.
- Digital: Often includes GPS tracking and real-time lift status; however, cold weather drains smartphone batteries quickly.
- Protection: Keep your electronics in the “media pocket” of your ski jackets to preserve battery.
- Orientation Methods:
- The Sun: Use the sun’s position to help orient the map; most maps are “top-down,” with the summit at the top.
- Reference Points: Use prominent peaks or the base village as fixed points to determine your current location.
- Check Frequently:
- Tip: Don’t wait until you are lost to check the map. Look at it at the top of every lift ride.
- Progression: As you move to more difficult terrain, your reliance on the map will increase.
Effective navigation also involves knowing your limits when Snowshoeing or exploring off-piste trails. Many maps have a “North Arrow,” which is critical if you are navigating without the help of marked signs. For those using digital tools, apps like Fatmap provide 3D high-resolution terrain data. Always carry a physical backup, especially when traveling with gear in a Hard-Shell Ski Bag to remote areas.
Conclusion: Navigation as the Foundation of Confidence
Mastering the ability to read a ski resort trail map transforms your mountain experience from one of reaction to one of intention. By understanding difficulty symbols, lift types, and boundary markers, you ensure that every run is within your skill level. Confidence on the snow starts with knowing exactly where you are and how to get back to the lodge. By prioritizing safety zones and aid stations, you create a safety net for yourself and your group.
Remember that a map is only as good as the technique you use to descend the trails. Keep your Ski Fitness high and continue to practice your Edge Control. As you progress from green circles to black diamonds, the map becomes a guide to your own growth as an athlete. High-quality optics, like the Best Ski Goggles 2026, will help you see the physical signs on the mountain that confirm what the map tells you.
The mountain is waiting, and with your map skills refined, you are ready to explore it safely. Treat the map as a trusted partner, and it will reward you with endless adventures across every peak. The transition from beginner to expert is a path paved with preparation and spatial awareness. Step onto the snow with a plan, respect the boundaries, and enjoy the unparalleled beauty of the alpine landscape.
Discover more from Maive Verse
Subscribe to get the latest posts sent to your email.