This hiking for beginners guide covers gear, trail selection, safety tips & navigation — everything you need to hit the trail confidently in 2026.

Table of Contents
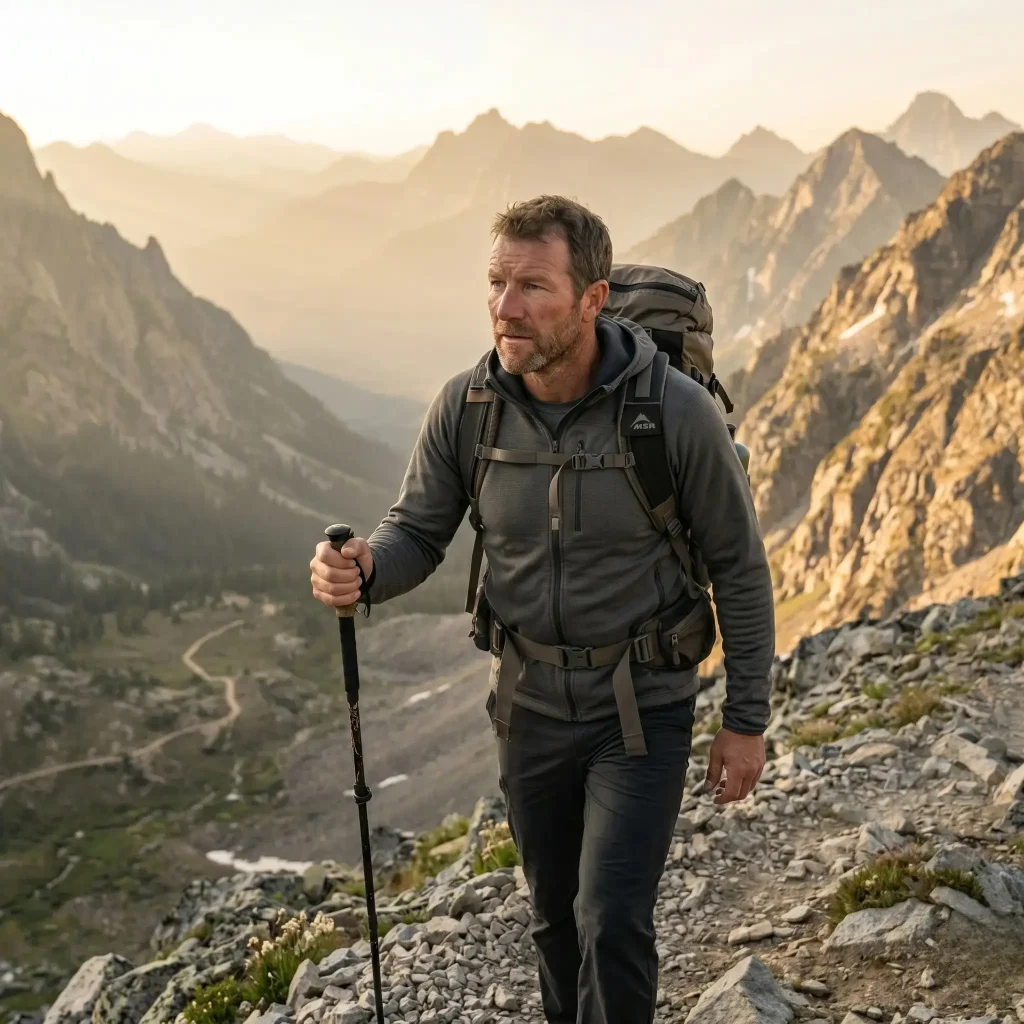
Hiking for beginners seems simple enough on paper: pick a trail, lace up your shoes, walk into the woods. That is exactly what most beginners think before the trail delivers its first real lesson.
Picture this: jeans and canvas sneakers, no map, no water, and zero awareness that “moderate difficulty” actually means something. Three hours in, there’s a rocky slope that was absolutely not on the trailhead sign, a dead phone, and a single crumbled granola bar at the bottom of a bag. Making it back feels like an unlikely victory. But somewhere in that miserable, humbling experience — that is exactly where the obsession with hiking tends to begin.
That is the thing about hiking for beginners: it rewards preparation and punishes overconfidence, usually at the same time. This hiking for beginners guide covers everything you need before that first real trail: the right hiking for beginners gear, how to pick a trail that will not break you, how to stay safe out there, and how to turn one nervous weekend hike into a skill you keep building on for years.
Disclosure: This post contains affiliate links. As an Amazon Associate, we earn from qualifying purchases.
A. Why Start Hiking? The Benefits That Actually Matter
Knowing the real reasons hiking is worth doing is what gets you out the door on a cold Saturday morning when the couch has a serious competitive advantage. Here is the honest case for it.
1. It Resets Your Mental State in a Way Nothing Else Does
Stanford researchers found that 90 minutes walking in nature significantly reduced activity in the brain region tied to repetitive negative thoughts, a core driver of anxiety and depression. They ran the same test in an urban setting. Nature won by a wide margin.
Coming back from a weekend trail feeling like your brain was reset is one of the biggest reasons people keep hiking. The mental noise from emails, social media, and daily stress shuts off fast on the trail. It kicks in sooner than you expect, even on short hikes.
2. It Is Real Fitness That Does Not Feel Like the Gym
Hiking for beginners is essentially interval training disguised as a walk. Uphill sections push your heart rate into cardio zones; flatter stretches let you recover. A moderate 5-mile hike with 1,000 feet of elevation gain burns 400 to 700 calories depending on your weight and pack load, and it builds leg strength, hip stability, and cardiovascular endurance simultaneously.
The difference from a treadmill is that on hiking for beginners trails, you are too busy watching the terrain to notice you are working out. By the time your legs are tired, you are three miles from the car and completely absorbed in something other than counting reps.
3. It Is Cheap to Start
For hiking for beginners on a budget, a decent pair of hiking shoes and a simple daypack are genuinely the only gear requirements for your first hikes. Most state park and national forest trails are free or charge a modest day-use fee. You do not need GPS devices, trekking poles, or a wardrobe overhaul to start. Add gear gradually as you figure out what you actually use.
4. The Skill Ceiling Is Basically Unlimited
Easy day trails within an hour of home can keep you busy for years without repeating the same one twice. Or you can work toward summit routes, long ridgelines, multi-day backpacking, and eventually treks abroad. Hiking scales with you. There is no ceiling.
B. Types of Hiking: Finding Your Starting Point
Before picking a trail, it helps to understand the different types of hiking. What you pack, how you plan, and what to expect from the day all depend on which kind of hike you are actually doing.

1. Day Hikes: Where Everyone Should Start
A day hike means you leave your car, walk a trail, and return the same day. No overnight gear, no backcountry permits, no sleeping on the ground. If you ever want to try a night out, check out our camping for beginners guide first. These range from half-mile flat nature loops to challenging 15-mile ridge routes with serious elevation. For your first 10 hikes, easy to moderate trails under 6 miles is the right target for hiking for beginners.
Best for: Everyone. This is where you build skills, test gear, and figure out how much you genuinely enjoy being outdoors before investing further.
2. Out-and-Back vs. Loop Trails
Out-and-Back: You walk to a destination and retrace your steps back to the trailhead. The biggest advantage for beginners is that you always know exactly where you are. If something goes wrong or you run low on water, you simply turn around.
Loop Trails: You complete a circuit and end where you started. More interesting scenery, but harder to navigate if you lose your bearings. Save loops until you have a few out-and-back hikes under your belt.
3. Overnight and Backpacking Hikes
Everything you need to sleep on the trail goes in your pack. This is an entirely separate discipline with its own gear requirements, navigation demands, and physical preparation. Do not attempt an overnight trip until you have completed at least 10 to 15 comfortable day hikes on AllTrails. The skills overlap, but the stakes are very different.
Best for: Experienced day hikers ready to push further. It is absolutely worth the wait.
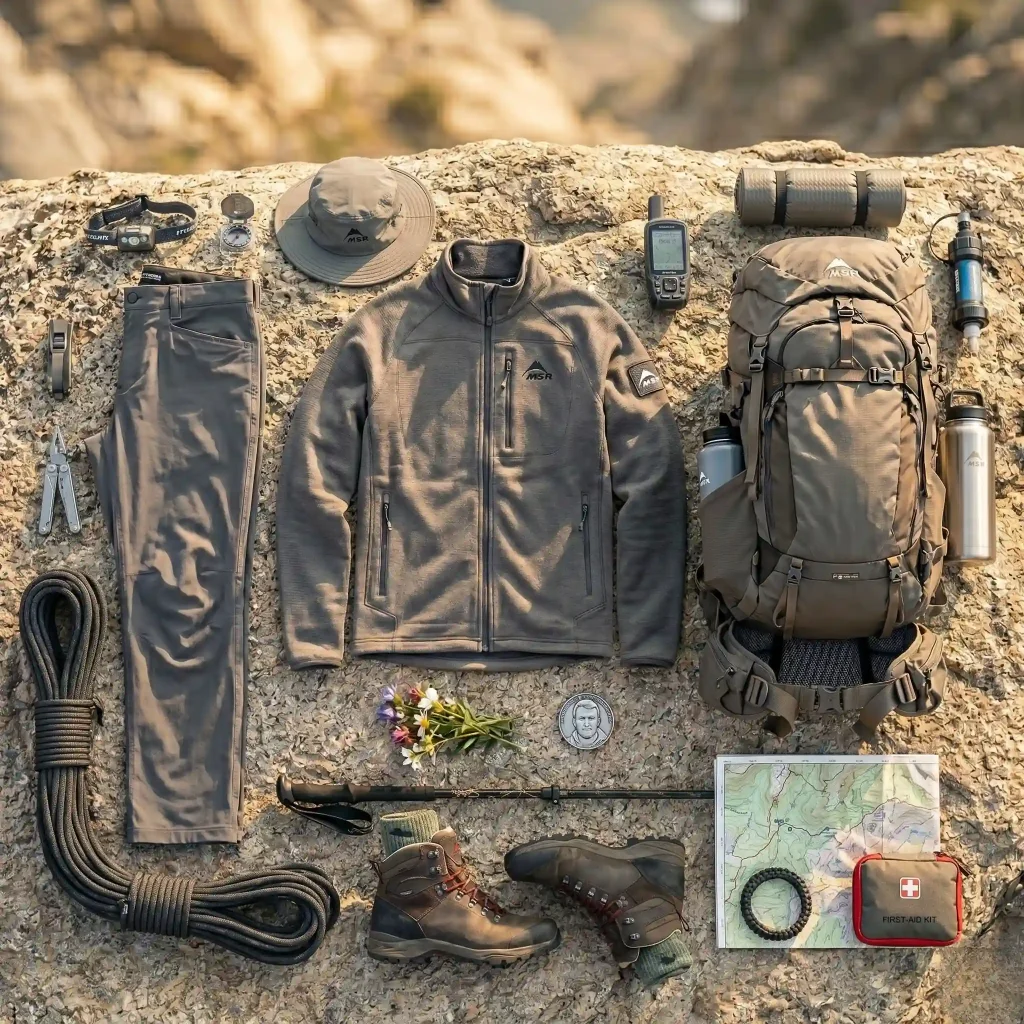
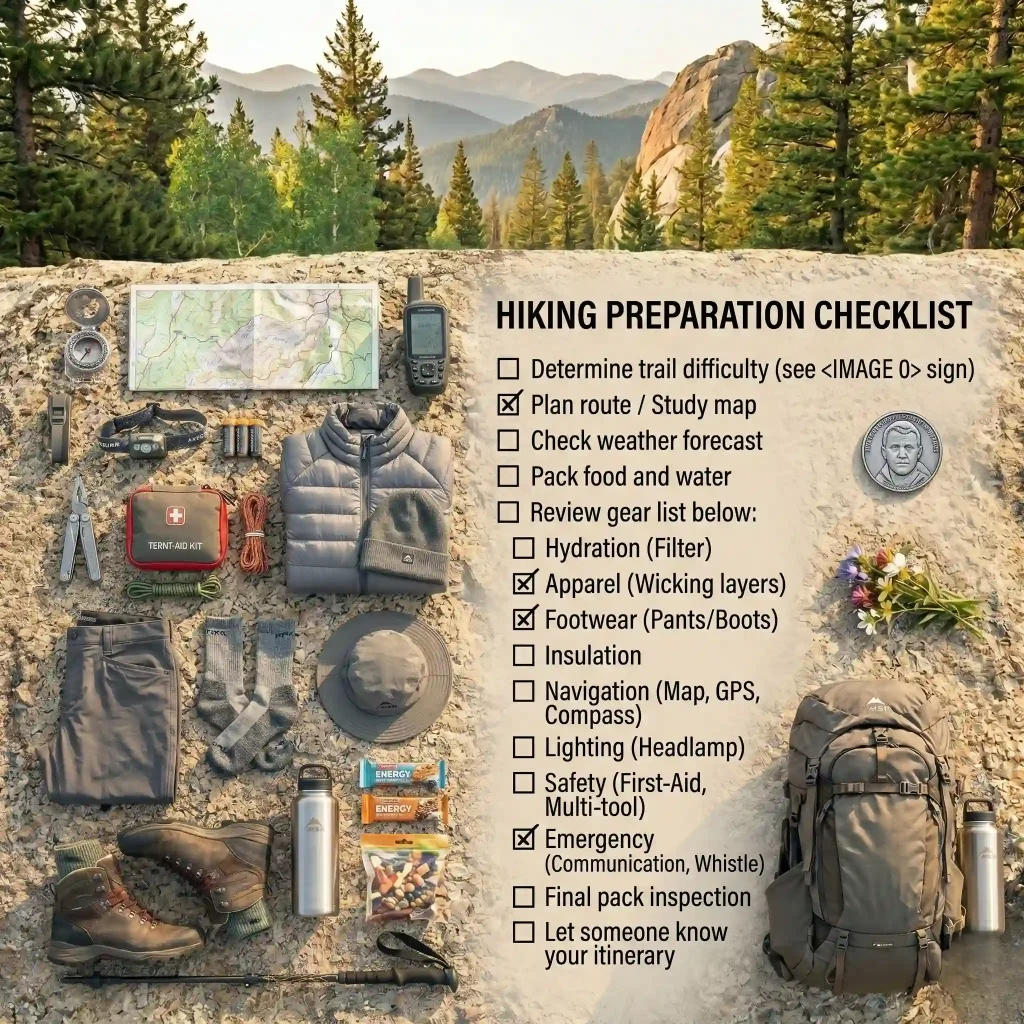
C. Essential Hiking Gear
You do not need to spend much to start hiking. But a few things are worth buying right, and a few you genuinely cannot skip. A good gear checklist saves you from the mistakes that ruin an otherwise solid day on the trail.
1. Footwear: The Most Important Decision You Will Make
Bad footwear wrecks hikes faster than almost anything else. Blisters, rolled ankles, slipping on wet rock — most of it traces directly to what is on your feet. Solid hiking shoes do not need to cost a lot to handle beginner trails well.
Hiking Boots vs. Trail Runners: For most beginner day hikes, trail runners offer plenty of support and feel more comfortable right out of the box. Boots provide better ankle protection on rocky terrain and with heavier loads. Either works for starting out. If you plan to hike in cold weather, a dedicated pair of waterproof hiking boots makes a real difference.
- Budget: Merrell Moab 3, The most consistently recommended beginner hiking shoe for good reason. Waterproof version available. Durable and comfortable.
- Budget Alternative: KEEN Targhee III, Wider toe box, great for people with wider feet.
- Mid-Range: Salomon X Ultra 4, Lightweight, excellent grip on wet surfaces, comfortable from day one.
- Premium: Scarpa Zodiac Plus GTX, Once you are doing serious mileage or technical terrain.
Critical: Never take brand-new footwear on a long hike. Wear them around the house, on short walks, and to the store before hitting a trail. Blisters from stiff new shoes on mile three of a 7-mile hike are not fun.
2. The Daypack
You need something to carry water, food, extra layers, and a first aid kit. For day hikes under 10 miles, a 20 to 30 liter pack is the right size. Too small and you are cramming things in awkwardly. Too large and you will fill it with things you do not need.
- Budget: Osprey Daylite, Clean, lightweight, and durable. A classic for a reason.
- Mid-Range: Deuter Speed Lite 20, Better fit, more comfortable for longer hikes, excellent back ventilation.
- Premium: Gregory Miwok 18, Top-tier build quality worth having if you hike regularly.
What makes a pack worth carrying: a padded hip belt for weight transfer, sternum strap for stability, ventilated back panel, hydration bladder sleeve, and enough pockets to stay organized without digging through everything to find your snacks.
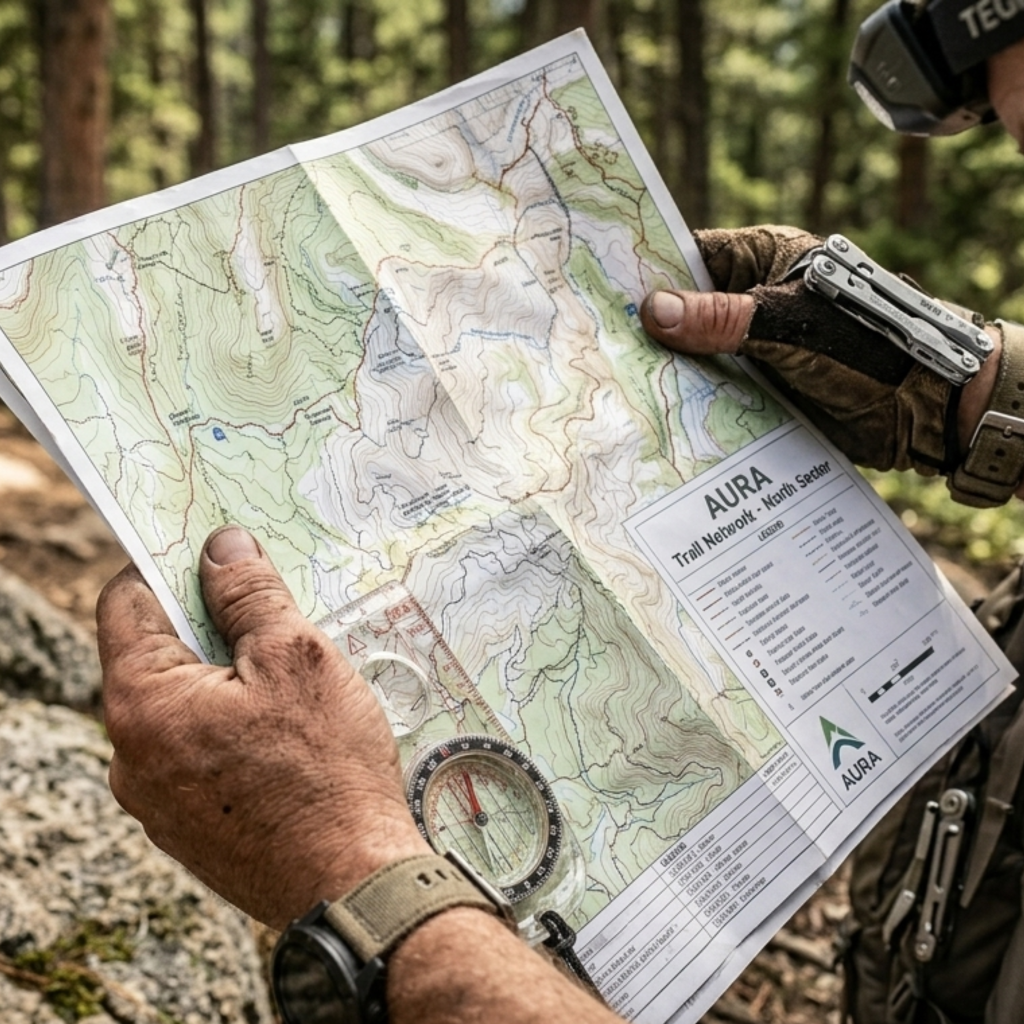
3. Navigation: Maps and Apps
Most beginners skip this step and regret it. Your phone GPS works without cell service, but only if you downloaded the offline maps before leaving home. Cell service disappears fast on trails, often within the first mile. Gaia GPS is worth the download for detailed offline topo maps.
- AllTrails (Free / Pro at/year): The best beginner trail app. Shows trail maps, elevation profiles, difficulty ratings, and recent user reviews. Download your trail offline before leaving home.
- Gaia GPS: More detailed mapping, better for off-trail navigation. Overkill for your first hikes.
- Maps.me (Free): Works completely offline. Good emergency backup.
Physical Maps: National Geographic Trails Illustrated maps are excellent for national parks and popular wilderness areas. They do not run out of battery and work when your phone dies. The USGS National Map is also a free source for detailed topographic maps.
4. The Ten Essen
The Mountaineers put this list together decades ago and it still holds. For any hike beyond a short nature walk, bring all ten.
- Navigation (downloaded offline map and compass)
- Sun Protection (SPF 30+ sunscreen, sunglasses, sun hat)
- Insulation (extra layer for unexpected temperature drops)
- Illumination (headlamp with fresh batteries)
- First Aid Kit (bandages, moleskin for blisters, ibuprofen, antiseptic wipes)
- Fire (lighter or waterproof matches)
- Repair Tools and Knife (multi-tool, duct tape)
- Nutrition (an extra day’s worth of snacks beyond what you plan to eat)
- Hydration (at least 2 liters of water per 5 miles, plus a filter or purification tablets)
- Emergency Shelter (space blanket or emergency bivy, weighs almost nothing)
The emergency shelter, fire starter, and extra food feel like overkill until the day they are not. Search and rescue teams hear the same story over and over: someone who figured they would not need this stuff.
5. Trekking Poles: Optional but Worth Considering
A lot of beginners write off trekking poles as something for older hikers and miss out for years. On steep descents, poles take real load off your knees. On slippery wet rock and creek crossings, they are often the difference between balance and a fall.
- Budget: Black Diamond Trail, Collapsible, durable, no frills.
- Mid-Range: Leki Cressida FX, Lighter and stiffer, worth it for regular hikers.
- Premium: Black Diamond Distance Carbon, Ultralight carbon for serious mileage.
D. Clothing: What to Wear on the Trail
Wrong clothing ruins hikes faster than almost anything else. The single most important rule: no cotton. Cotton absorbs sweat and moisture, stays wet, gets heavy, and causes chilling and chafing that make every remaining mile miserable. Every experienced hiker has a cotton horror story. Here is yours to skip.
1. The Layering System
Base Layer (Next to Skin): Moisture-wicking synthetics or merino wool only. These pull sweat away from your skin and dry quickly, keeping you comfortable even on hard climbs. No cotton, ever. Pack two or three shirts for multi-day trips.
Mid Layer: Fleece pullover or light down jacket. You need this for early morning starts, exposed summits, and unexpected weather. Most hikes it stays stuffed in the pack, never worn — until the one time it is needed, and then it is worth every ounce.
Shell Layer: A waterproof breathable rain jacket is non-negotiable even on clear days in the mountains. Weather above treeline changes in 20 minutes. This layer weighs under 12 ounces packed and takes up almost no space.
2. Pants and Bottoms
Convertible hiking pants with zip-off legs are the most versatile option. Trail shorts work well for warm dry conditions. Avoid jeans at all costs: heavy when wet, slow to dry, and painful to hike in.
- Budget: Columbia Silver Ridge Convertible
- Better: Prana Stretch Zion, noticeably more comfortable and more durable
- Premium: Arc’teryx Gamma, once you are doing serious mileage
3. Socks: Do Not Cheap Out Here
Thin cotton socks cause blisters. Merino wool hiking socks regulate temperature, resist odor, cushion your feet, and dry quickly. Darn Tough, Smartwool, and Dexfil are the three names to know.
Darn Tough Hiker comes with a genuine unconditional lifetime guarantee. When they wear out, you mail them back and get a new pair. That is not a marketing tagline. They actually do it.
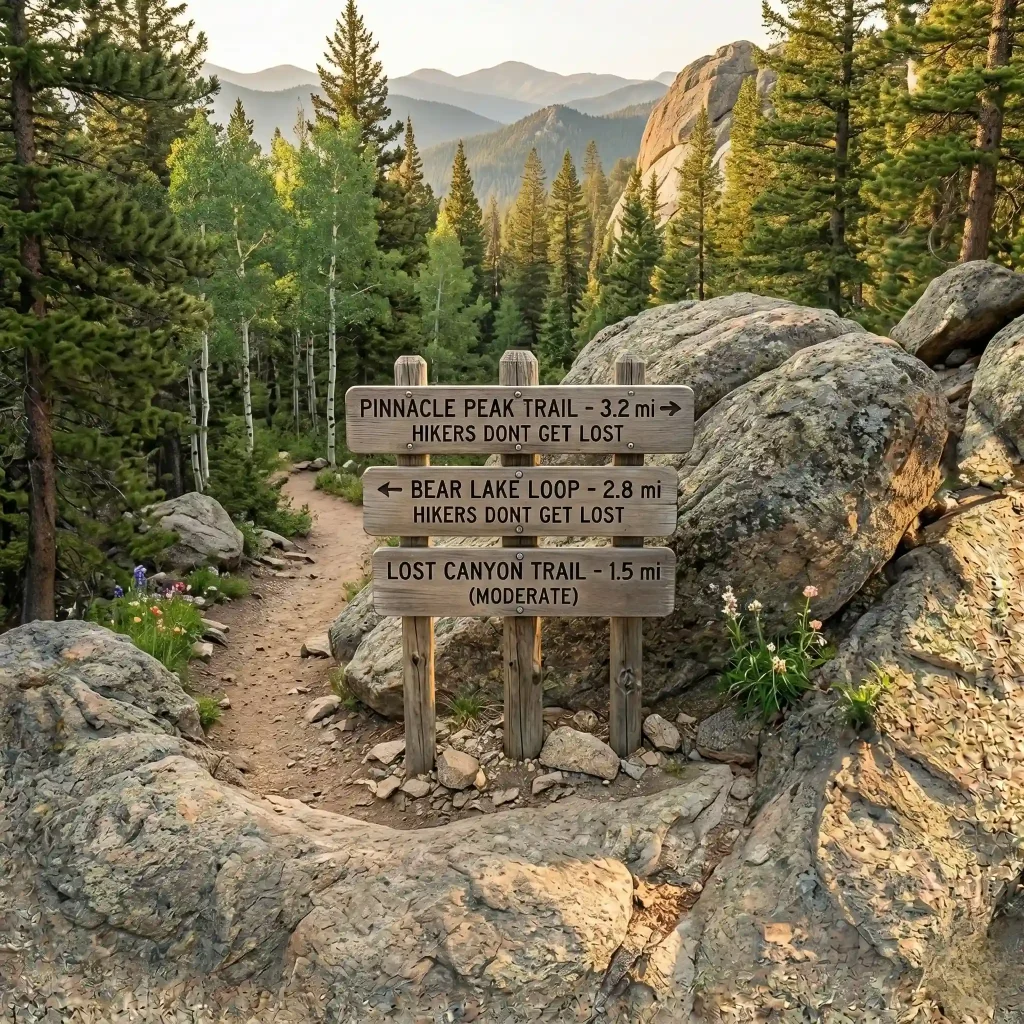
E. How to Choose Your First Trail
Picking the wrong trail is the most common beginner mistake. One of the most important hiking for beginners tips: match the trail to your current fitness, not your aspirational fitness. A trail that is too long or too technical turns a potential new hobby into a miserable afternoon. Use AllTrails to filter by difficulty and find beginner-friendly options near you.
1. Understanding Trail Difficulty Ratings
Easy: Under 5 miles, less than 500 feet of elevation gain, well-maintained and well-marked. Perfect for your first 3 to 5 hikes. Do not skip this stage.
Moderate: 5 to 10 miles, 500 to 1,500 feet of elevation gain, some rocky or uneven sections. Appropriate after a handful of easy hikes.
Strenuous or Hard: Over 10 miles or 2,000+ feet of elevation gain, technical terrain, navigation required. Save this until you have built real experience.
Important caveat: Different apps and park services define difficulty differently. Always read recent user reviews on AllTrails, not just the official rating. Recent reviews tell you what the trail is actually like right now.
2. Where to Find Good Beginner Trails
AllTrails is the best starting point. Filter by easy, sort by most popular, and look for trails with hundreds of recent reviews. Popular trails tend to be better maintained and more clearly marked than obscure ones.
State Parks are the top recommendation for first hikes and the ideal starting ground for hiking for beginners. Well-marked trails, maintained restrooms, potable water at the trailhead, and rangers available if something goes wrong. Reasonable day-use fees.
National Forests offer more primitive trails with less crowding than national parks. Stick to heavily reviewed trails until you know what you are doing.
3. What to Check Before Committing to a Trail
- Total mileage AND elevation gain, not just mileage (a 4-mile trail with 2,000 feet of gain is harder than an 8-mile flat trail)
- Trailhead parking situation (some popular trails require timed entry reservations now)
- Water availability on trail (can you refill, or do you carry everything from the start?)
- Recent trail condition reports in AllTrails reviews
- Cell service situation (download your map offline before leaving)
- Permit requirements (some heavily-trafficked trails require advance permits)
Red flags to avoid: A trail with zero recent reviews, reviews mentioning “hard to follow” or “easy to lose the trail,” or trails crossing multiple unmarked intersections. Skip those until you are more experienced.
F. How to Prepare for a Hike: The Week-Before Checklist
How much you prepare before leaving the house has as much effect on your day as the trail you pick. More, usually.
1. Seven-Day Countdown
Day 7, One Week Out:
- Confirm the trail and check recent AllTrails reviews
- Start tracking the weather forecast (check it multiple times as the date approaches)
- Verify trailhead access, parking, and any reservation requirements
- Test your pack: load it and walk around the block. Adjust straps until weight sits on your hips, not your shoulders.
Day 5, Mid-Week:
- Plan your food and snacks. Pre-portion trail mix and prep anything that needs prep.
- Charge all devices: phone, headlamp, GPS watch
- Download offline trail map on AllTrails
- Replace anything expired in your first aid kit
Night Before:
- Pack your bag completely. Do not do this in the morning.
- Set a realistic alarm. Trailheads fill up early on weekends.
- Check weather one final time
- Sleep well. Fatigue makes everything harder on the trail.
2. Starting Time
Start early, especially in summer and in the mountains. Afternoon thunderstorms are common above treeline. Check weather.gov and Windy.com for mountain forecasts the night before. Trailheads are quieter before 9am. And if something goes wrong, daylight is your most important asset.
Target: Leave the trailhead by 8am at the latest. For summit hikes or anything above treeline, aim for 6 to 7am. The worst outcome is finishing early with time to relax at the car. That is not a bad problem.
3. The Turn-Around Rule
Set a turn-around time before you start, not a destination. This is one of the most underrated safety rules in hiking for beginners. “I will turn around at 1pm regardless of where I am” is better than “I will turn around when I reach the summit.” Most hiking accidents happen when people push past the point of safe return because they are close to a goal. The summit will be there next time.
Write the turn-around time in your phone notes before you start — it is a simple hiking for beginners habit that prevents bad decisions on the trail. That way you cannot negotiate with yourself on the trail.
G. Trail Nutrition and Hydration
Running out of energy on a trail is miserable and preventable. Fueling properly is a fundamental lesson in hiking for beginners. Dehydration is even worse. Here is what actually works.

1. Water: The Most Critical Thing You Carry
The rule of thumb for hiking for beginners is 16 to 24 ounces of water per hour, more in heat or on steep terrain. For a 4-hour moderate hike, that means bringing at least 64 to 96 ounces. Most people bring less than this and regret it. A 2-liter hydration bladder plus a 1-liter Nalgene as backup is a reliable setup for most day hikes.
Water treatment for hikes near natural water sources:
- Sawyer Squeeze, Lightweight squeeze filter. Fast, reliable, easy to use.
- LifeStraw, Simple straw filter. Good lightweight backup.
- Aquatabs, Chemical treatment. Tasteless and ultralight. Takes 30 minutes to work.
2. Trail Food: What to Bring
Bring things with high calories per ounce that survive heat, hold up in a pack, and are easy to eat one-handed while walking. Once you are three miles from the car and flagging, taste stops mattering and caloric density becomes everything.
- Trail mix with nuts, dried fruit, and chocolate (make your own, it is cheaper and better)
- RX Bars or Clif Bars: real food with good calorie density, hold up well in heat
- Peanut butter packets and crackers
- Beef jerky or meat sticks for sustained protein
- A piece of fruit for the first hour while it is still fresh
- One treat you will actually look forward to, for me it is dark chocolate at the turnaround point
3. What to Avoid
Alcohol before or during a hike increases dehydration and impairs judgment on terrain. Candy-only snacks cause an energy spike followed by a crash at the worst possible moment. And plain water is not enough on hot days with heavy sweating. Bring electrolyte tablets or powder to replace sodium and potassium that sweat takes out.
H. Hiking Safety and Emergency Preparedness
Most of these lessons come from uncomfortable personal experiences on the trail. You do not have to learn them the hard way.

1. Tell Someone Your Plan
Before every hike, tell a non-hiking friend or family member where you are going, which trail, where your car will be parked, and what time they should call for help if they have not heard from you. You can also share your planned route from AllTrails or Hiking Project. Trailhead sign-in sheets are not reliable enough on their own.
2. Common Hiking Hazards
Weather: Mountain weather changes in 20 minutes. Check forecasts obsessively. Lightning above treeline kills. If storm clouds are building and you are exposed, descend immediately. Do not wait to see what happens.
Hypothermia: Possible even in summer at elevation when rain combines with wind. Symptoms include uncontrollable shivering, stumbling, and confused thinking. Prevention: stay dry, carry that extra layer, and descend before conditions deteriorate.
Heat Exhaustion: High heat plus sustained effort plus inadequate water is a real danger in summer. Symptoms include heavy sweating, weakness, cold clammy skin, and fast heartbeat. Treatment: stop hiking, get to shade, drink water with electrolytes, and rest until fully recovered.
3. Wildlife Encounters
Bears: Make noise while hiking so you do not surprise them. In bear country, carry bear spray and know how to deploy it before you need it. If you encounter a bear: do not run. Stand tall, speak calmly, and back away slowly.
Snakes: Most bites happen when people step on or try to handle snakes. Watch carefully where you place your hands and feet on rocky terrain. If bitten, keep calm, immobilize the limb, and get to emergency care immediately.
Ticks: Do a full tick check after every hike in wooded areas. Check armpits, behind the knees, along the hairline, and anywhere clothing was tight.
4. If You Get Lost: The STOP Method
Stop the moment you are uncertain of your location. Panic leads directly to bad decisions and more distance from help. Sit down, breathe, and look at your downloaded trail map.
The STOP protocol: Stop, Think, Observe, Plan. Stop moving. Think about the last point where you were certain of your location. Observe landmarks around you. Plan your next step with information, not anxiety.
If you genuinely cannot relocate the trail: retrace your exact steps to the last confirmed point. Do not continue forward in an uncertain direction.
If it is getting dark and you cannot find the trail: stay where you are. Deploy your emergency shelter. Your whistle (three sharp blasts is the universal distress signal) carries much farther than your voice. Search and rescue will look for you near where you were expected, not wherever you wandered.
I. Navigation Basics for Beginners
You do not need to be a wilderness navigator to hike beginner trails. But you do need to understand the basics before you need them.
1. Trail Markers
Most maintained trails are marked with colored blazes painted on trees, cairns (stacked rocks) at junctions, wooden signs at intersections, and paint marks on exposed rock. Markers can be faded, vandalized, or sparse. Treat them as confirmation, not primary navigation. Your downloaded map is your guide.
2. Reading Elevation Profiles
AllTrails shows an elevation profile for every trail. A gentle upward curve is a gradual climb. A vertical spike over a short horizontal distance means a steep push that will require stops. Before any hike, look at the profile and understand where the hardest sections are and how much of the trail they cover.
3. Using Your Phone for Navigation
AllTrails Pro lets you download maps for offline use and tracks your position as a blue dot on the trail map, all without cell service once downloaded. Keep your phone battery above 30% and carry a small portable battery pack for longer hikes.
4. When to Learn Compass and Paper Map Skills
If you plan to hike regularly, invest one afternoon learning basic compass and paper map navigation. It takes a few hours to learn and can genuinely matter in the field. REI runs free navigation clinics in stores and their online guides are thorough. The Mountaineers’ “Freedom of the Hills” is the definitive reference if you want to go deep.
J. Trail Etiquette and Leave No Trace
The outdoors does not maintain itself. Trail etiquette and Leave No Trace principles are what keep hiking accessible and beautiful for everyone who comes after us.
1. Trail Etiquette Rules
- Uphill hikers have the right of way. They are working harder and losing momentum to stop is genuinely painful. Step aside.
- Yield to horses, always. Step off the trail to the downhill side, stand still, and speak calmly so the horse knows you are a person.
- Do not blast music through a speaker on shared trails. Use headphones. Some people hike specifically for the quiet.
- Keep dogs on a leash on marked trails. Not everyone loves dogs. Some people are afraid of them.
- Pack out everything you pack in. Every wrapper, apple core, and used tissue.
2. The Seven Leave No Trace Principles
These are not optional suggestions. They are the reason our trails remain open and beautiful. Learn all seven principles at Leave No Trace.
- Plan Ahead and Prepare: Know regulations, check conditions, bring appropriate gear.
- Travel on Durable Surfaces: Stay on the trail. Cutting switchbacks destroys vegetation and accelerates erosion.
- Dispose of Waste Properly: Pack out all trash. Human waste in catholes at least 200 feet from water, trails, and camp.
- Leave What You Find: Rocks, wildflowers, feathers, interesting logs. Leave them exactly where you found them.
- Minimize Campfire Impacts: Use a camp stove. Campfires leave lasting scars even in established rings.
- Respect Wildlife: Observe from a distance. Never feed wild animals, ever.
- Be Considerate of Other Visitors: Keep noise down, share the trail, and let nature sounds win.
Conclusion: The First Hike Is the Hardest One
That scramble with a dead phone, a crumbled granola bar, and jeans that weighed five pounds from sweat has a way of turning into a practice. Then a habit. Then a significant part of understanding what you are actually capable of out there.
The surprising thing is that the first hike does not have to go well to do its job. It just has to happen. You learn more from a humbling trail than a comfortable one, and the discomfort fades faster than you expect.
You do not need perfect gear or peak fitness to start hiking for beginners. You need a trail map, a decent pair of shoes, enough water, and the willingness to learn as you go. Start with an easy trail close to home. Let it be imperfect. Notice what you would do differently next time.
The outdoors rewards people who keep showing up. Start small, stay curious, and build your skills one trail at a time. The mountains are patient. They will still be there when you are ready for the harder ones.
Ready to go? Search for easy trails near you on AllTrails, pack the Ten Essentials, and find your footing on the trail. This is what hiking for beginners is all about.
Discover more from Maive Verse
Subscribe to get the latest posts sent to your email.